How to use LiteSpeed Cache and Memcached on DigitalOcean
 Paddy
~ August 23, 2023
Paddy
~ August 23, 2023
Looking for the fastest way to run WordPress on DigitalOcean? In this tutorial, you’ll set up an OpenLiteSpeed WordPress Droplet on DigitalOcean and learn how to leverage Memcached in two ways using the LiteSpeed Cache WordPress plugin. First, you’ll use the Memcached server included with the OpenLiteSpeed WordPress Droplet. Second, you’ll create and use a MemCachier cluster for improved scalability, high availability, and powerful cache debugging.
The OpenLiteSpeed WordPress Droplet from DigitalOCean comes with the OpenLiteSpeed Web Server. OpenLiteSpeed is an open-source web server known for its high performance, scalability, and ability to handle thousands of simultaneous connections with minimal memory consumption.
Outline
- OpenLiteSpeed WordPress Droplet vs. Standard WordPress Droplet
- Create an OpenLiteSpeed WordPress Droplet
- Check the LiteSpeed Cache WordPress plugin’s Object Cache Settings
- Use a MemCachier cache for enhanced scalability and high availability
Prerequisites
- Familiarity with WordPress.
- A DigitalOcean account.
OpenLiteSpeed WordPress Droplet vs. Standard WordPress Droplet
Why choose the OpenLiteSpeed WordPress Droplet over the standard WordPress Droplet?
The OpenLiteSpeed WordPress Droplet uses the OpenLiteSpeed Web Server instead of Apache on the standard WordPress Droplet. OpenLiteSpeed Web Server includes several distinct features for enhanced speed and security, such as the built-in full-page cache module, LSCache, and a native SAPI for PHP which allows PHP apps (like WordPress) to run up to 50% faster. Also, the server is optimized for WordPress and comes with an in-built Memcached server and the PHP Memcached module already installed and enabled.
Create an OpenLiteSpeed WordPress Droplet
A WordPress Droplet is the easiest to install WordPress on DigitalOcean. You’ll have a WordPress website up and running in a few clicks.
Log in to your DigitalOcean account and go to the OpenLiteSpeed WordPress Droplet page on the DigitalOcean Marketplace.
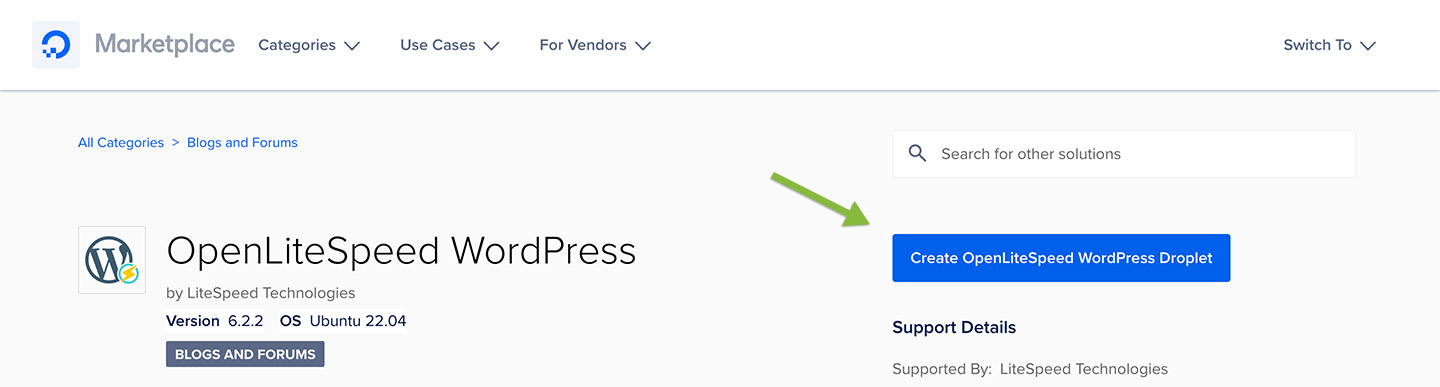
Next, click Create OpenLiteSpeed WordPress Droplet.
On the Create Droplets page, choose the following options:
- Choose Region: I’ll use New York for this tutorial.
- Datacenter: I’ll use NYC1. You would choose the data center closest to you or your users for a production site. Note your data center, as you’ll need it later.
- VPC Network: Leave as the default.
- Choose an image: The OpenLiteSpeed WordPress image will already be selected for you.
- Choose Type: Leave as the default Basic.
- CPU options: Select Regular and choose the smallest available plan, $6/mo at the time of writing. The most inexpensive plan is more than sufficient for this tutorial.
- Choose Authentication Method: For simplicity I’ll choose Password and create a root password. If you’re familiar with working with SSH keys, feel free to choose SSH Key. SSH Key is the recommended authentication method. Learn how to configure SSH key-based authentication.
- Finalize Details: Give your Droplet an identifying name. I’ll use wordpress-memcached. Select a project for your Droplet. I’ll use a project I created named Tutorial. You can choose any of your projects.
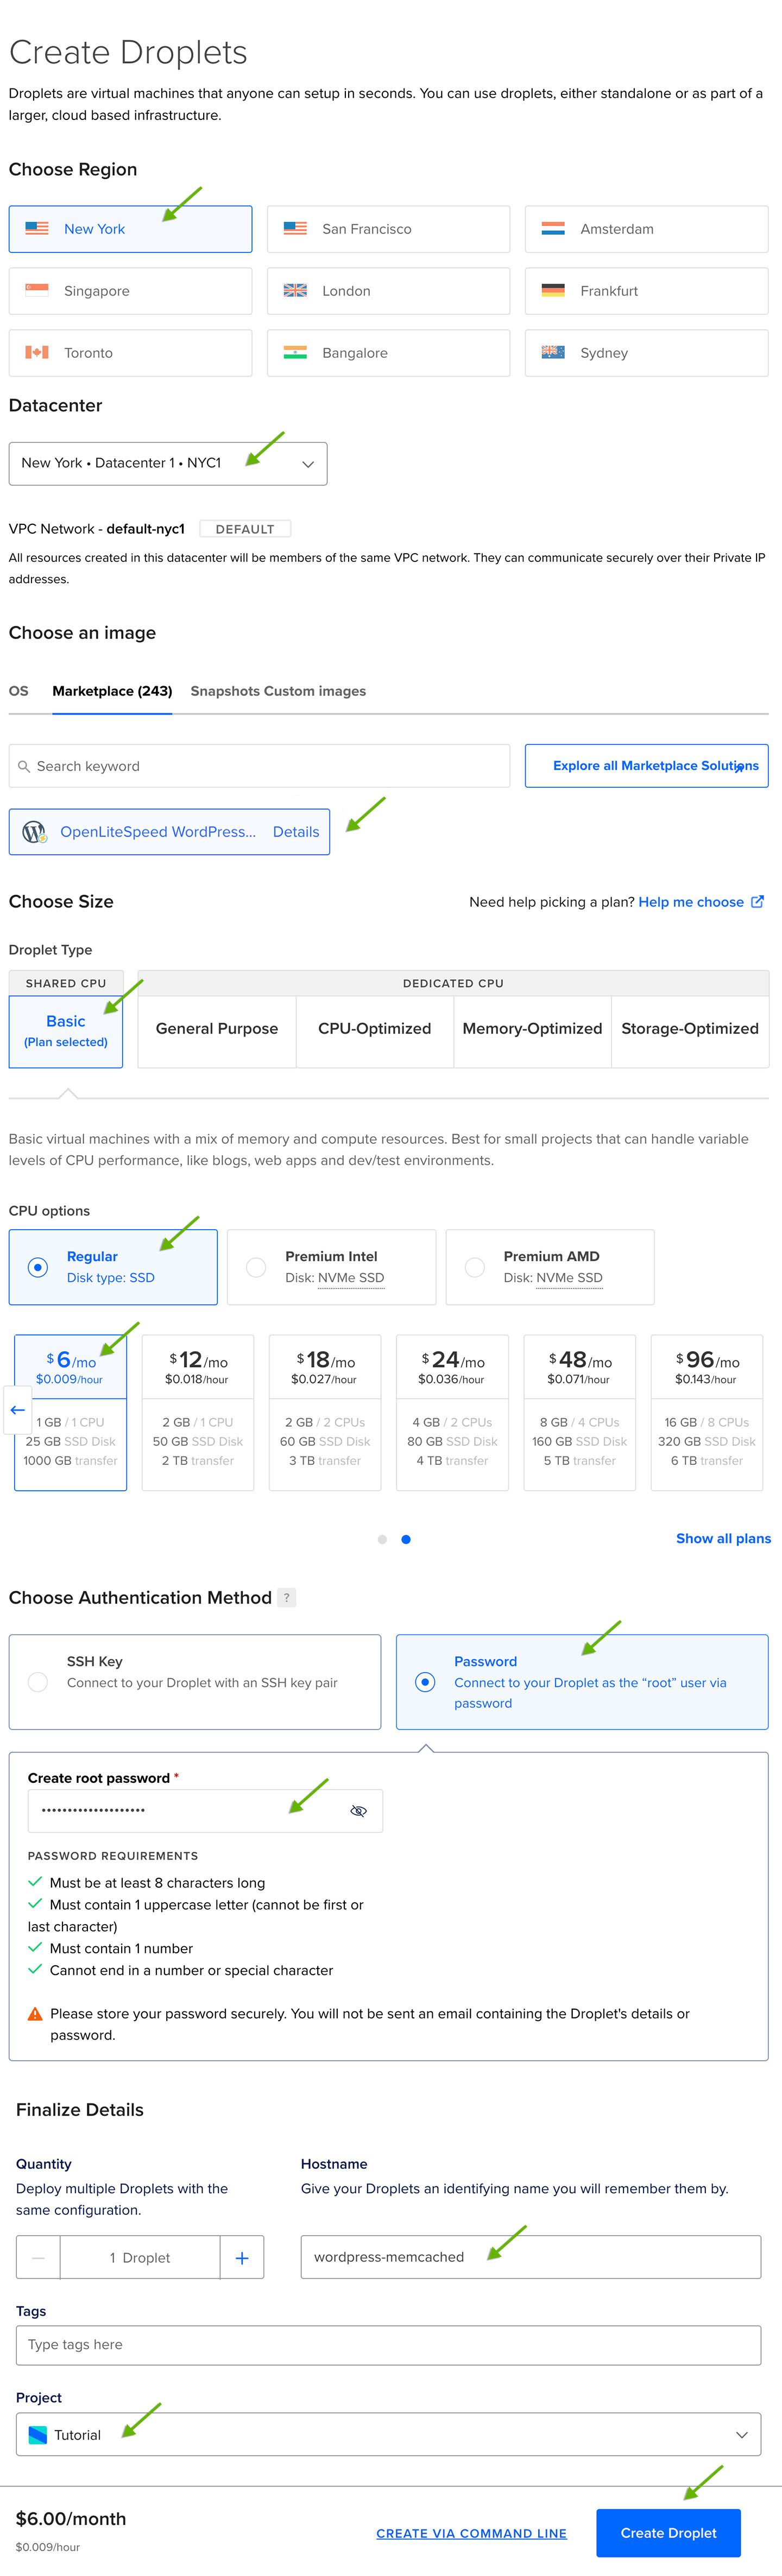
Finally, click Create Droplet.
You’ll be redirected to your project dashboard, where your new WordPress Droplet will appear.
Your Droplet IP address will appear once it has been created. Next, you’ll use that IP to connect to your Droplet and finish setting up WordPress.
Connect via SSH and complete the Droplet setup
In this step, you’ll connect to your Droplet via SSH and run the initialization script to complete its setup.
Copy your Droplet IP. Then, open a terminal window and run the following command to connect to your Droplet:
$ ssh root@<YOUR_DROPLET_IP>For example, ssh root@54.175.221.184.
You’ll be prompted, Are you sure you want to continue connecting? Type yes, and press the ENTER key to confirm.
You’ll then be prompted for your Droplet password. Enter the password and press the ENTER key.
After entering your password, you should be connected to your Droplet, and the initialization script will automatically run, prompting you for several pieces of information.
- Your domain: Enter a domain name if you have one you would like to use. Otherwise, for this tutorial, use the Droplet IP. Enter a value and press
ENTER. Then, typeYand pressENTERto confirm your domain. - Do you wish to issue a Let’s encrypt certificate for this domain? As you use an IP address for this tutorial and not a fully qualified domain name, type
Nand pressENTER. - Do you wish to update the system now? This will update the web server as well: Type
Yand pressENTER.
In your terminal window, you’ll see Update Starting... and a completion indicator.
When the update is complete, you’ll see the message, Update complete. Enjoy your accelerated OpenLiteSpeed server!.
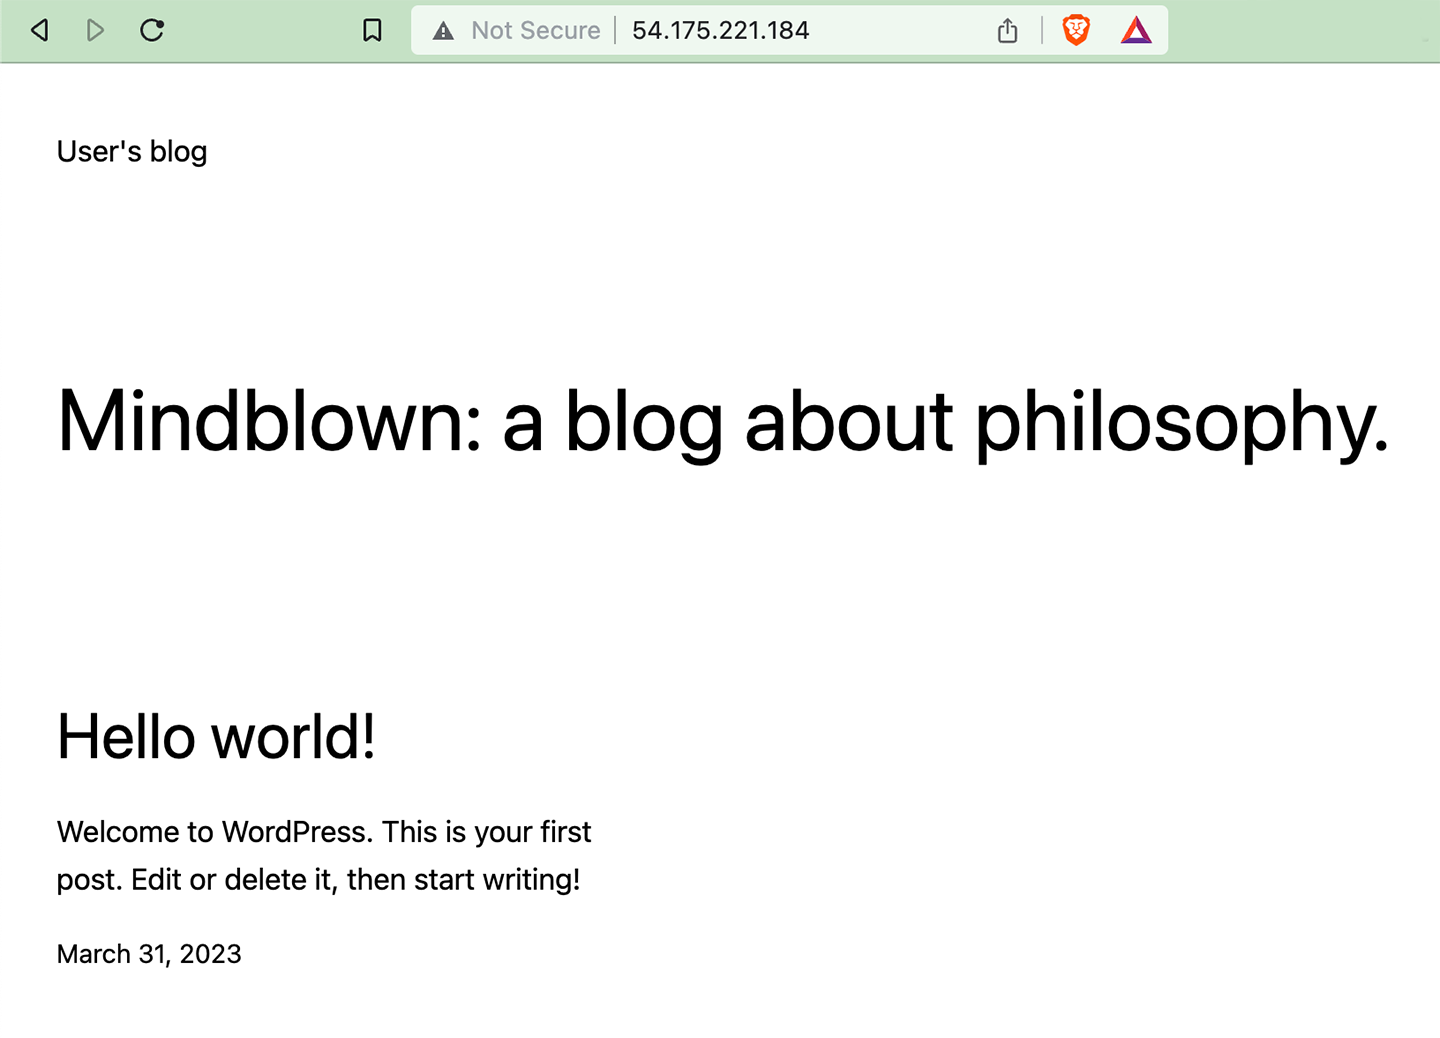
Next, open up your Droplet IP in a web browser, and you’ll be redirected to the WordPress install screen.
Choose your language and click Continue. On the next screen, fill out the Information needed form, adding a Site Title, Username, Password, and Email. Then, click Install WordPress. You’ll be redirected to a Success screen where you can log in. Log in, and you’ll be taken to the WordPress Dashboard.
Note the warning notice In order to use QC services, need a real domain name, cannot use an IP. You can safely ignore that. A real domain name isn’t needed for using the LiteSpeed Cache Plugin’s Object Cache with Memcached.
You can now access your WordPress site by opening your Droplet IP in a browser.
With that, your WordPress on DigitalOcean setup is complete.
Check the LiteSpeed Cache WordPress plugin’s Object Cache Settings
From the WordPress Dashboard, click Plugins in the left-hand sidebar menu. Notice the LiteSpeed Cache plugin is already installed. Click update now to install the latest plugin version if an update is available. Then click Settings from the plugin card. Alternatively, click LiteSpeed Cache from the left-hand sidebar menu, then click Cache.
On the LiteSpeed Cache Settings page, click the [6] Object tab.
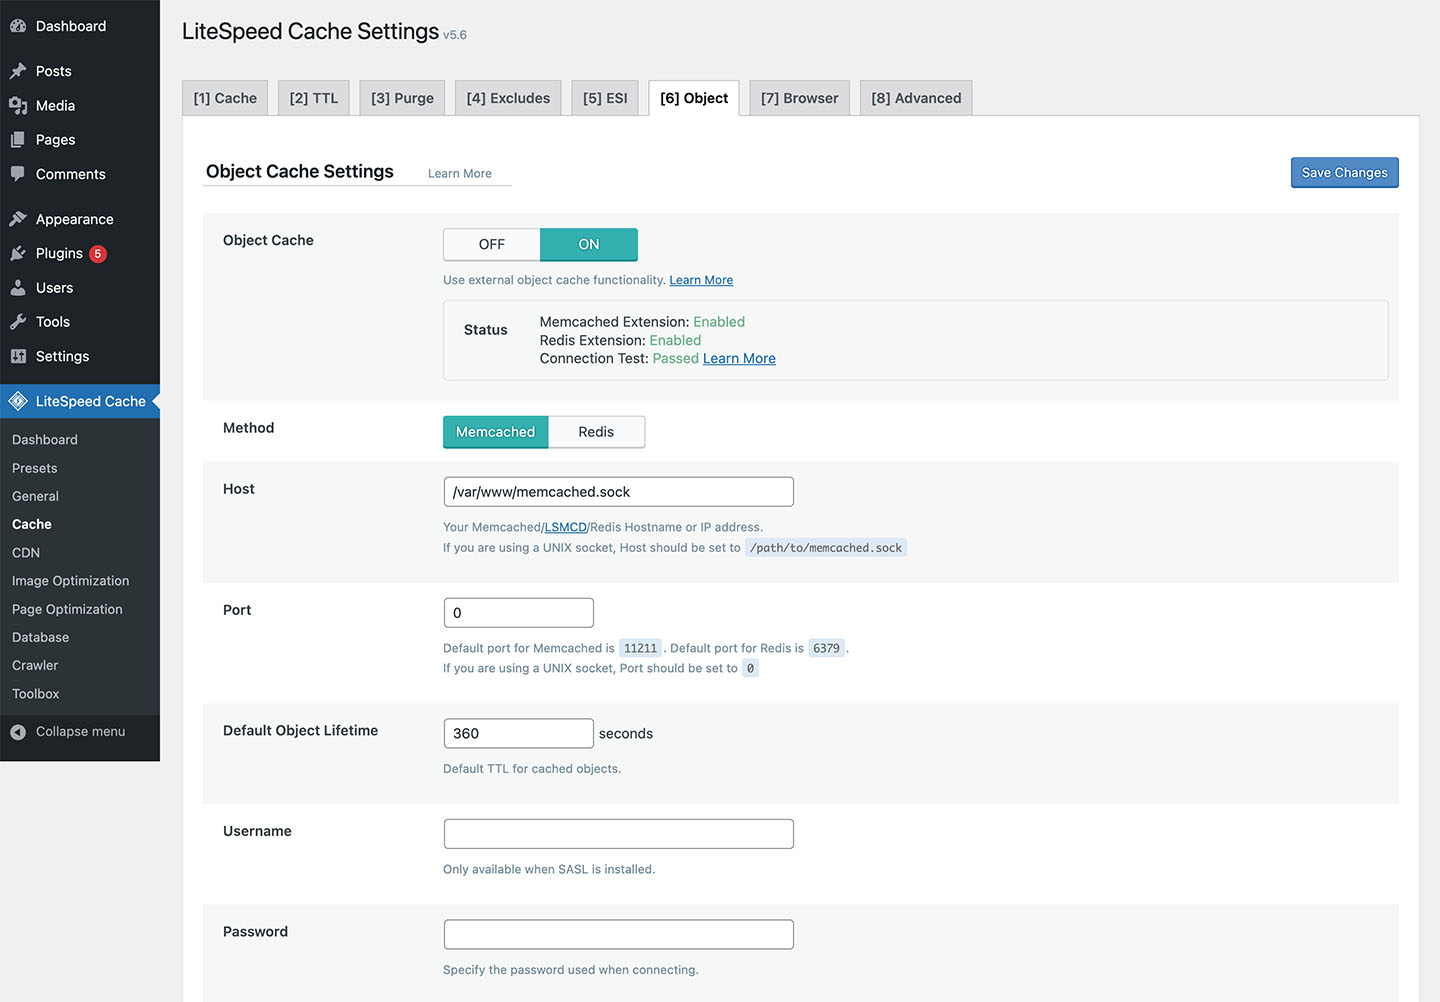
By default, the Object Cache is enabled and configured to use the Memcached server included on your Droplet. Notice the PHP Memcached extension is already installed and enabled for you too.
If using the standard WordPress Droplet:
At this point, you would see the notice Memcached Extension: Disabled. Learn how to install and enable the Memcached PHP extension for a standard WordPress Droplet.
You’d also likely see this notice: WARNING LSCache caching functions on this page are currently unavailable! To use the caching functions, you must have a LiteSpeed web server or be using QUIC.cloud CDN. You could ignore that message, as the Object Cache would still work. However, keep in mind by using OpenLiteSpeed WordPress Droplet, you benefit from the LSCache module being built-in.
For many small sites, this setup provides excellent WordPress performance. However, as the Memcached server lives on the Droplet, sharing its memory, it can’t be effectively scaled. Also, if your Droplet goes down or is restarted, your Memcached cache contents will be lost. For effortless setup, scalability, and improved reliability, MemCachier provides an excellent solution to these limitations. You’ll create and configure a MemCachier cache next.
Use a MemCachier cache for enhanced scalability and high availability
Running Memcached on the same Droplet as WordPress has a few limitations:
- Limited Scalability: The cache size is limited to the memory of your Droplet. If your application grows and needs more cache, you must scale the entire Droplet or migrate to a different caching solution.
- No Redundancy: A failure in the Droplet might mean loss of cached data. There’s no built-in failover mechanism.
Using a separate Memcached server avoids these limitations. One way is to run Memcached on a different machine on DigitalOcean is to create a new Droplet where you manually install and configure Memcached. Another option, offering effortless scaling, is to use the MemCachier Add-On from the DigitalOcean Marketplace.
What is MemCachier?
MemCachier is a fully managed caching service that simplifies setting up and using Memcached in your web applications. Built for seamless integration with cloud platforms like DigitalOcean, MemCachier offers developers a streamlined and hassle-free way to implement high-performance caching in their applications without worrying about the complexities of managing a cluster of Memcached servers.
Here are some of our key features:
Free Development Cache: Get started with a free 25MB Developer cache.
Fully managed service: MemCachier takes care of the underlying server infrastructure, including setup, configuration, monitoring, and maintenance, allowing you to focus on your application’s core functionality.
Effortless scaling: As your application grows, you can quickly scale your cache size without changing your app’s code, ensuring optimal performance even under increasing load.
High availability: MemCachier caches are spread across many servers. When one of those servers goes down, you’ll only lose a small percentage of your cache and hence only see a slight increase in cache misses.
Comprehensive analytics and monitoring: MemCachier offers cache metrics, historical usage statistics, and customizable alerts, giving you valuable insights into your cache’s performance and helping you make informed decisions about optimizing your caching strategy. Learn how to Debug, Optimize and Monitor Your Memcache With the MemCachier Advanced Analytics Dashboard
Exceptional customer support: MemCachier’s team of caching experts is available to assist you with any questions or issues you may encounter. You’ll speak directly with engineers.
In short, MemCachier is a robust, reliable, and easy-to-use managed caching service that enables you to harness the full power of Memcached on DigitalOcean without the hassle of managing it yourself. By choosing MemCachier, you can unlock the performance benefits of Memcached while enjoying a streamlined and worry-free experience.
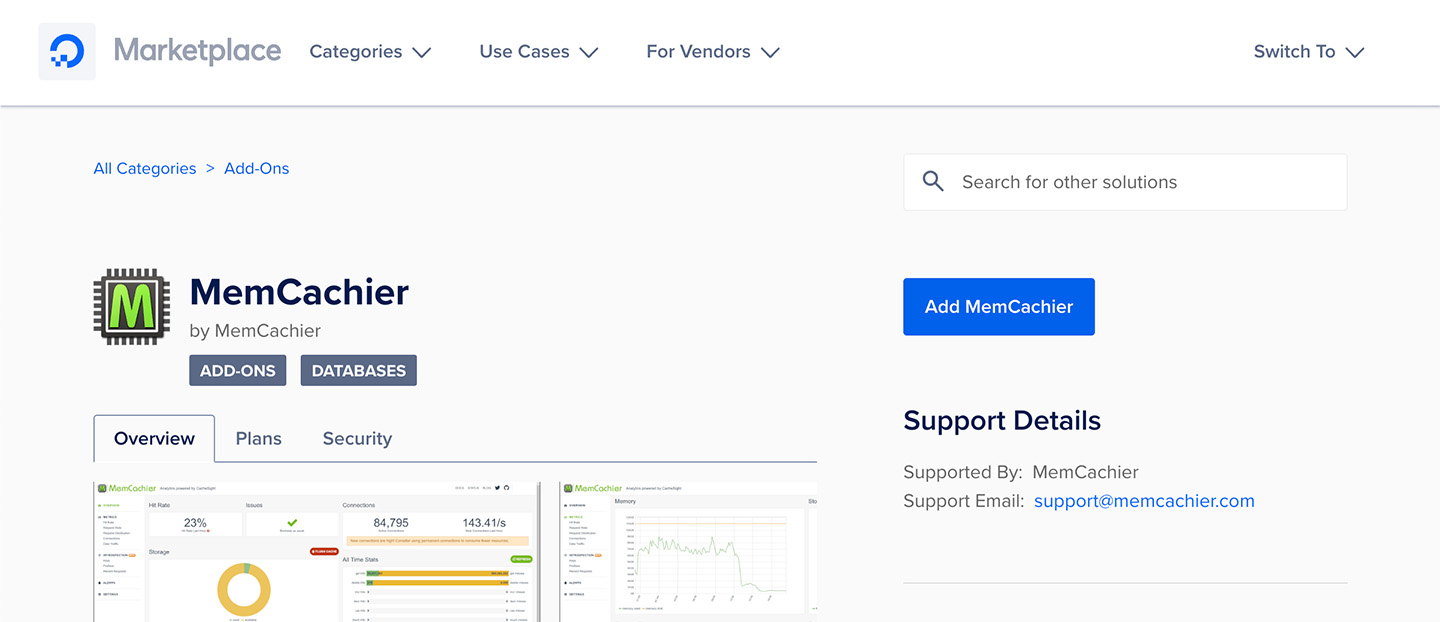
Using The MemCachier DigitalOcean Marketplace Add-On
You can provision a Memcached-compliant cache with the MemCachier Add-On from the DigitalOcean Marketplace in a few clicks.
First, you’ll add the MemCachier Add-On from the DigitalOcean Marketplace. Visit the MemCachier Add-On page and click Add MemCachier. On the next screen, give your cache a name, choose the Free Developer plan, and make sure to select the same region your App Platform app is in. I’ll use nyc1. Your app and cache should be in the same region so that latency is as low as possible.
To figure out region name-to-slug mappings, see DigitalOcean’s Available Datacenters. For example, the region San Francisco maps to sfo3.
Then, click Add MemCachier to provision your cache.
Within a minute or two, your cache will be provisioned, and you can access its configuration variables. Add capacity later as needed by selecting a different plan—no need to change any code.
To find your Add-On configuration variables, click the name of your MemCachier Add-On. Then, click the Show button for Configuration Variables to display the values for MEMCACHIER_USERNAME, MEMCACHIER_PASSWORD, and MEMCACHIER_SERVERS.
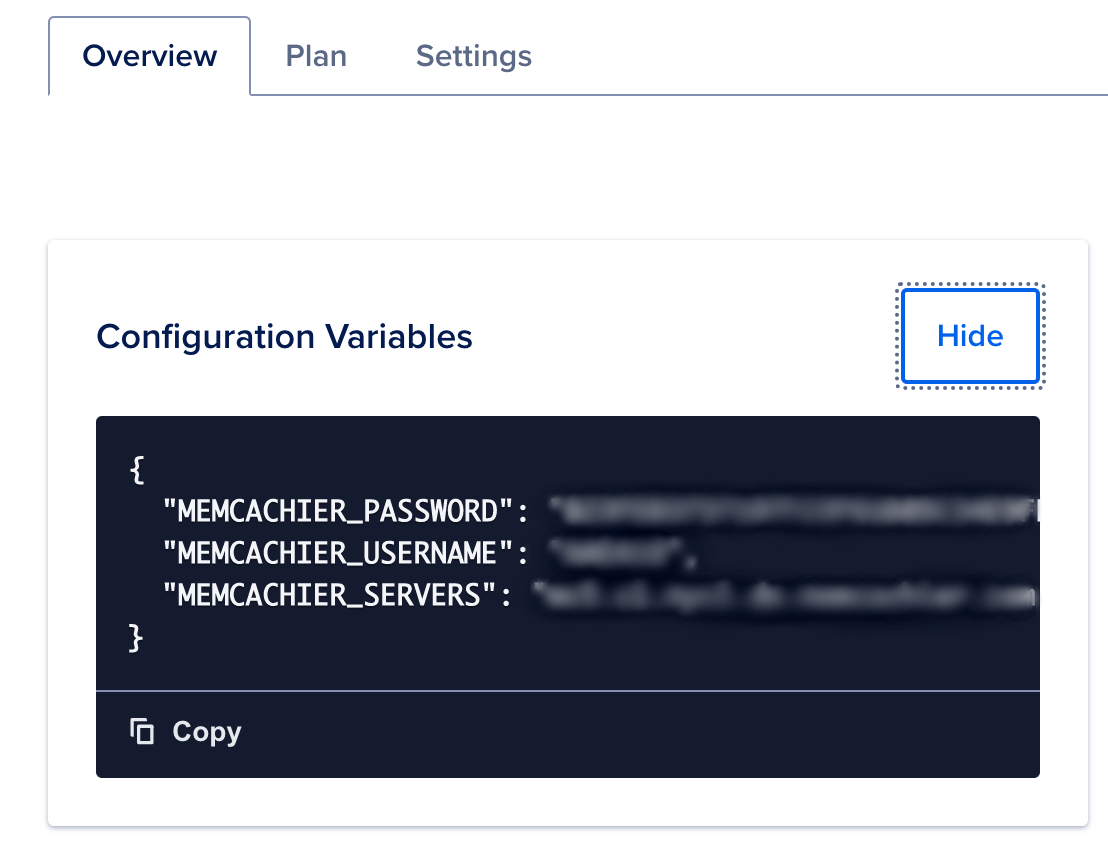
Note these values. You’ll need them to configure the LiteSpeed Cache WordPress plugin next.
Configuring LiteSpeed Cache WordPress plugin to use MemCachier
Go back to your WordPress Admin, to the LiteSpeed Cache Settings page. If you need to find the settings page again, click LightSpeed Cache, then Cache, from the left-hand sidebar menu.
Then update the host, port, username, and password fields.
For host, use the first part of your MEMCACHIER_SERVERS value, the part before the colon. For example, if your MEMCACHIER_SERVERS value is mc4.c1.nyc1.do.memcachier.com:11211, you would set the host value to mc4.c1.nyc1.do.memcachier.com.
For port, use the part of your MEMCACHIER_SERVERS value after the colon, 11211.
Use your MEMCACHIER_USERNAME and MEMCACHIER_PASSWORD values for username and password, respectively.
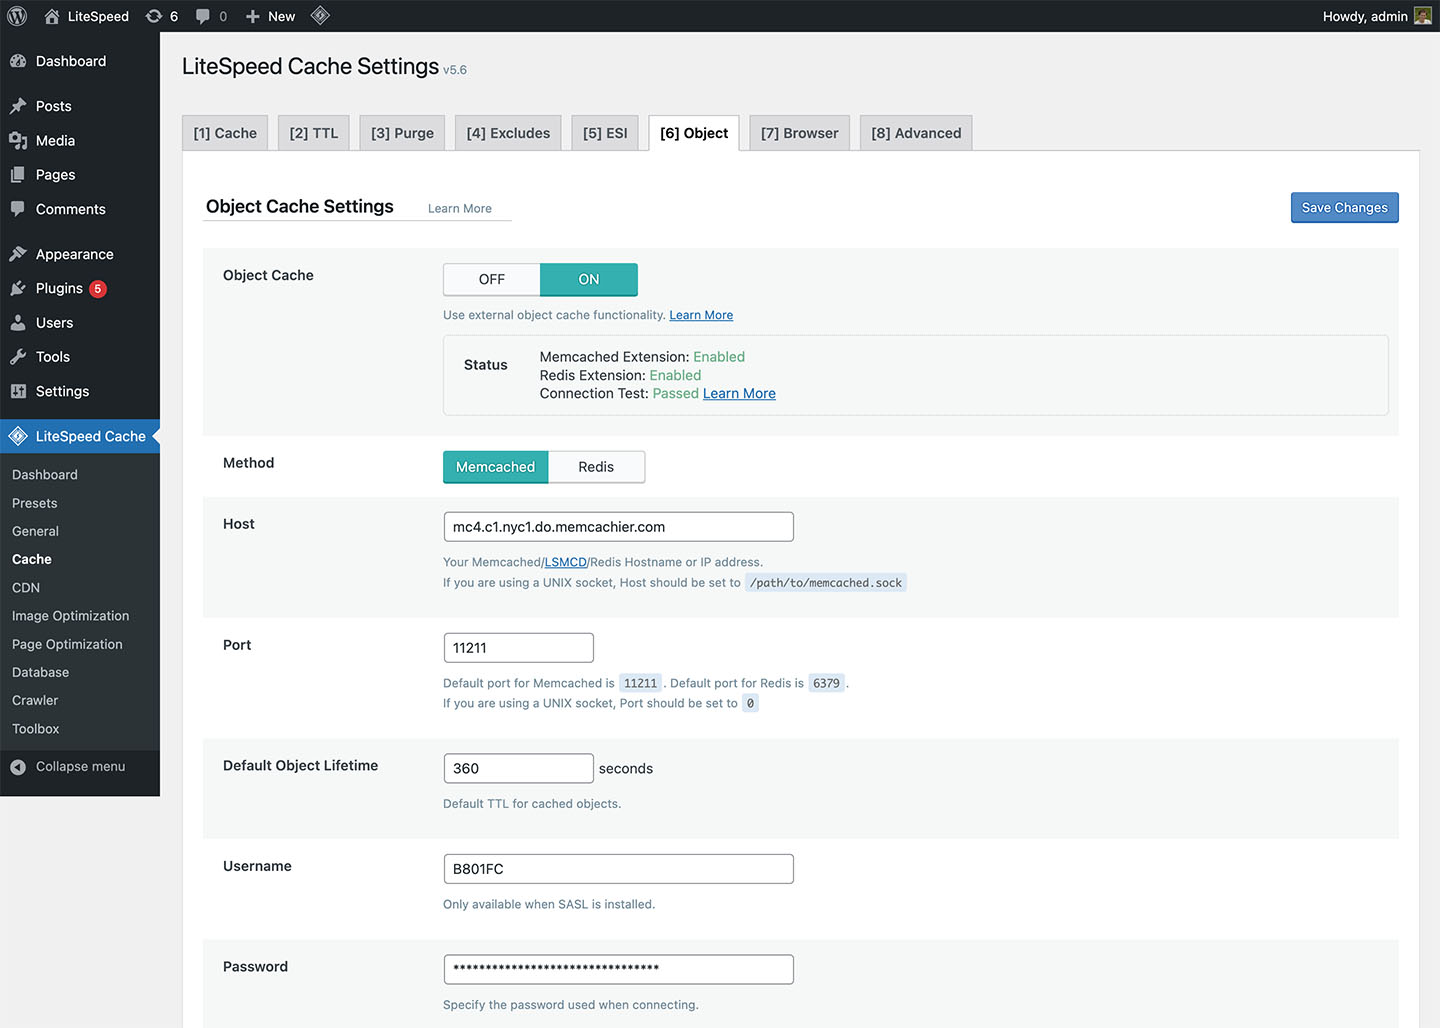
Click Save Changes. LiteSpeed Cache is now using MemCachier as its Object Cache.
View cache statistics
Another MemCachier benefit is its analytics dashboard. To help demystify Memcache caching operations, it’s helpful to visualize what’s going on under the hood. Though very cumbersome, one way to do that is to telnet into a Memcached server and run the stats command to see changes as operations are performed on your cache. With MemCachier, however, you get an analytics dashboard that displays your cache’s statistics so you can monitor performance and troubleshoot issues quickly and easily.
To open your MemCachier analytics dashboard, go to your Add-Ons Dashboard and click the View MemCachier dashboard link.
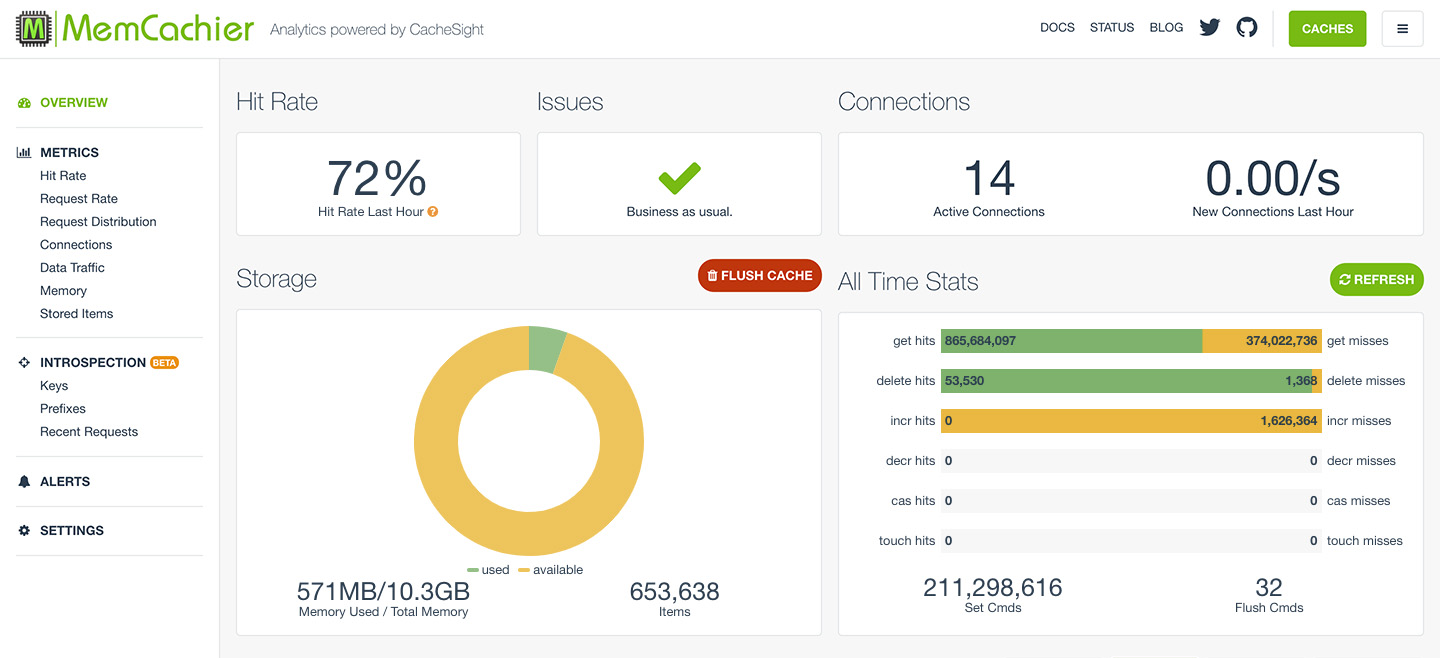
With each page refresh, you will see your cache stats change. Learn more about our advanced analytics features.
Conclusion
In this tutorial, you created an accelerated WordPress site on DigitalOcean with the OpenLiteSpeed WordPress Droplet. You learned about the Droplet’s included Memcached server and the default Memcached configuration and limitations. And finally, you created a MemCachier cache and configured the LiteSpeed Cache WordPress plugin to use that cache, overcoming scalability limitations of a Memcached and web server living on the same machine.