Deploy Rails and Memcache on Render: A How-To Guide
 Paddy
~ June 7, 2023
Paddy
~ June 7, 2023
Do you want to deploy a Ruby on Rails application on Render and boost its performance with Memcache? In this tutorial, you’ll create a simple Rails contact list app, deploy it to Render, and finally use Memcache to speed it up.
Memcache serves as an in-memory data storage system, a tool that significantly enhances the efficiency and scalability of web applications. Consider integrating Memcache if your pages exhibit sluggish load times or your application faces scaling challenges. Regardless of your app’s size, Memcache has the potential to quicken page loads and help future-proof your app.
Outline
- Initialize a Rails project
- Create a Rails contact list app
- Configure your app for Render
- Deploy Rails to Render
- Set up caching in Rails
- Implement caching strategies in Rails
Prerequisites
- Familiarity with Ruby and Rails.
- A Render account.
- A GitHub account and Git installed on your local machine. To deploy to Render, you must push code to a remote code repository. Render supports GitHub and GitLab.
- Ruby version
>=2.7.0installed on your computer.2.7.0is the minimum Ruby version required by Rails 7.
Initialize a Rails project
To begin, install Rails on your computer by running the following command in your terminal:
gem install railsThis tutorial uses Rails version 7.0.5, but the steps should be compatible with 5and 6. You can your installed version by running the following command in your terminal:
rails --versionIf you see the message Rails is not currently installed on this system... after installing Rails, the terminal window likely doesn’t know about the path to the rails executable that was just added. Try opening a new terminal window and re-run the command.
Run the following command to create a new project with the rails CLI:
rails new rails_memcacheThe argument after the new command is your application name. For this tutorial, I’ll use rails_memcache.
Change into your newly created project directory:
cd rails_memcacheRun the Rails web server, Puma:
rails serverVisit http://127.0.0.1:3000/ in your browser to see your basic Rails app running.
Create a Rails contact list app
Use the Rails scaffold generator to create an interface for storing and viewing a simple directory of names and email addresses. In your terminal, run the following:
rails g scaffold contact name:string email:stringThe g in this command stands for generate. The scaffold generator creates a new model, database migration for that model, controller to manipulate it, and views to view and manage the data. contact is the name of the model being generated. name and email are the fields, of type string, to be added to the contact model.
Next, run the migration you just created:
rails db:migrateOpen config/routes.rb in your code editor and set contacts#index as the root path route:
# config/routes.rb
Rails.application.routes.draw do
  # ...
  root :to => 'contacts#index'
end
Note # ... denotes code removed for brevity.
Your simple contact list app is now functional. With Rails’ server running, rails server, Visit http://127.0.0.1:3000/ in your browser and try it out. You should be able to add and delete contacts, to view all contacts, and to view a single contact.
Configure your app for Render
To prepare your Rails app to be deployed to Render, you’ll do the following:
- Add Render’s platform to your
Gemfile.lock - Configure Rails to use PostgreSQL
- Create a Render build script
- Define your Render infrastructure as code
- Create a remote code repository for your app
Add Render’s platform to your Gemfile.lock
Render ruby web service runtime uses the x86_64-linux platform. Add it to your Gemfile.lock to help to avoid issues where a gem works on one platform but not on another. For example, if you develop on a macOS machine. In your terminal, run the following command:
bundle lock --add-platform x86_64-linuxConfigure Rails to use PostgreSQL in production
Your Rails app is configured to use SQLite by default. You’ll update the database configuration to use SQLite in development and PostgreSQL in production.
Open up Gemfile in your code editor. Find the following line:
# Gemfile
#...
gem "sqlite3", "<version>"
#...
And replace it with the following:
# Gemfile
# ...
group :development do
  gem 'sqlite3'
end

group :production do
  gem 'pg'
end
# ...
This configuration ensures the sqlite3 gem is used in development and the pg gem in production.
To avoid locally installing gems in the production group in your Gemfile, run the following command in your terminal:
bundle config set --local without 'production'That command will create a local bundle config file .bundle/config, which is excluded in .gitignore.
To update your Gemfile.lock file, run the following:
bundle installNext, open config/database.yml in your code editor. Update the production database configuration to use a connection string with the DATABASE_URL environment variable:
# config/database.yml
# ...
production:
  <<: *default
  url: <%= ENV['DATABASE_URL'] %>
Note you are replacing the line database: db/production.sqlite3.
The DATABASE_URL environment variable will be your Render PostgreSQL database internal URL. You will set the variable in your app’s Web Service environment when you provision your Render infrastructure in the step Define your Render infrastructure as code.
Create a Render build script
You’ll next create a build script for Render to install Rails dependencies and run database migrations. Create a file bin/render-build.sh in your project root directory and add the following:
#!/usr/bin/env bash
# exit on error
set -o errexit

bundle install
bundle exec rails assets:precompile
bundle exec rails assets:clean
bundle exec rails db:migrate
rails assets:precompile takes your assets (JavaScript, CSS, images, etc.), processes them, minimizes them (when applicable), and then puts the results into the public/assets directory.
rails assets:clean removes old, compiled assets from the public/assets directory. This is useful because the assets:precompile task generates fingerprinted versions of your assets, and over time, as you make changes to your assets and recompile them, old and unused assets can accumulate and take up space.
The bundle exec part is just a way to ensure that the command is run in the context of your current bundle (the specific set of gems specified in your Gemfile).
Make the script executable:
chmod a+x bin/render-build.shThe chmod command changes the file’s permissions, and a+x means “add execute permission for all users”.
In the next step, you’ll configure Render to run this script on every git push.
Define your Render infrastructure as code
Create a render.yaml Blueprint spec file in your project root directory. You’ll define a Rails Web Service and PostgreSQL Database in the spec.
# render.yaml
databases:
  - name: rails_memcache
    plan: free
    databaseName: rails_memcache
    user: rails_memcache

services:
  - type: web
    plan: free
    name: rails_memcache
    runtime: ruby
    buildCommand: "./bin/render-build.sh"
    startCommand: "bundle exec puma -C config/puma.rb"
    envVars:
      - key: DATABASE_URL
        fromDatabase:
          name: rails_memcache
          property: connectionString
      - key: RAILS_MASTER_KEY
        sync: false
Note you’re specifying Render’s Free plan, which is sufficient for this tutorial. The default plan is Starter.
The buildCommand property runs the bin/render-build.sh script you created in the previous step.
RAILS_MASTER_KEY has the property sync: false, making it a Render placeholder environment variable. Placeholder environment variables are those which you want to exclude from your Blueprint spec and are not generated, such as external secrets. You will later be prompted to enter your RAILS_MASTER_KEY value on the Render dashboard before your deployment is finalized.
See the Render Blueprint spec documentation for an explanation of all properties.
Create a remote code repository for your app
To deploy to Render, you need a remote code repository. In this step, you’ll commit your code to your app’s git repository and push it to GitHub.
Apps generated with the rails new CLI command come with an initialized git repo and a .gitignore file. So you can stage your code:
git add .And commit:
git commit -m 'Initial commit: Create contacts app'Now your code is committed, you’ll push it to GitHub.
In your browser, log in to GitHub and create an empty repository called rails_memcache. The repo can be public or private.
Back in the terminal, add your GitHub repo as a remote origin, replacing your_username with your actual GitHub username:
git remote add origin https://github.com/your_username/rails_memcache.gitThat command tells Git where to push your code to.
Rename the default branch:
git branch -M mainAnd push your code to GitHub:
git push -u origin mainYour app’s code is now on GitHub, ready to be deployed to Render.
Deploy Rails to Render
Now that your code is on GitHub, deploying to Render is as simple as creating a new Blueprint Instance and connecting your GitHub repository.
Log in to Render and go to your Dashboard. Click New +, then click Blueprint.
Connect your GitHub account if you still need to do so. Then, find your repo in the Connect a repository section of the Create a new Blueprint Instance page and click Connect.
After clicking Connect you’ll be taken to a settings page. Choose a Blueprint Name. I’ll stick with rails_memcache.
Next, copy the value from your master.key file and set it as the RAILS_MASTER_KEY environment variable value.
Finally, click Apply to begin deploying.
If the web service deployment fails and you receive a notice An error has occurred, click on the name of the web service to display its Events tab. You’ll see an event for the failed deployment. Click on deploy logs in the event to investigate.
When the deployment is live, go to your Render Dashboard, click on your Web Service, and finally click on its URL under the Web Service name to open it in your browser. The contact list app should work as it does locally.
Next, you’ll implement caching.
Set up caching in Rails
Setting up caching with Memcached in Rails involves the following steps:
- Create a Memcached-compatible cache
- Configure Rails to use your cache
Create a Memcached cache
In this tutorial, you’ll create a free Memcached-compatible cache with MemCachier. For another option to use Memcached on Render, read our blog post to learn how to run Memcached as a Render Private Service.
MemCachier is a fully managed caching service that simplifies setting up and using Memcached in your web applications. Built for seamless integration with cloud platforms like Render, MemCachier offers developers a streamlined and hassle-free way to implement high-performance caching in their applications without worrying about the complexities of managing a cluster of Memcached servers.
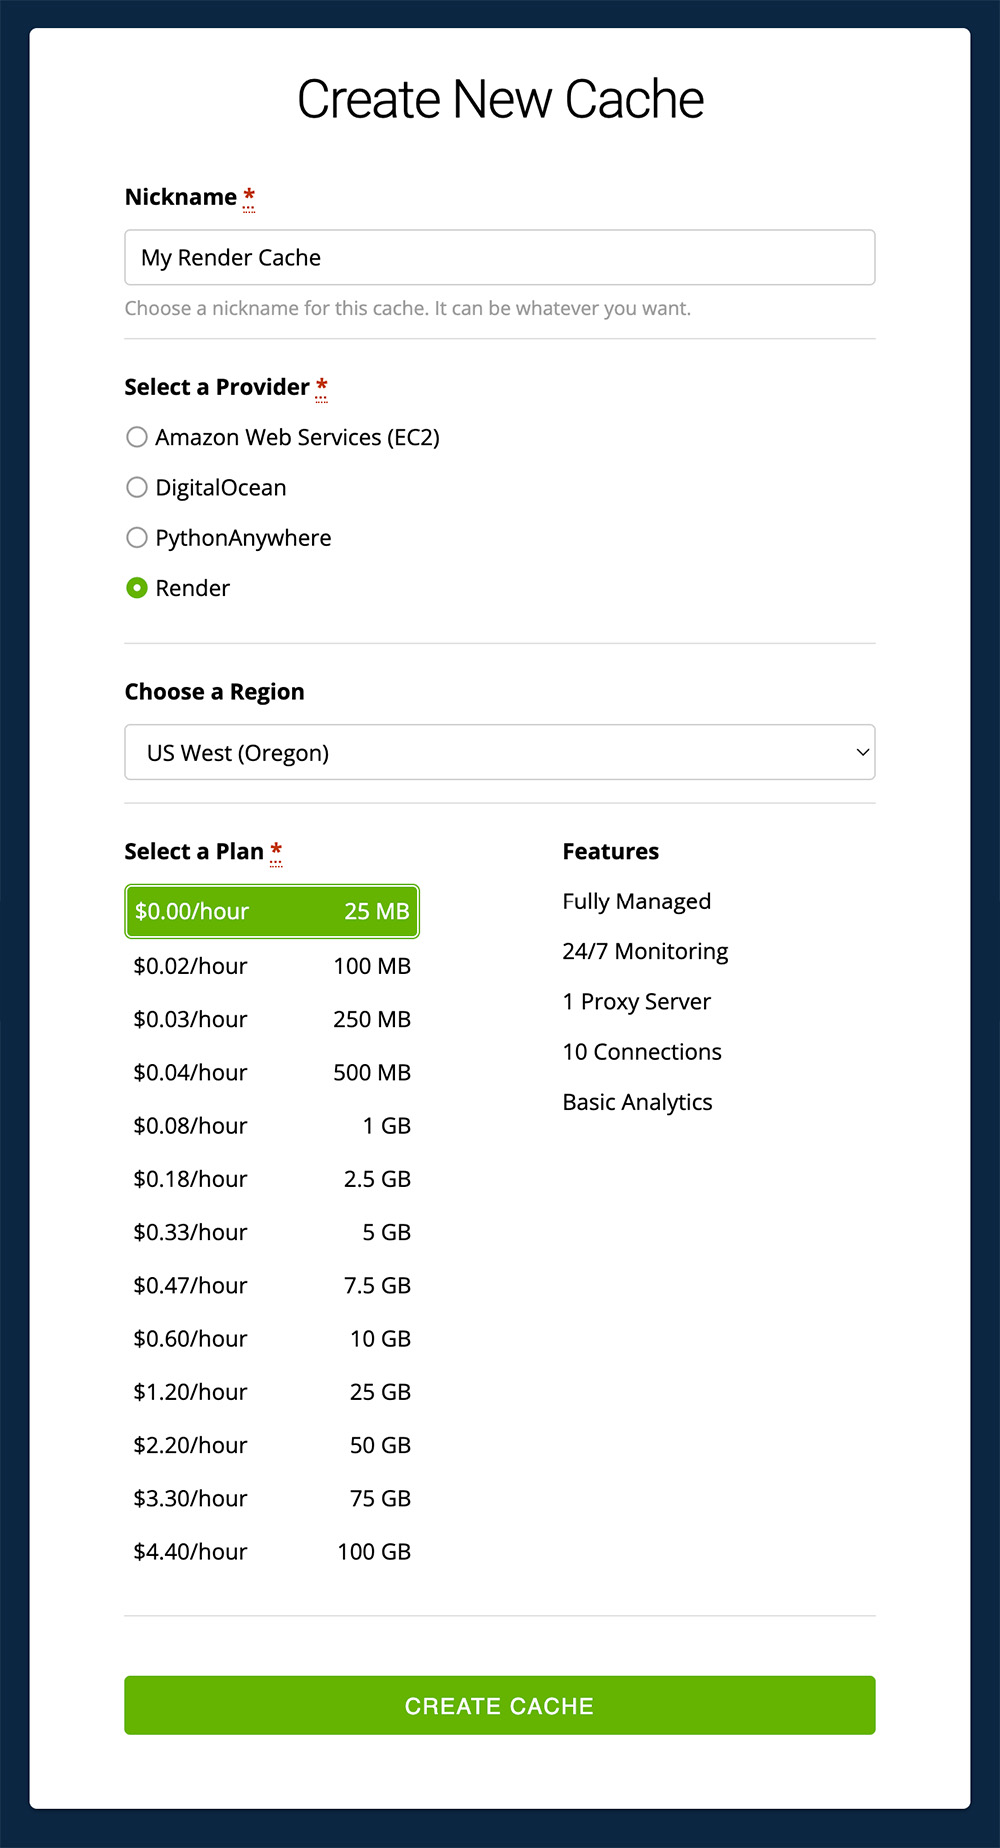
To begin, create a new MemCachier cache. Choose Render as the provider. Choose the same region as your Render Web Service. Choose the Free plan. Finally, click CREATE CACHE.
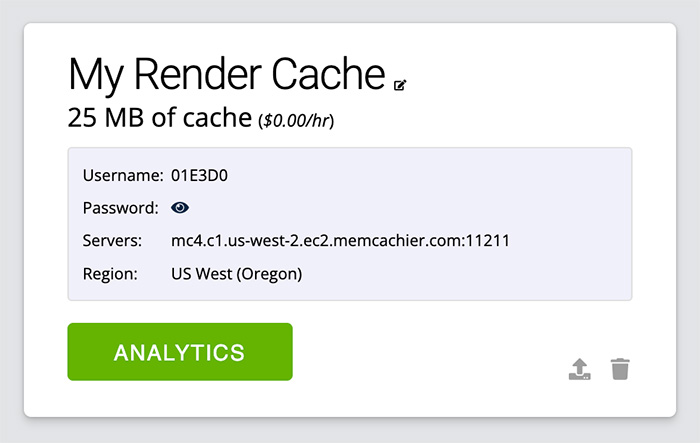
After creating your cache, you’ll find its configuration settings (Username, Password, Servers) on the CACHES dashboard.
On your Render dashboard, select your Web Service, then select the Environment tab. Then, add your MemCachier Servers, Username, and Password config values, naming the environment variables MEMCACHIER_SERVERS, MEMCACHIER_USERNAME, and MEMCACHIER_PASSWORD, respectively.
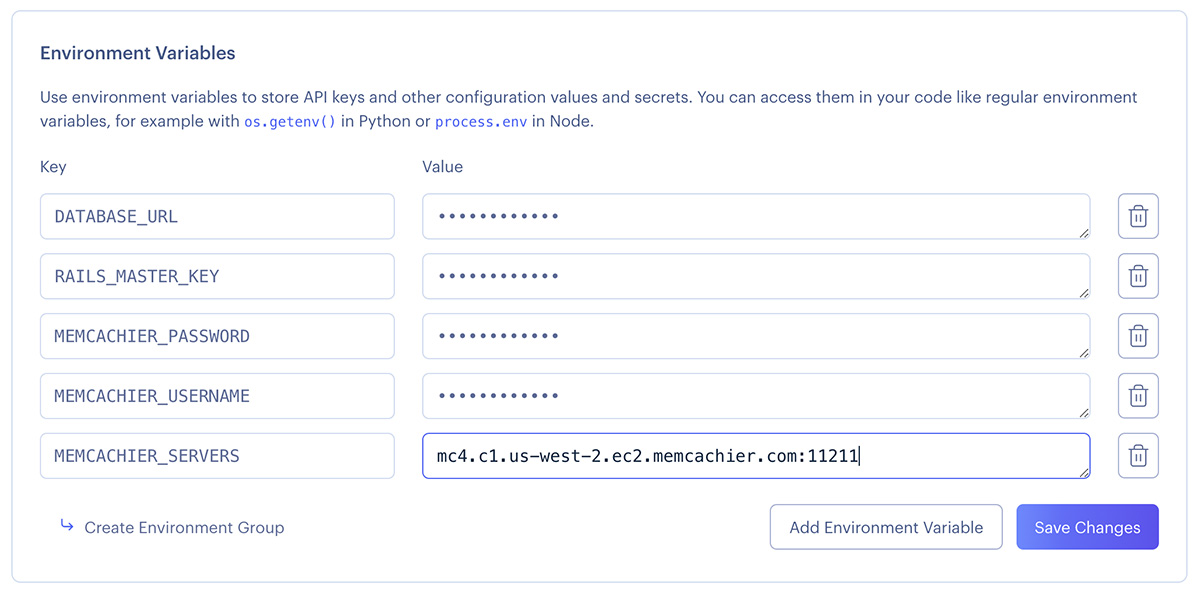
Click Save Changes. Next, you’ll configure Rails to use your cache.
Configure Rails to use your cache
dalli is a high-performance, pure Ruby client for accessing memcached servers. Add dalli as a dependency in your Gemfile:
# Gemfile
# ...
gem 'dalli'

group :development do
  gem 'sqlite3'
# ...
In your terminal, install the added gem and update your Gemfile.lock file:
bundle installNow, configure your app’s default production cache store to use the cache store provided by dalli by setting the config.cache_store configuration option. Open config/environments/production.rb in your code editor. Then, search for the commented-out line # config.cache_store = :mem_cache_store and replace with the following:
# config/environments/production.rb
# ...
config.cache_store = :mem_cache_store,
                    (ENV["MEMCACHIER_SERVERS"] || "").split(","),
                    {:username => ENV["MEMCACHIER_USERNAME"],
                     :password => ENV["MEMCACHIER_PASSWORD"],
                     :failover => true,
                     :socket_timeout => 1.5,
                     :socket_failure_delay => 0.2,
                     :down_retry_delay => 60
                    }
# ...
For an explanation of the options, see the Dalli client options documentation.
Implement caching strategies in Rails
Rails provides fragment caching out-of-the-box. To add page and action caching, you need to add actionpack-page_caching and actionpack-action_caching to your Gemfile. Rails’ official caching documentation is an excellent resource with in-depth explanations of the various Rails caching capabilities.
For fine-grained caching control, low-level caching is available, for example, for when you need to cache a particular value or database query result.
Fragment caching
Pages in Rails are generally built from various components. These components can be cached with fragment caching so they do not need to be rebuilt each time the page is requested.
For example, your /contacts page is built from contact components, each showing
the name, the email, and three actions (show, edit, and destroy). We can cache
these fragments by adding the following to @contacts.each loop in
app/views/contacts/index.html.erb:
# app/views/contacts/index.html.erb
# ...
<% @contacts.each do |contact| %>
  <% cache contact do %>
    # ...
  <% end %>
<% end %>
# ...
Fragment caching in Rails uses key-based expiration, or key-based invalidation, to make sure a cached fragment is kept up-to-date when its contents change.
Redeploy the app to Render with:
git add .
git commit -m 'Add fragment caching with Memcached'
git push
View Memcache statistics
To help demystify Memcache caching operations, it’s helpful to visualize what’s going on under the hood.
Though very cumbersome, one way to do that is to telnet into a Memcached server and run the stats command to see changes as operations are performed on your cache.
With MemCachier, however, you get an analytics dashboard that displays your cache’s statistics so you can monitor performance and troubleshoot issues quickly and easily.
To open your MemCachier analytics dashboard, log in to your MemCachier account, click Caches, then click the Analytics button for your cache.
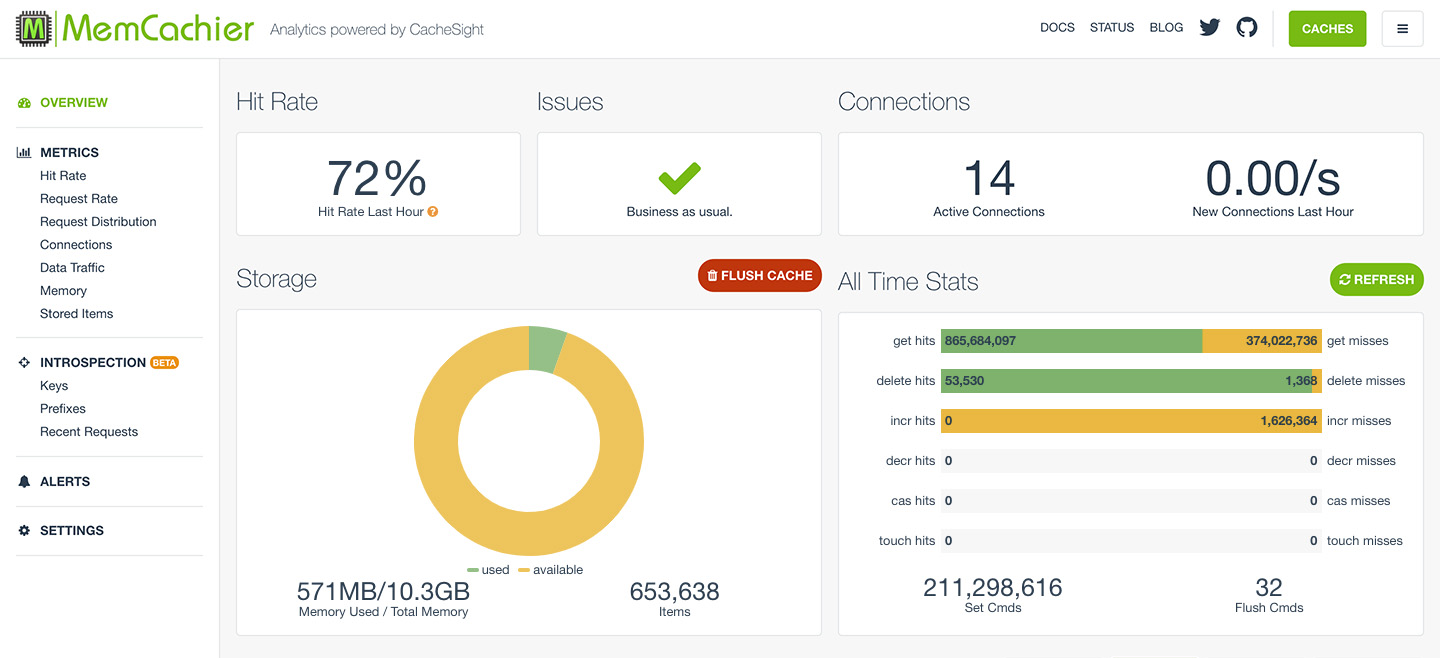
With contact fragment caching in place, you’ll see a get hit for each contact in your list each time you load the /contacts page in the browser. Each time a contact is updated, you’ll set Set Cmds increment as a new cache key is set for the updated fragment.
Session caching
Memcache can also be used as Rails’ session store. Memcache works well for storing information for short-lived sessions that time out. However, because Memcache is a cache and therefore not persistent, long-lived sessions are better suited to permanent storage options, such as your database.
To use your cache for session storage create the file config/initializers/session_store.rb and add the following:
# config/initializers/session_store.rb
Rails.application.config.session_store :cache_store, key: '_rails_memcached_session'
Clean up
Once you finish this tutorial and no longer need your app, you can delete your Web Service and Database from the Render dashboard. You could also delete the corresponding Blueprint from Blueprints.
You can also delete your MemCachier cache from the Caches dashboard if you no longer need it.