How to use Memcached on Render.com
 Paddy
~ May 24, 2023
Paddy
~ May 24, 2023
Web application performance has become more critical than ever, and a crucial part of optimizing performance is an efficient caching strategy. Enter Memcached—an open-source, powerful, distributed memory object caching system to speed up dynamic web applications.
In this tutorial you’ll learn two methods for working with Memcached on Render—deploying Memcached as a Private Service and integrating with MemCachier. MemCachier is a cloud-based service that manages and scales clusters of Memcached-compliant servers so you can focus on your app.
Prerequisites
- A Render account.
- A GitHub account and Git installed on your local machine. To deploy to Render you must push code to a remote code repository. Render supports GitHub and GitLab.
Optional - Create a Render Web Service
If you already have a Render app, you can skip this step and go straight to the first option for using Memcached on Render.
If you don’t already have an app running on Render, in this step, you’ll set up a super simple Node Express application on Render. A running app will enable you to connect to and use Memcached with the techniques explained in this post. Experience with Node or Express is optional.
Create a Simple Node Express App
To begin, open your terminal and create a new project directory:
mkdir render-memcacheChange to the newly created directory:
cd render-memcacheInitialize an NPM project, passing the -y option to select the defaults:
npm init -yNext, install Express:
npm install expressNow that the project setup is complete, create a server.js file in your root directory and open it with your code editor. Then, add the following:
// server.js
const express = require('express');
const app = express();

app.get('/', (req, res) => {
  res.send('Success!');
});

const port = process.env.PORT || 3000;
app.listen(port);
console.log(`Listening on port ${port}`);
That code imports express and creates an Express app. A GET route is then defined for the / path, which returns a Success! message. Finally, the Express server listens for connections on a default port of 3000 if a PORT environment variable is not defined.
In the terminal, run node server.js and open http://localhost:3000 in your browser, and you’ll see the text, Success!.
Create a Code Repository for your Web Service
To deploy to Render, you need a remote code repository. In this step, you’ll initialize a Git repository and push it to GitHub.
Start by initializing a Git repo:
git initCreate a .gitignore file and add the following:
# .gitignore

node_modules

# macOS file
.DS_Store
You are excluding your app’s dependencies from the repository with node_modules. .DS_Store is a macOS-specific file that doesn’t need to be present on other operating systems.
Add your changes:
git add .Commit those changes:
git commit -m "Create simple Express app"You’ll see output similar to the following:
# output
[main (root-commit) 5355710] Create simple Express app
 4 files changed, 1067 insertions(+)
 create mode 100644 .gitignore
 create mode 100644 package-lock.json
 create mode 100644 package.json
 create mode 100644 server.js
Now your code is committed, you’ll push it to GitHub.
In your browser, log in to GitHub and create an empty repository called render-memcache. The repo can be public or private.
Back in the terminal, add your GitHub repo as a remote origin, replacing your_username with your actual GitHub username:
git remote add origin https://github.com/your_username/render-memcache.gitThat command tells Git where to push your code to.
Rename the default branch:
git branch -M mainAnd push your code to GitHub:
git push -u origin mainYou’ll see output similar to the following:
# output
Enumerating objects: 6, done.
Counting objects: 100% (6/6), done.
Delta compression using up to 8 threads
Compressing objects: 100% (5/5), done.
Writing objects: 100% (6/6), 7.57 KiB | 7.57 MiB/s, done.
Total 6 (delta 0), reused 0 (delta 0), pack-reused 0
To https://github.com/your_username/render-memcache.git
 * [new branch]      main -> main
branch 'main' set up to track 'origin/main'.
Your app’s code is now on GitHub, ready to be deployed to Render.
Deploy your App to Render
Now that your code is on GitHub deploying to Render is as simple as creating a new Web Service and connecting your GitHub repository.
Log in to Render and go to your Dashboard. Click New +, then click Web Service.
Connect your GitHub account if you still need to do so. Then, find your repo in the Connect a repository section of the Create a new Web Service page and click Connect.
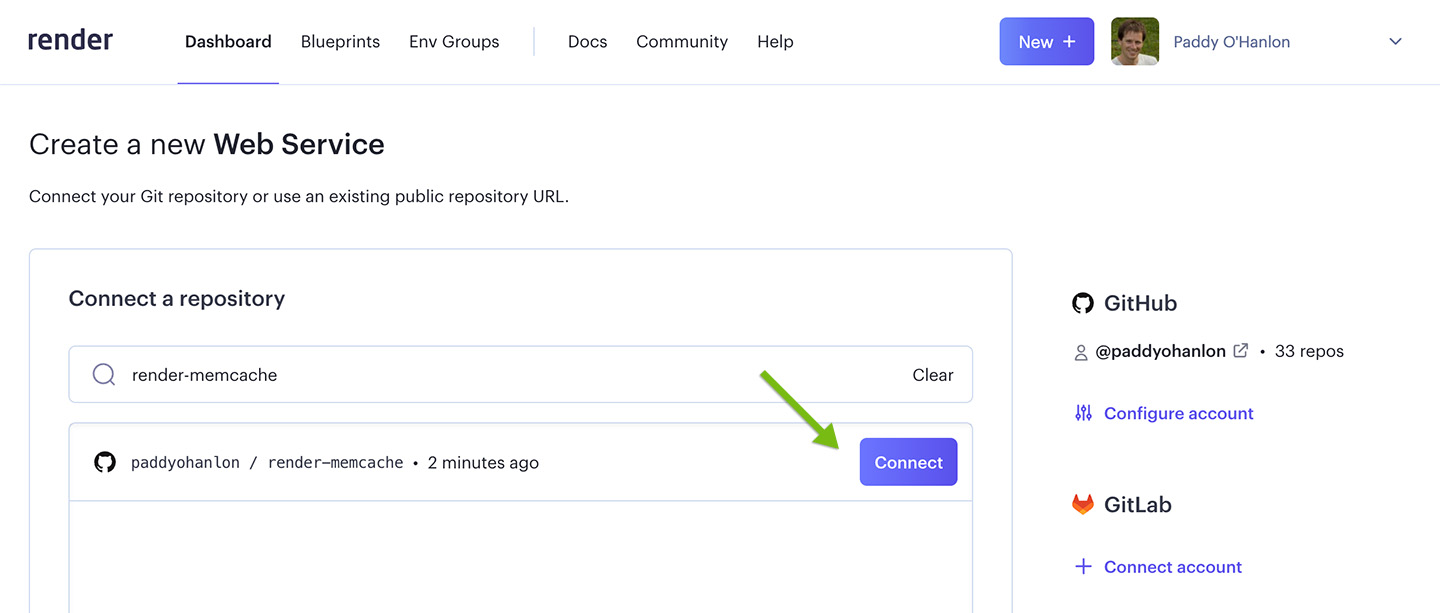
After clicking Connect you’ll be taken to a settings page. Specify the following settings:
- Name: Choose a name. I’m using
render-memcache. - Region: Choose a region or leave it as the default.
- Branch: Leave as the default,
main. - Root Directory: Leave as the default.
- Runtime: Leave as the default,
Node. - Build Command: Leave as the default,
yarn. - Start Command: Use
node server.js.
Choose the Free instance type.
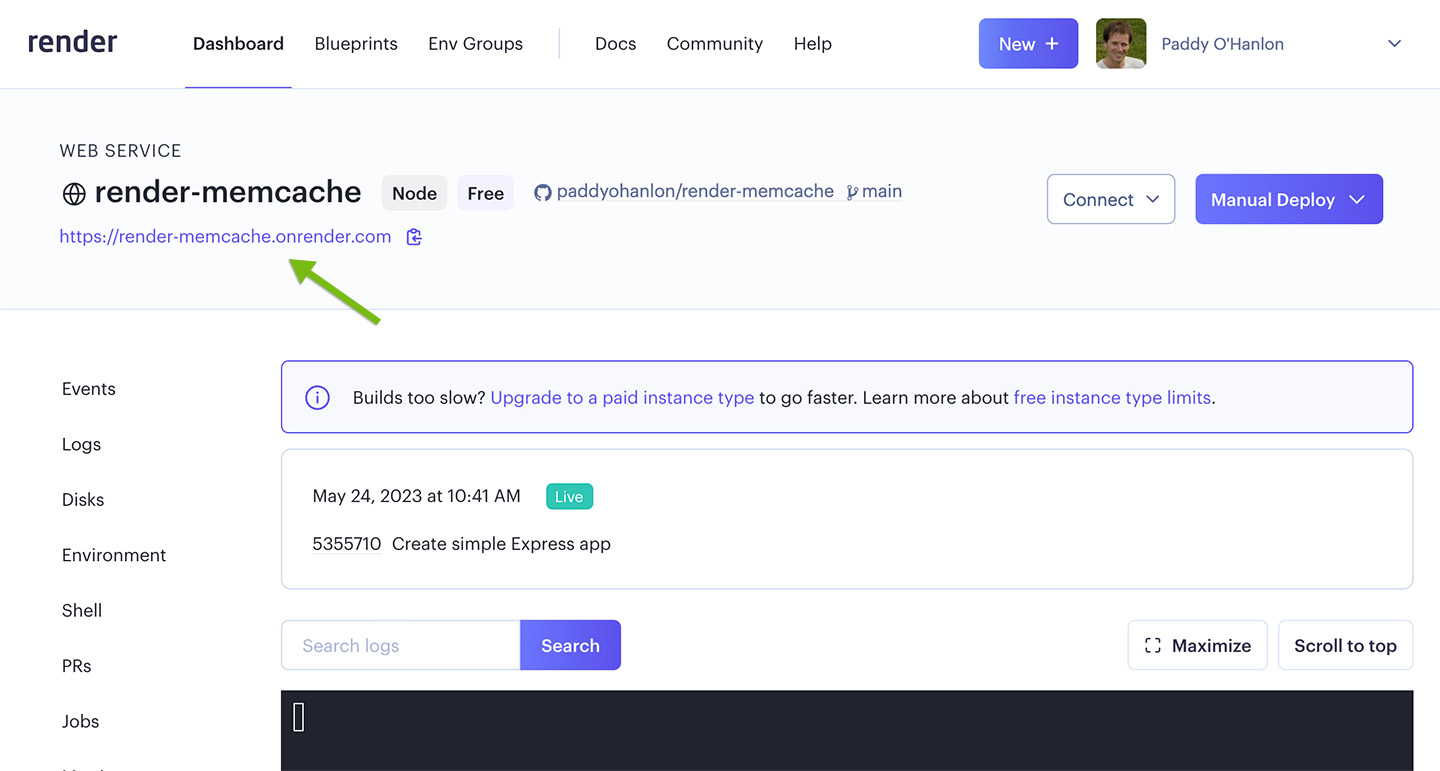
Finally, click Create Web Service. You’ll be taken to the Web Service dashboard, where you will see logs for the deployment process.
When the deployment is live, click on its URL under the Web Service name to open it in your browser. You’ll see the same Success! message you saw locally.
Next, you’ll learn two methods for using Memcached on Render:
- Using Memcached on Render through a Private Service
- Using MemCachier on Render
Option 1: Using Memcached on Render through a Private Service
A Render Private Service runs internal services you don’t want publicly accessible over the internet. A cache is a good use case for a Private Service.
Note that Private Services are unavailable with Render’s Free plan, so you must enter payment information to create a Private Service.
To create a Memcached Private Service, you need a code repository to hold its configuration.
To begin, open your terminal and create a new project directory:
mkdir render-memcache-memcachedChange to the newly created directory:
cd render-memcache-memcachedNext, create a file named Dockerfile and add the following:
# Dockerfile
FROM memcached:1.6.20
That line tells the Dockerfile to use the official Memcached Docker Hub image for your service.
Create a Render Blueprint spec by creating a render.yaml file. Add the following:
# render.yaml
services:
  - type: pserv
    name: memcached
    env: docker
    plan: starter
A Render Blueprint spec allows you to define infrastructure as code. In this file, you specify type as a Private Service, give the service a name, specify docker as the service environment, and choose the least expensive plan, starter. A Dockerfile path can be specified, but the Dockerfile you created will be found in the project root directory by default.
Create a Code Repository for your Private Service
In this step, you’ll initialize a Git repository and push it to GitHub.
Start by initializing a Git repo:
git initFor macOS users, create a .gitignore file and add the following:
# .gitignore
.DS_Store
Add your changes:
git add .Commit those changes:
git commit -m "Add Memcached Private Service config"You’ll see output similar to the following:
# output
[main (root-commit) 01394e1] Add Memcached Private Service config
 3 files changed, 9 insertions(+)
 create mode 100644 .gitignore
 create mode 100644 Dockerfile
 create mode 100644 render.yaml
Now your code is committed, you’ll push it to GitHub.
In your browser, log in to GitHub and create an empty repository called render-memcache-memcached. The repo can be public or private.
Back in the terminal, add your GitHub repo as a remote origin, replacing your_username with your actual GitHub username:
git remote add origin https://github.com/your_username/render-memcache-memcached.gitThat command tells Git where to push your code to.
Rename the default branch:
git branch -M mainAnd push your code to GitHub:
git push -u origin mainYou’ll see output similar to the following:
# output
Enumerating objects: 5, done.
Counting objects: 100% (5/5), done.
Delta compression using up to 8 threads
Compressing objects: 100% (3/3), done.
Writing objects: 100% (5/5), 423 bytes | 423.00 KiB/s, done.
Total 5 (delta 0), reused 0 (delta 0), pack-reused 0
To https://github.com/your_username/render-memcache-memcached.git
 * [new branch]      main -> main
branch 'main' set up to track 'origin/main'.
Your Private Service code is now on GitHub, ready to be deployed to Render.
Deploy your Memcached Private Service to Render
Back in the browser, start by clicking New + on your Render Dashboard, then click Private Service.
You’ll be prompted to enter payment information if you need to add a card to your Render account. Enter your payment information and click Add Card. You’ll then be taken to the Create a new Private Service page.
Next, connect a GitHub repository.
Connect your GitHub account if you still need to do so. Then, find your repo in the Connect a repository section of the Create a new Private Service page and click Connect.
After clicking Connect you’ll be taken to a settings page. Specify the following settings:
- Name: Choose a name. I’m using
render-memcache-memcached. - Region: Choose the same region as your Web Service.
- Branch: Leave as the default,
main. - Root Directory: Leave as the default.
- Runtime: Leave as the default,
Docker.
Choose the most inexpensive instance type, Starter, which costs $7 / month at the time of writing.
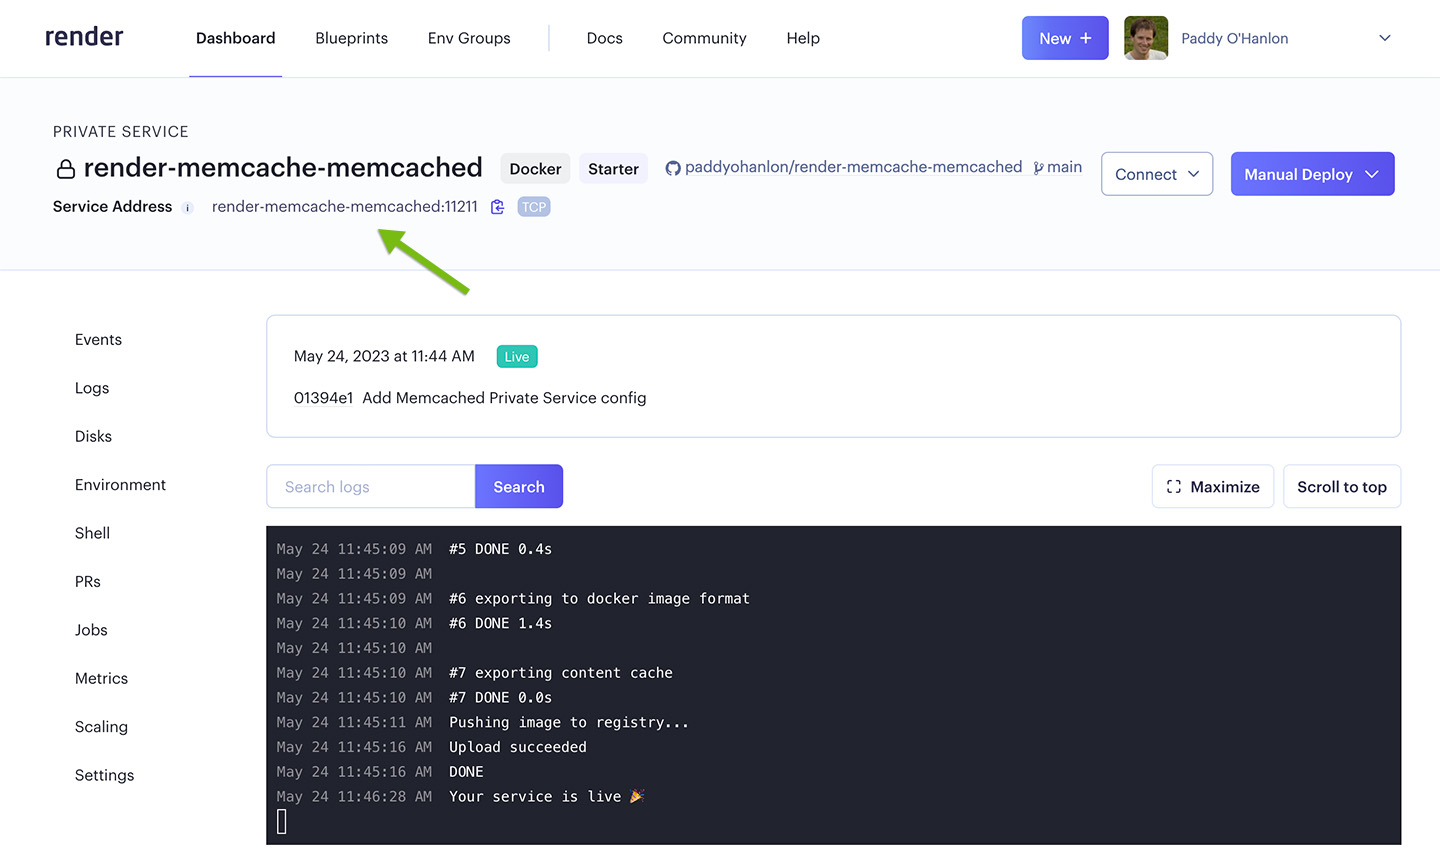
Finally, click Create Private Service. You’ll be taken to the Private Service dashboard, where you will see logs for the deployment process.
When the deployment is live, notice its Service Address (its host:port value) will be displayed under the Private Service name.
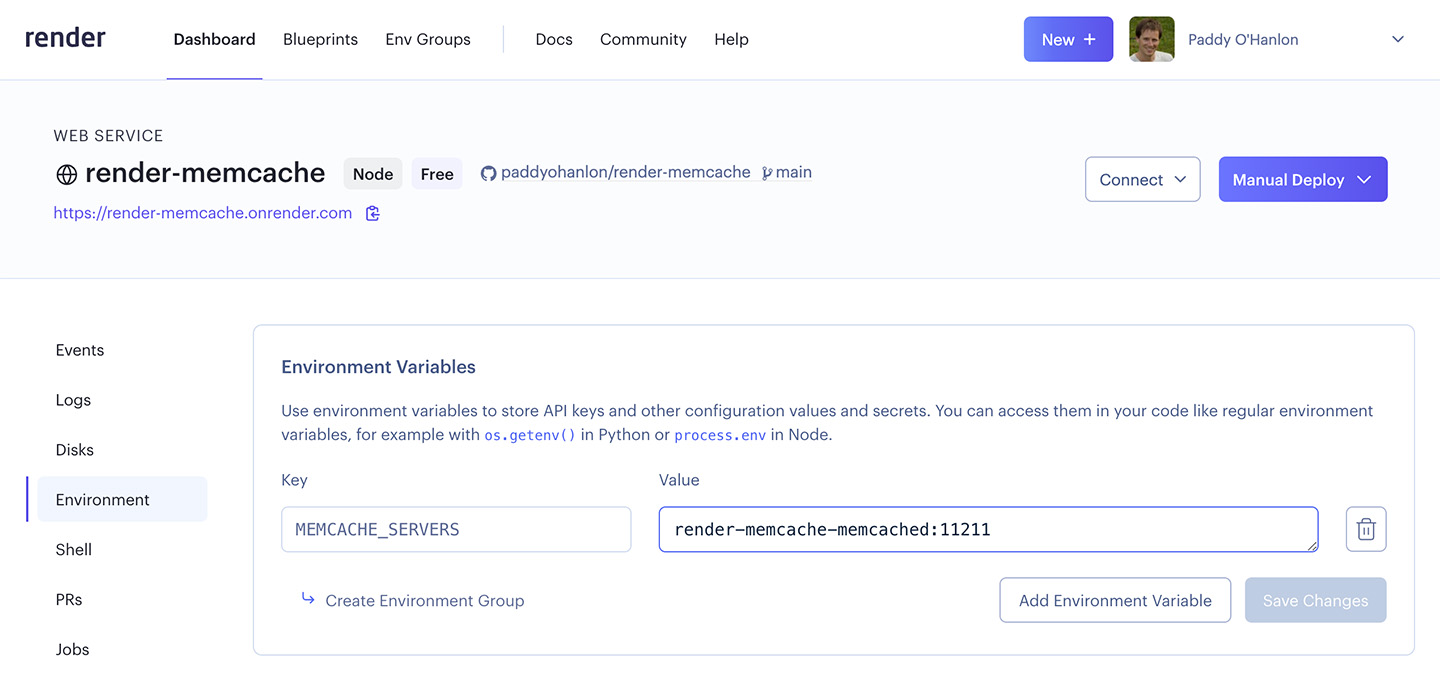
Now, set the host:port value as an environment variable for your render-memcache Web Service. On your Render dashboard, select your Web Service, then select the Environment tab and add a MEMCACHE_SERVERS variable with your Private Service Address. For example, render-memcache-memcached:11211.
Next, you’ll configure your app to use Memcached.
Configure your Render app to use Memcached
Configuring your app to use your Memcached implementation will vary depending on the language and framework used. Still, the process is the same at a high level: choose a compatible Memcache client library and configure a client using your cache’s settings.
For this tutorial, I’ll stick with the Express sample app.
Install the Memcache client library memjs to facilitate communication between your app and cache. In the terminal, run the following:
npm install memjsNext, open server.js back up in your code editor. Add the following lines to import memjs and configure a client.
// server.js
// ...
const app = express();

const memjs = require('memjs');

const memcache = memjs.Client.create(process.env.MEMCACHE_SERVERS, {
  failover: true,
  timeout: 1,
  keepAlive: true,
});

// ...
This code imports the memjs library. A memjs client is created, passing process.env.MEMCACHE_SERVERS—the Web Service environment variable you just created. The ... denotes code removed for brevity.
Next, replace the GET / route with the following:
// server.js
// ...

app.get('/', async (req, res) => {
  const key = 'message';
  const { value } = await memcache.get(key);
  if (value) {
    res.send(`${value.toString()}. <a href="/flush">Flush Cache</a>`);
    return;
  }
  await memcache.set(key, 'Served from cache');
  res.send('Served from memory');
});

// ...
The new route controller calls memcache.get(key) to check the cache for an item with the key message. If the item exists, its value is rendered along with an HTML link to a GET /flush route, which you’ll add next. If the item is not in the cache, it is stored with the value Served from cache, and the message Served from memory is returned.
Now, add the flush cache route.
// server.js
// ...

app.get('/', async (req, res) => {
  // ...
});

app.get('/flush', async (req, res) => {
  await memcache.flush();
  res.redirect('/');
});

// ...
This route’s controller flushes the cache and redirects to the home route.
The full server.js file will look like this:
// server.js
const express = require('express');
const app = express();

const memjs = require('memjs');

const memcache = memjs.Client.create(process.env.MEMCACHE_SERVERS, {
  failover: true,
  timeout: 1,
  keepAlive: true,
});

app.get('/', async (req, res) => {
  const key = 'message';
  const { value } = await memcache.get(key);
  if (value) {
    res.send(`${value.toString()}. <a href="/flush">Flush Cache</a>`);
    return;
  }
  await memcache.set(key, 'Served from cache');
  res.send('Served from memory');
});

app.get('/flush', async (req, res) => {
  await memcache.flush();
  res.redirect('/');
});


const port = process.env.PORT || 3000;
app.listen(port);
console.log(`Listening on port ${port}`);
Commit your changes:
git add .git commit -m 'Add cached home route and flush route'And push to GitHub to deploy:
git pushWhen the deployment is live, open up your app in the browser. Now, you’ll see the message Served from cache when the message item is stored in the cache. If you click the Flush cache link, the cache will be flushed, and you’ll see Served from memory. Refresh the page you’ll again see re-cached message Served from cache.
Option 2: Using MemCachier on Render
MemCachier is a fully managed caching service that simplifies setting up and using Memcached in your web applications. Built for seamless integration with cloud platforms like Render, MemCachier offers developers a streamlined and hassle-free way to implement high-performance caching in their applications without worrying about the complexities of managing a cluster of Memcached servers.
Using MemCachier with Render involves just two steps:
- Create a MemCachier cache.
- Configure your app to use the cache.
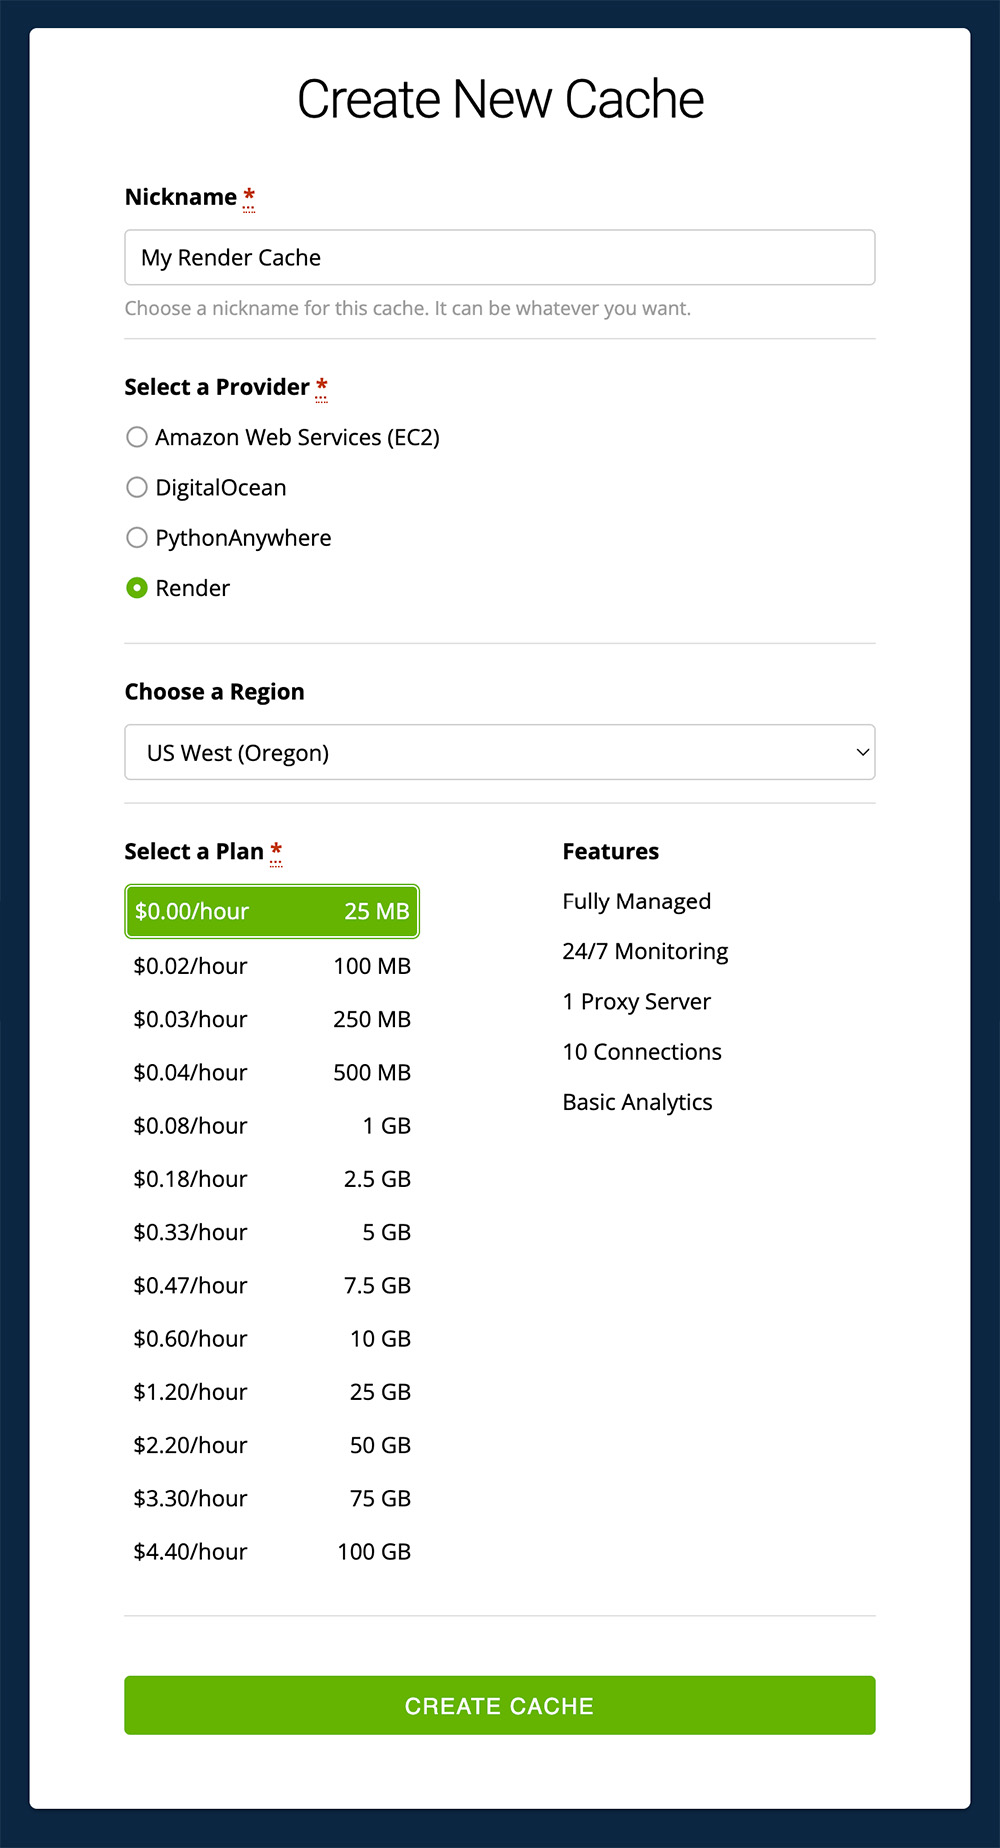
To begin, create a new MemCachier cache. Choose Render as the provider. Choose the same region as your Render Web Service. Choose the Free plan. Finally, click CREATE CACHE.
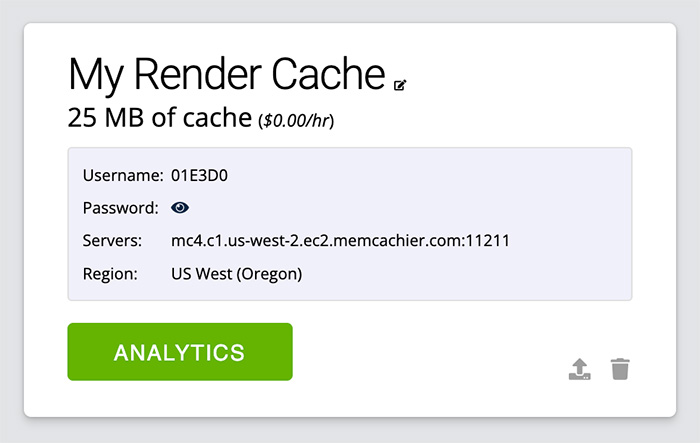
After creating your cache, you’ll find its configuration settings (Username, Password, Servers) on the CACHES dashboard.
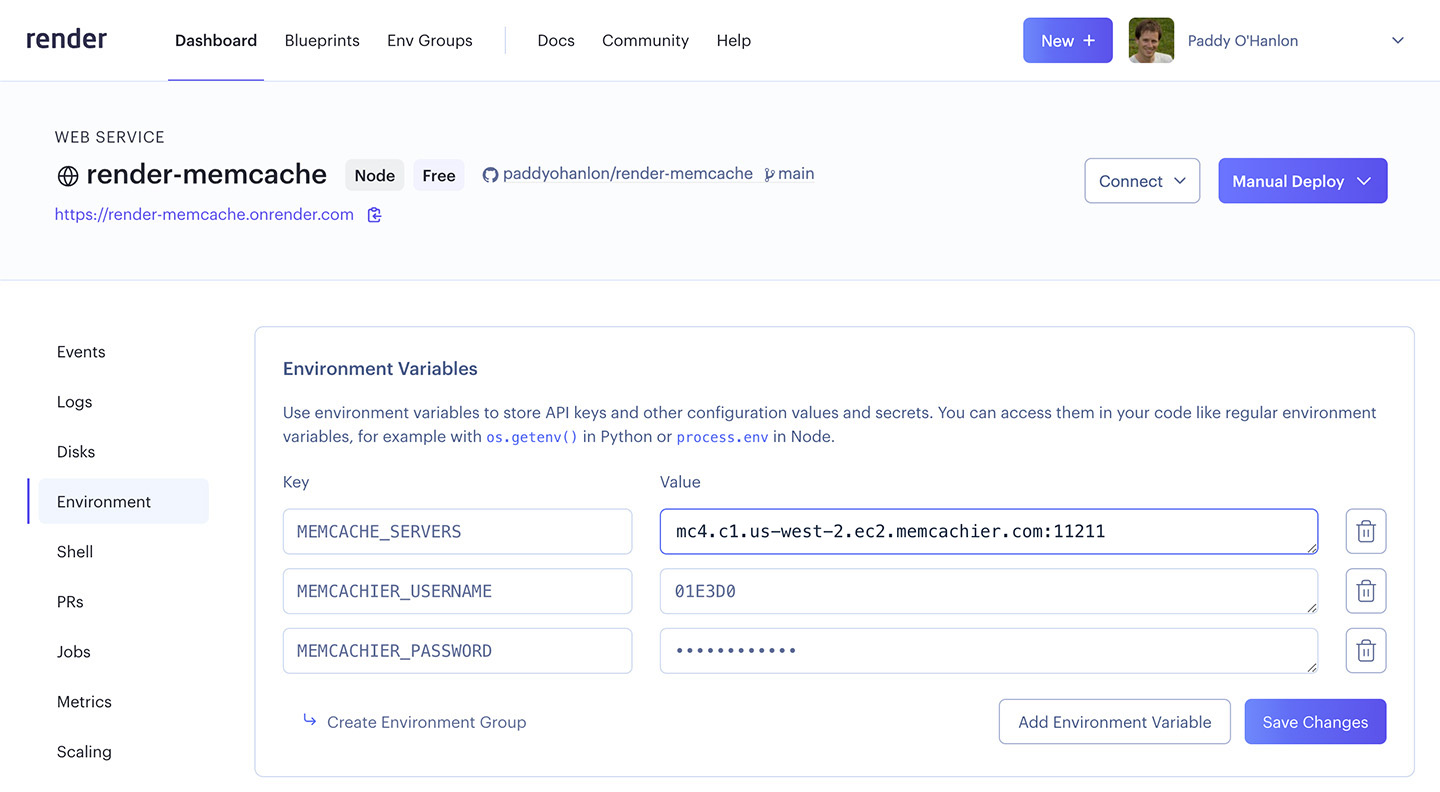
On your Render dashboard, select your Web Service, then select the Environment tab. Update the MEMCACHE_SERVERS value to be your MemCachier Servers setting, e.g., mc4.c1.us-west-2.ec2.memcachier.com:11211. And add your MemCachier Username and Password, naming the environment variables MEMCACHIER_USERNAME and MEMCACHIER_PASSWORD, respectively.
And that’s all there is to it. You’re now caching with MemCachier.
After clicking Save Changes, you can click on the Events tab to see the deployment status. When the deployment is live, check your app in the browser again, and the app will function exactly as before, but now, it’s caching with MemCachier.
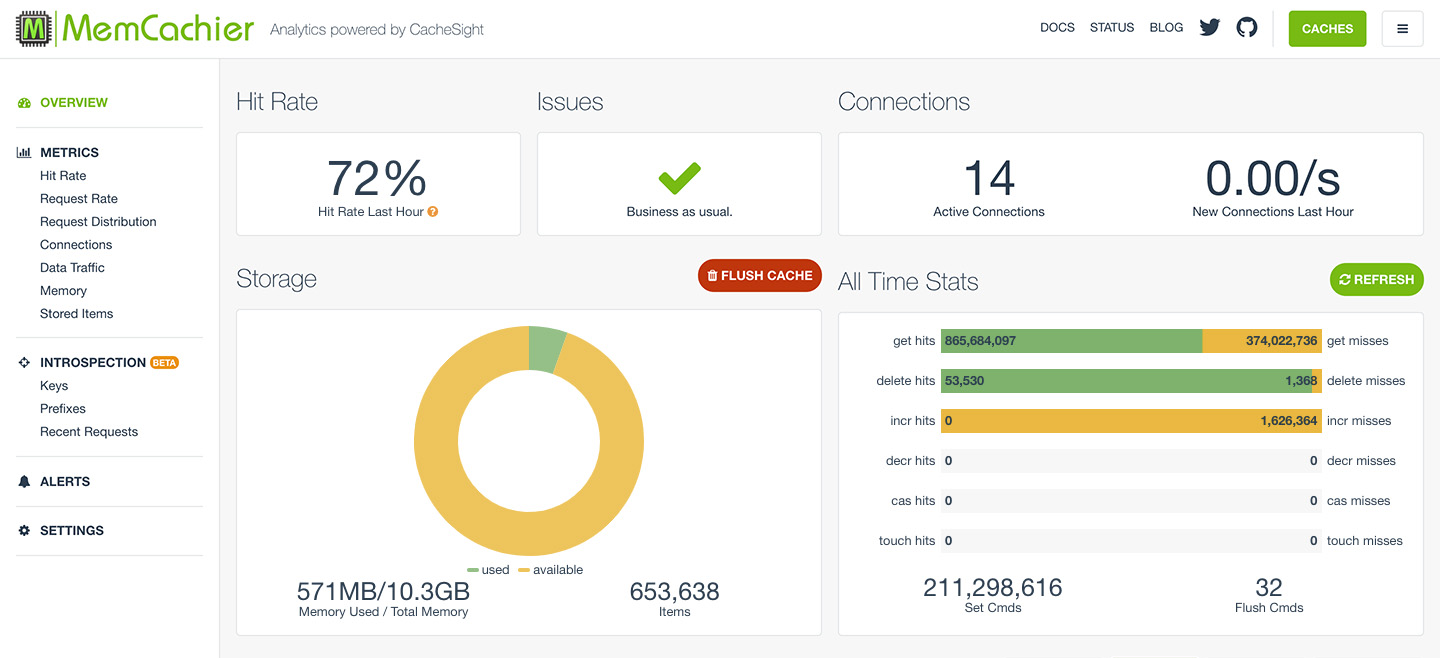
You can open the MemCachier Analytics dashboard to see stats change as you make requests to your app. To open the analytics dashboard log into your MemCachier account, view the Caches page, then click the ANALYTICS button for your cache.
Comparing Memcached Private Service and MemCachier
When evaluating how to implement Memcached on Render, MemCachier offers several advantages over the Private Service approach.
Get started for free: The Free MemCachier plan offers 25 MB of storage.
Fast and Simple Setup: Create a cache, configure a client, and start caching—no need to manage configuration in a separate code repository.
Fully managed service: MemCachier handles the underlying server infrastructure, including setup, configuration, monitoring, and maintenance, allowing you to focus on your application’s central functionality.
Effortless scaling: As your app grows, quickly scale your cache size without changing your app’s code, ensuring optimal performance even under increasing load.
High availability: MemCachier caches are spread across several servers. When a server goes down, you’ll lose only a small percentage of your cache and, as a result, see only a slight increase in cache misses. (available on 1 GB plans and greater)
Comprehensive analytics and monitoring: MemCachier offers cache metrics, historical usage statistics, and customizable alerts. The Analytics dashboard gives valuable insights into your cache’s performance, helping you make informed decisions about optimizing your caching strategy. Learn how to Debug, Optimize and Monitor Your Memcache With the MemCachier Advanced Analytics Dashboard.
Exceptional customer support: MemCachier’s team of caching experts are ready to support you with any questions or issues you may encounter. You’ll speak directly with engineers.
Essentially, MemCachier is a user-friendly, dependable, and powerful managed caching solution that allows you to fully utilize the capabilities of Memcached on Render without the stress of self-management. By opting for MemCachier, you’ll be able to access the performance enhancements provided by Memcached, coupled with a simplified and hassle-free user experience.
Further Reading
Need to migrate an existing MemCachier cache from Heroku? Read our post on migrating from Heroku to Render.