Deploy Flask on Elastic Beanstalk and Scale with Memcache
 Paddy
~ September 8, 2023
Paddy
~ September 8, 2023
Want to deploy a Flask application on AWS Elastic Beanstalk that is ready to scale? In this tutorial, you’ll set up an Elastic Beanstalk environment, deploy a Flask application, hook it up to a MySQL database, and finally use Memcache to speed it up.
Memcache is an in-memory key-value store, a technology that improves the performance and scalability of web apps. Consider using Memcache when your pages load slowly, or your app has scalability issues. Memcache can make page loads snappy even for small sites and help future-proof your app.
Outline
- Prerequisites
- Initialize a Flask project
- Create a Flask task list app
- Configure Flask for Elastic Beanstalk
- Deploy your Flask app with Elastic Beanstalk
- Create and configure a cache
- Implement caching in Flask
Prerequisites
- Familiarity with Python and, ideally, Flask.
- An AWS account.
- The EB CLI installed and configured on your computer.
- Python 3.11 and Git installed on your computer.
At the time of writing, the latest version of the Python platform on Elastic Beanstalk uses Python 3.11. If you’re running a different version of Python on your machine, consider using a tool like pyenv to install and use multiple versions of Python.
Initialize a Flask project
The following commands create an isolated Python virtual environment and a basic Flask app.
Create a new folder for the project and change into that directory:
$ mkdir flask-memcache && cd $_Make sure your terminal window is using Python 3.11, then create a new Python virtual environment:
$ python -m venv venvNote your Python interpreter may work with the command python3 instead of python.
When you run this command, Python creates a new directory called venv, allowing you to install additional packages and dependencies into this virtual environment without affecting your system’s global Python installation. -m venv tells Python to use the venv module to create a new virtual environment. The final venv is the name of the directory where the virtual environment will be created. You can choose any name you like, but venv is a common convention.
Next, activate the Python virtual environment:
$ source venv/bin/activateAfter running that command, you should see the name of the virtual environment displayed in your terminal prompt, e.g., (venv) ➜ flask-memcache.
Install the latest version of Flask (2.3.3 at the time of writing) using the pip package installer:
(venv) $ python -m pip install FlaskIn general, it’s a good idea to use python -m pip instead of pip to install packages, especially when working with virtual environments, to ensure that you are using the correct version of pip and installing packages into the correct environment.
Create a Flask task list app
In this section, you’ll create a simple task list app where tasks can be listed, added, and deleted.
Create a new Flask app instance
To begin, create a module to contain all the code for the task list app. Create the folder task_list and the file task_list/__init__.py in your project’s root directory. Then, open task_list/__init__.py in your code editor and add the following:
# task_list/__init__.py
from flask import Flask

def create_app():
    app = Flask(__name__)

    @app.route("/")
    def hello_world():
        return "<p>Hello World</p>"

    return app
The __init__.py file is a special file in Python. Its presence indicates that a directory should be treated as a Python package.
The function create_app is an example of the application factory pattern. When called, it will create a new instance of a Flask application and return it. For now, the app will display a “Hello World” message.
Next, create the file application.py in your project’s root directory. Open application.py in your code editor and add the following:
# application.py
from task_list import create_app

application = create_app()
Run the development server
Now, try to run the Flask development server. Open a terminal window and enter flask run. Notice you get the following error:
Error: Could not locate a Flask application. Use the 'flask --app' option, 'FLASK_APP' environment variable, or a 'wsgi.py' or 'app.py' file in the current directory.By default, Flask expects a file named app.py to be your app. However, Elastic Beanstalk expects a file named application.py with a Flask app named application, like the one you just created. You’ll set a local environment variable to tell Flask where your app is.
Create the file .env and open it in your code editor. Then, add the following:
# .env
FLASK_APP=application.py
Next, install python-dotenv to populate values from .env into your environment:
(venv) $ python -m pip install python-dotenvRun flask run again, and you should see the message * Running on http://127.0.0.1:5000. Open that URL in your browser, and you’ll see Hello World!.
macOS users: When running flask run, you’ll likely see Access to localhost was denied. HTTP ERROR 403 because port 5000 is used by AirPlay Receiver. You can run the development server on a different port with the --port option. For example, flask run --port 5001.
Set up a local SQLite database
To interact with your database and manage migrations, install the following packages:
(venv) $ python -m pip install Flask-SQLAlchemy Flask-MigrateNext, create an instance folder, where your local SQLite database will live. To do that, create a folder named instance in your project’s root directory.
Create a file task_list/db.py and add the following:
# task_list/db.py
from flask_sqlalchemy import SQLAlchemy
from flask_migrate import Migrate

db = SQLAlchemy()
migrate = Migrate()
These changes import the SQLAlchemy ORM for interacting with your database. Migrate is also imported from Flask-Migrate, an extension for Flask that simplifies database migrations by adding commands to the Flask command line interface for managing migrations using Alembic. Alembic is a database migration tool for SQLAlchemy.
Next, make the following changes in task_list/__init__.py.
Remove these lines as you no longer need them:
# task_list/__init__.py
@app.route("/")
def hello_world():
    return "<p>Hello World!</p>"
Then, update task_list/__init__.py to match the following:
# task_list/__init__.py
from flask import Flask
from task_list.db import db, migrate

def create_app():
    app = Flask(__name__)

    # Configure the SQLite database relative to your app instance folder
    app.config["SQLALCHEMY_DATABASE_URI"] = "sqlite:///task_list.db"

    # Initialize the SQLAlchemy extension with your app
    db.init_app(app)

    # Initialize the Flask-Migrate extension with your app and database
    migrate.init_app(app, db)

    return app
With these changes, the SQLite database is configured relative to the app instance folder by setting SQLALCHEMY_DATABASE_URI.
The init_app method is a common pattern in Flask extensions. It ties the extension to a specific Flask app instance and sometimes to other extensions’ instances (like db in the case of migrate.init_app(app, db)).
You’ll create a Task model in the next step.
Create the Task model
In this step, you’ll create a Task model to represent a task in your app.
Create the file task_list/models.py, open it in your code editor, and add the following:
# task_list/models.py
from task_list.db import db

class Task(db.Model):
    id = db.Column(db.Integer, primary_key=True)
    name = db.Column(db.Text(), nullable=False)

    def __repr__(self):
        return '<Task: {}>'.format(self.name)
That model gives you a task table with two columns: id and name.
To ensure that models are known to SQLAlchemy and Flask-Migrate, import them into task_list/__init__.py:
# task_list/__init__.py
# ...

def create_app():
    # ...
    migrate.init_app(app, db)

    from . import models # add this import

    return app
The # ... denotes code removed for brevity.
Set up database migrations
Next, initialize database migrations by running the following:
(venv) $ flask db init# output
Creating directory '.../flask-memcache/migrations' ... done
Creating directory '.../flask-memcache/migrations/versions' ... done
Generating .../flask-memcache/migrations/script.py.mako ... done
Generating .../flask-memcache/migrations/env.py ... done
Generating .../flask-memcache/migrations/README ... done
Generating .../flask-memcache/migrations/alembic.ini ... doneflask db init is a command added by the Flask-Migrate extension. That command will create a migrations folder and add the files and folders Alembic needs to manage database migrations.
Next, generate a migration script for your Task model:
(venv) $ flask db migrate -m "task table"# output
# ...
INFO [alembic.autogenerate.compare] Detected added table 'task'
Generating .../flask-memcache/migrations/versions/179b1b5c657c_task_table.py ... doneIf you haven’t created an instance folder, when doing flask db migrate -m "task table", you will get an error:
sqlalchemy.exc.OperationalError: (sqlite3.OperationalError) unable to open database file.
The Flask-Migrate extension also adds the flask db migrate command. The command auto-generates migration scripts based on the changes detected in your models. The -m option allows you to add a message (or a description) to the migration, making it easier to understand its purpose.
You’ll find the migration file in migrations/versions/. It will look similar to migrations/versions/179b1b5c657c_task_table.py.
Notice that instance/task_list.db was also created when running that flask db migrate. That’s because Flask-Migrate attempts to compare the current state of the database with the current state of your models to determine what migrations need to be generated. If the SQLite database file doesn’t exist, SQLAlchemy will automatically create it when attempting to connect. Auto-creation is a characteristic behavior of SQLite: if you attempt to connect to a database file that doesn’t exist, SQLite will create it for you.
Next, apply the migration you just created:
(venv) $ flask db upgrade# output
# ...
INFO [alembic.runtime.migration] Running upgrade -> 179b1b5c657c, task tableThat command applies any pending migration scripts to the database to bring it up to date with the current state of your models.
Create a controller Blueprint
In this step, you’ll create a Flask Blueprint to add routes to your app for listing tasks, adding a task, and deleting a task.
Create the file task_list/routes.py and add the following:
# task_list/routes.py
from flask import (
    Blueprint, redirect, render_template, request, url_for
)

from task_list.db import db
from task_list.models import Task

bp = Blueprint('task_list', __name__)

@bp.route('/', methods=('GET', 'POST'))
def index():
    if request.method == 'POST':
        name = request.form['name']
        db.session.add(Task(name=name))
        db.session.commit()

    tasks = Task.query.all()
    return render_template('index.html', tasks=tasks)

@bp.route('/<int:id>/delete', methods=('POST',))
def delete(id):
    task = Task.query.get(id)
    if task != None:
        db.session.delete(task)
        db.session.commit()
    return redirect(url_for('task_list.index'))
This code defines a Flask Blueprint for task management.
A Flask Blueprint named task_list is created. The Blueprint contains an Index route (/) with two methods (GET and POST) and a Delete route (/task_id/delete) with a single POST method.
When GET / is requested, all tasks are retrieved from the database and displayed using the index.html template. Flask will look for templates in the templates folder. You’ll create task_list/templates/index.html shortly.
When POST / is requested (when the add task form is submitted), it adds a new task to the database.
When POST /task_id/delete is requested, it looks up the task in the database, deletes it, and redirects the user back to the index page of the task list.
Next, register the Blueprint in __init__.py:
# __init__.py
# ...
def create_app():
    # ...

    from . import routes
    app.register_blueprint(routes.bp)

    return app
Create a template
In this step, you’ll create a template with a form for adding a task, and a list of task names, each with a delete button. Flask uses the Jinja templating engine, which allows you to add Python-like control flow statements inside {% %} delimiters.
To begin, create a template file task_list/templates/index.html and add the following:
<!-- task_list/templates/index.html -->
<!DOCTYPE html>
<html lang="en">
<head>
<meta charset="utf-8" />
<title>MemCachier Flask Tutorial</title>
<meta name="viewport" content="width=device-width, initial-scale=1" />
</head>
<body>
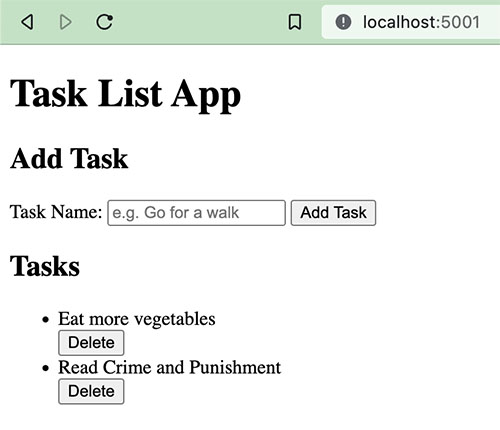
<h1>Task List App</h1>
<h2>Add Task</h2>
<form method="POST">
<label>
Task Name:
<input
type="text"
name="name"
placeholder="e.g., Go for a walk"
required
/>
</label>
<button>Add Task</button>
</form>
{% if tasks %}
<h2>Tasks</h2>
<ul>
{% for task in tasks %}
<li>
<div>{{ task['name'] }}</div>
<form action="{{ url_for('task_list.delete', id=task['id']) }}" method="POST">
<button>Delete</button>
</form>
</li>
{% endfor %}
</ul>
{% endif %}
</body>
</html>Flask will look for templates in the templates folder.
With that, your task list app is functional. Restart the development server, flask run, and try it out in your browser.
Configure Flask for Elastic Beanstalk
In this section, you’ll prepare your app to be deployed to Elastic Beanstalk.
Configure environment variables
Create the file .ebextensions/environment-variables.config. In that file, set FLASK_APP so the Flask CLI can find your app, just as you did in your local .env file earlier:
# .ebextensions/environment-variables.config
option_settings:
  aws:elasticbeanstalk:application:environment:
    FLASK_APP: application.py
Without setting this environment variable, you will see the following error when creating your Elastic Beanstalk environment: ModuleNotFoundError: No module named 'application'.
Configure the MySQL database
In this step, you’ll configure your environment and Flask to use a MySQL database in production (you’ll provision a database later with Elastic Beanstalk).
Install the mysqlclient package with Pip
You will need a MySQL driver to allow SQLAlchemy to interact with the MySQL database:
(venv) $ python -m pip install mysqlclientIf you get the error Failed building wheel for mysqlclient when trying to install mysqlclient, try running pip install -U wheel to ensure you’re using the latest version of wheel. Then, try installing mysqlclient again.
Then, use pip freeze to write your dependencies to a file named requirements.txt:
(venv) $ pip freeze > requirements.txtThis file is required to tell Elastic Beanstalk what Python dependencies to install.
Configure Elastic Beanstalk to install the required OS packages
To install mysqlclient, you must install the Python3 and MariaDB development libraries on your Elastic Beanstalk instance(s).
Without installing those packages, you’re EB environment creation will fail with errors like:
Getting requirements to build wheel did not run successfully.
Command 'pkg-config --exists mysqlclient' returned non-zero exit status 1.
Command 'pkg-config --exists mariadb' returned non-zero exit status 1.
Exception: Can not find valid pkg-config name.
To do that, create the file .ebextensions/packages.config and add the following:
# .ebextensions/packages.config
packages:
  yum:
    python3-devel: []
    mariadb105-devel.x86_64: []
Amazon Linux 2023 uses DNF as its package manager, replacing YUM. But! If you use dnf: instead of yum: in the config file above, packages will not be installed. They will be silently ignored, even though DNF installs packages, not YUM.
Why am I using mariadb105-devel.x86_64 instead of mariadb-devel? Because that’s the name of the equivalent package on my Amazon Linux 2023 release. You can check available packages by finding the packages page for your Amazon Linux 2023 release and searching there. Or, you can SSH into your EB instance (eb ssh) and check available packages with dnf list available. To search for package names starting with mariadb, try dnf list available mariadb*.
Update database settings to use MySQL in production
Open up task_list/__init__.py and replace the line app.config["SQLALCHEMY_DATABASE_URI"] = "sqlite:///task_list.db" with the following:
# task_list/__init__.py
# ...
if 'RDS_HOSTNAME' in os.environ:
    DATABASE = {
        'NAME': os.environ['RDS_DB_NAME'],
        'USER': os.environ['RDS_USERNAME'],
        'PASSWORD': os.environ['RDS_PASSWORD'],
        'HOST': os.environ['RDS_HOSTNAME'],
        'PORT': os.environ['RDS_PORT'],
    }
    app.config["SQLALCHEMY_DATABASE_URI"] = 'mysql://%(USER)s:%(PASSWORD)s@%(HOST)s:%(PORT)s/%(NAME)s' % DATABASE
else:
    app.config["SQLALCHEMY_DATABASE_URI"] = "sqlite:///task_list.db"
# ...
Notice the RDS_* variables. Later, you will provision an Amazon RDS for MySQL database with Elastic Beanstalk. Elastic Beanstalk provides the connection information to your application when the database is provisioned. It does so by setting the environment variables for the database hostname, port, user name, password, and database name.
SQLite will be used if the RDS_HOSTNAME environment variable is absent (as it is locally).
Finally, import the os package at the top of task_list/__init__.py. The completed file should look like this:
# task_list/__init__.py
import os
from flask import Flask
from task_list.db import db, migrate

def create_app():
    app = Flask(__name__)

    if 'RDS_HOSTNAME' in os.environ:
        DATABASE = {
            'NAME': os.environ['RDS_DB_NAME'],
            'USER': os.environ['RDS_USERNAME'],
            'PASSWORD': os.environ['RDS_PASSWORD'],
            'HOST': os.environ['RDS_HOSTNAME'],
            'PORT': os.environ['RDS_PORT'],
        }
        app.config["SQLALCHEMY_DATABASE_URI"] = 'mysql://%(USER)s:%(PASSWORD)s@%(HOST)s:%(PORT)s/%(NAME)s' % DATABASE
    else:
        app.config["SQLALCHEMY_DATABASE_URI"] = "sqlite:///task_list.db"

    db.init_app(app)
    migrate.init_app(app, db)

    from . import models

    from . import routes
    app.register_blueprint(routes.bp)

    return app
Configure Elastic Beanstalk to run database migrations
To run the database migrations when deploying on Elastic Beanstalk, create the file .ebextensions/container-commands.config and add the following:
# .ebextensions/container-commands.config
container_commands:
  01_migrate:
    command: "flask db upgrade"
    leader_only: true
The leader_only attribute states that a particular resource or action should be executed only on the environment’s leader instance. The leader instance is the instance that manages the Elastic Beanstalk environment, such as handling deployments, scaling, and managing other resources.
If the FLASK_APP=application.py environment variable has not been set, later creating your EB environment will fail with an error, Error occurred during build: Command 01_migrate failed, because of EB being unable to locate the Flask app.
MySQL configuration is now complete. The final step before deploying your app is committing your code with Git.
Commit your code with Git
The EB CLI integrates with Git, allowing us to commit our code and deploy.
Create a .gitignore file to exclude unwanted files from your Git repository. Add the following to .gitignore:
venv/
.env
*.pyc
__pycache__/
instance/

# macOS file
.DS_Store
Now, initialize a Git repository, then stage and commit all files:
(venv) $ git init
(venv) $ git add .
(venv) $ git commit -m 'Initial commit'
Your Flask app is finally ready to be deployed to Elastic Beanstalk.
Deploy your Flask app with Elastic Beanstalk
Deploying your app to EB involves two steps:
- Initialize an Elastic Beanstalk application
- Create and deploy an Elastic Beanstalk environment
Initialize an Elastic Beanstalk Application
Next, you’ll initialize an Elastic Beanstalk Application. Back in your terminal, run:
(venv) $ eb init -p python-3.11 flask-memcache --region us-east-1If you want to add an SSH key, add the --key option to the eb init command.
Python 3.11 is the latest version supported on the Elastic Beanstalk Python platform at the time of writing.
I’m using us-east-1 as my AWS region. You can specify another if you prefer.
Running eb init creates the directory and file .elasticbeanstalk/config.yml with the config you specified and adds a few Elastic Beanstalk-related entries to your .gitignore file.
eb init also creates an Application on Elastic Beanstalk. I find the EB Application naming confusing and prefer to consider it an EB project. An EB Application can contain multiple Environments. Your Flask application is run within an Environment that lives in an Application: EB Application → EB Environment → My application.
Create an Elastic Beanstalk Environment
Next, create an Elastic Beanstalk Environment and deploy your Flask application to it:
(venv) $ eb create flask-env -db.engine mysql -db.i db.t2.microNotice we’re adding a MySQL database to our EB environment with -db.engine mysql and are setting the database instance size to a t2.micro with -db.i db.t2.micro. A small size is sufficient for development purposes.
You’ll be prompted for a username and password for the database. You can set the username and password to whatever you like, but when choosing your password, AWS does not handle symbols very well (! $ @, etc.), and using them can cause unexpected behavior. Stick to letters and numbers, and make sure the password is at least eight characters long.
That eb create command will create an AWS Relational Database Service (RDS) instance associated with this application. When you terminate this application, the database instance will also be destroyed. If you need an RDS instance independent of your Elastic Beanstalk application, create one via the AWS RDS interface.
By default, AWS regions have default VPCs. However, if, for some reason, the AWS region you’re creating in does not have a default VPC, creation will fail with an error like:
'CREATE_FAILED' Reason: The following resource(s) failed to create: [AWSEBLoadBalancer]. Default VPC not found. The solution is to create a default VPC in the region.
This environment creation process will take about five to fifteen minutes. Once it’s complete, run the following command to open your app in a browser:
(venv) $ eb openYour app should look and work the same as it does locally.
Check the logs if you get a 50X error when you open the application. They’re in the EB console in the side menu labeled Logs. Or view them in your terminal with eb logs.
For subsequent deployments, you will commit your code to Git and run eb deploy. eb create creates your EB environment and deploys your code, so there’s no need to run eb deploy after eb create if no changes have been made.
Create and configure a cache
Memcache is an in-memory, distributed cache. Its primary API consists of SET(key, value) and GET(key). Memcache is like a hashmap (or dictionary) spread across multiple servers, where operations are still performed in constant time.
The most common use for Memcache is to cache the results of resource-intensive computations, database queries, and HTML renders so that these expensive operations don’t need to happen repeatedly.
Create a MemCachier cache
To use Memcache in Flask, you must first provision an actual Memcached cache. You can get one for free from MemCachier. MemCachier provides easy-to-use, performant caches compatible with the popular Memcached protocol. It allows you to use a cache without setting up and maintaining actual Memcached servers yourself.
Head over to MemCachier, sign up for an account, and create a free
development cache, selecting Amazon Web Services as the provider and choosing the same region as your Elastic Beanstalk environment. If you chose the same as me earlier, that is US East (N. Virginia), us-east-1.
If you need to find your EB region, open .elasticbeanstalk/config.yml and look for the default_region property. Your cache must be in the same region as your app, so latency is as low as possible.
You’ll need three configuration variables for your application to connect to your cache: MEMCACHIER_SERVERS, MEMCACHIER_USERNAME, and MEMCACHIER_PASSWORD. You need to add these as Elastic Beanstalk environment variables.
Configure Elastic Beanstalk to use your cache
In your terminal window, set your MemCachier configuration values as Elastic Beanstalk environment variables with the following command:
(venv) $ eb setenv MEMCACHIER_USERNAME=<username> MEMCACHIER_PASSWORD=<password> MEMCACHIER_SERVERS=<servers>For example, eb setenv MEMCACHIER_USERNAME=1E4630 MEMCACHIER_PASSWORD=E9692E5BA662E5AD55477ED1FC5EF9B3 MEMCACHIER_SERVERS=mc3.dev.ec2.memcachier.com:11211
To add multiple servers, comma-separate values. For example, MEMCACHIER_SERVERS=mc3.prod.ec2.memcachier.com:11211,mc4.prod.ec2.memcachier.com:11211.
We can confirm that they’ve been set by running:
(venv) $ eb printenvThen, you must install the pylibmc Python package as a dependency.
(venv) $ python -m pip install pylibmcInstall libmemcached on Amazon Linux 2023
You must also install libmemcached, which pylibmc depends on. In Amazon Linux 2 and earlier, that could be achieved by adding libmemcached-devel as a package to be installed in your .ebextensions/packages.config file. However, Amazon Linux 2023 does not include a libmemcached package, so libmemcached must be installed from source.
To install libmemcached on Amazon Linux 2023, create the file .ebextensions/commands.config and add the following:
# .ebextensions/commands.config
commands:
  command block:
    command: |
      wget https://github.com/awesomized/libmemcached/archive/refs/heads/v1.x.zip
      unzip v1.x.zip
      mkdir build-libmemcached
      cd $_
      cmake ../libmemcached-1.x
      make
      sudo make install
      cd ..
      sudo rm -rf build-libmemcached libmemcached-1.x v1.x.zip
These commands will be run before the application and web server are set up. EB extension commands differ from container commands, which run after the application and web server have been set up. For example, you used a container command in .ebextensions/container-commands.config when flask db upgrade is run. Read more about customizing software on Linux servers on EB.
libmemcached-awesome is an open source C/C++ client library and tools for the memcached server. It is a resurrection of the original work from Brian Aker at libmemcached.org and is actively maintained.
I recommend you verify the ZIP URL is up to date by going to the libmemcached-awesome GitHub page, clicking the green <> Code button, then copy the Download ZIP link.
The following explains each libmemcached install command:
- wget …: Fetch the source code as a ZIP file from the libmemcached-awesome GitHub repo.
- unzip v1.x.zip: Unzip the downloaded ZIP file.
- mkdir build-libmemcached: Create a folder for building libmemcached from source.
- cd $_: Change into the newly created folder.
- cmake ../libmemcached-1.x: Configure and generate build files.
- make: Compile and build.
- sudo make install: Install.
- cd ..: Move to the parent directory.
- sudo rm -rf …: Clean up.
Configure Flask to use your cache
In this step, you’ll install Flask-Caching, a Flask extension that provides caching support.
(venv) $ python -m pip install Flask-CachingThen update your requirements.txt file again:
(venv) $ pip freeze > requirements.txtNext, open task_list/__init__.py and make the following changes:
# task_list/__init__.py
# ...
from flask_caching import Cache

cache = Cache()
# ...

def create_app():
    # ...

    if 'MEMCACHIER_SERVERS' in os.environ:
        cache.init_app(app,
            config={'CACHE_TYPE': 'SASLMemcachedCache',
                    'CACHE_MEMCACHED_SERVERS': os.environ['MEMCACHIER_SERVERS'].split(','),
                    'CACHE_MEMCACHED_USERNAME': os.environ['MEMCACHIER_USERNAME'],
                    'CACHE_MEMCACHED_PASSWORD': os.environ['MEMCACHIER_PASSWORD'],
                    'CACHE_OPTIONS': { 'behaviors': {
                        # Faster IO
                        'tcp_nodelay': True,
                        # Keep connection alive
                        'tcp_keepalive': True,
                        # Timeout for set/get requests
                        'connect_timeout': 2000, # ms
                        'send_timeout': 750 * 1000, # us
                        'receive_timeout': 750 * 1000, # us
                        '_poll_timeout': 2000, # ms
                        # Better failover
                        'ketama': True,
                        'remove_failed': 1,
                        'retry_timeout': 2,
                        'dead_timeout': 30}}})
    else:
        cache.init_app(app, config={'CACHE_TYPE': 'simple'})

  return app
These changes import the Flask-Caching extension, then initialize and configure it with your Flask app.
If a MEMCACHIER_SERVERS environment variable is present, the SASLMemcachedCache cache type is used and configured to use your MemCachier cache. Otherwise, the simple cache type is used. The simple cache type is a basic, in-memory cache that stores cached data in the application’s memory.
The behaviors settings passed to CACHE_OPTIONS are pylibmc behaviors, which are more or less one-to-one mappings of libmemcached behavior constants. The settings are our recommended starting configuration.
Next, that setup is complete, you’re ready to implement caching in Flask.
Implement caching in Flask
You’ll now implement several caching techniques in Flask: caching expensive database queries, Jinja snippets, entire views, and sessions.
Cache expensive database queries
Memcache is often used to cache expensive database queries. This simple app doesn’t include any expensive queries, but for learning, let’s assume that getting all tasks from the database is resource-intensive.
To cache the task query (Task.query.all()), make the following changes in task_list/routes.py:
# task_list/routes.py
# ...
from task_list import cache

# ...

@bp.route('/', methods=('GET', 'POST'))
def index():
    # ...

    tasks = cache.get('all_tasks')
    if tasks == None:
        tasks = Task.query.all()
        cache.set('all_tasks', tasks)
    return render_template('index.html', tasks=tasks)

# ...
Deploy and test this new functionality:
(venv) $ git add .
(venv) $ git commit -m 'Add caching with MemCachier'
(venv) $ eb deploy
(venv) $ eb open
View Memcache statistics
To help demystify Memcache caching operations, it’s helpful to visualize what’s going on under the hood.
Though very cumbersome, one way to do that is to telnet into a Memcached server and run the stats command to see changes as operations are performed on your cache.
With MemCachier, however, you get an analytics dashboard that displays your cache’s statistics so you can monitor performance and troubleshoot issues quickly and easily.
To open your MemCachier analytics dashboard, log in to your MemCachier account, click Caches, then click the Analytics button for your cache.
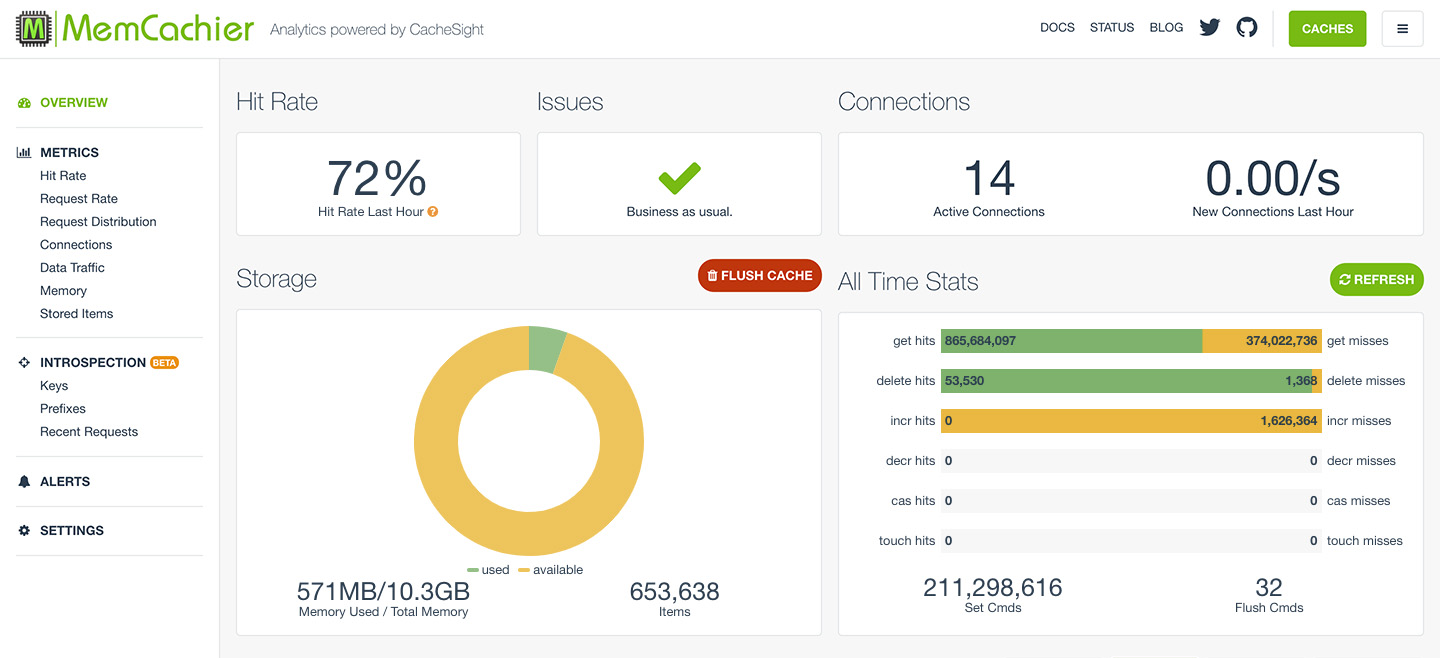
The first time you loaded your task list, you should have gotten an increase for get misses and Set Cmds commands. Every subsequent reload of the task list should increment get hits.
Our cache is working, but there is a significant problem. Add a new task and see what happens. No new task appears on the tasks list! The new task was created in the database, but the app serves the stale task list from the cache.
Clear stale data: Cache invalidation
When caching, it’s essential to invalidate stale data. In this case, the cached task list becomes stale whenever a new task is added, or an existing task is removed. You need to ensure the cache is invalidated whenever one of these actions is performed.
You achieve this by deleting the all_tasks key whenever a task is created or deleted in task_list/routes.py:
# task_list/routes.py
# ...

@bp.route('/', methods=('GET', 'POST'))
def index():
    if request.method == 'POST':
        name = request.form['name']
        db.session.add(Task(name=name))
        db.session.commit()
        cache.delete('all_tasks') # add this line

    # ...

@bp.route('/<int:id>/delete', methods=('POST',))
def delete(id):
    task = Task.query.get(id)
    if task != None:
        db.session.delete(task)
        db.session.commit()
        cache.delete('all_tasks') # add this line
    return redirect(url_for('task_list.index'))
Commit and deploy the fixed task list:
(venv) $ git add .
(venv) $ git commit -m 'Clear stale data from cache'
(venv) $ eb deploy
All tasks added since implementing caching will appear when you add or delete a task.
Use the Memoization decorator
The caching strategy above (try to obtain a cached value and add a new value to the cache if missing) is so common that Flask-Caching has a decorator for it called memoize. In this step, you’ll update the caching code for the tasks database query to use the memoize decorator.
First, put the task query into a function called get_all_tasks and decorate it with the memoize decorator.
Next, replace the deletion of stale data with cache.delete_memoized(get_all_tasks).
After making these changes, task_list/routes.py should look as follows:
# task_list/routes.py
# ...

@cache.memoize()
def get_all_tasks():
    return Task.query.all()

@bp.route('/', methods=('GET', 'POST'))
def index():
    if request.method == 'POST':
        name = request.form['name']
        db.session.add(Task(name=name))
        db.session.commit()
        cache.delete_memoized(get_all_tasks)

    tasks = get_all_tasks()
    return render_template('task_list/index.html', tasks=tasks)

@bp.route('/<int:id>/delete', methods=('POST',))
def delete(id):
    task = Task.query.get(id)
    if task != None:
        db.session.delete(task)
        db.session.commit()
        cache.delete_memoized(get_all_tasks)
    return redirect(url_for('task_list.index'))
Deploy the memoized cache list and make sure the functionality has not changed:
(venv) $ git add .
(venv) $ git commit -m 'Cache data using memoize decorator'
(venv) $ eb deploy
Because the get_all_tasks function doesn’t take any arguments, you can also
decorate it with @cache.cached(key_prefix='get_all_tasks') instead of
@cache.memoize() to be slightly more concise.
Cache Jinja snippets
With the help of Flask-Caching, you can cache Jinja snippets in Flask. Snippet caching is similar to fragment caching in Ruby on Rails. If you have complex Jinja snippets in your application, it’s a good idea to cache them because rendering HTML can be CPU-intensive.
Do not cache fragments that include forms with CSRF tokens. If you cache a template that includes a CSRF token, that token will be reused for all subsequent requests for all sessions. That means the token would be valid for a single request for the user whose token was cached. All other requests would include the invalid token and would be rejected.
To cache each rendered task, wrap the task HTML in {% cache <timeout>, <key> %}...{% endcache %}. Open task_list/templates/index.html and make the following changes:
<!-- task_list/templates/index.html -->
<!-- ... -->

{% for task in tasks %}
  {% cache None, 'task-fragment', task['id']|string %}
    <li>
      <!-- ... -->
    </li>
  {% endcache %}
{% endfor %}

<!-- ... -->
In the opening {% cache ... %} block, the timeout is None, and the key is a list of strings that will be concatenated. task['id']|string is a dynamic component of the cache key. It converts the id attribute from the task object to a string, ensuring that each task’s cache key is unique. As long as task IDs are never reused, this is all there is to caching rendered snippets.
If you use a database that does reuse IDs (such as SQLite), you must delete the fragment when its respective task is deleted. You can do this by adding the following code to the task deletion logic:
from flask_caching import make_template_fragment_key
key = make_template_fragment_key("task-fragment", vary_on=[str(task.id)])
cache.delete(key)
Commit and deploy your changes to see the effect of caching the Jinja snippets:
(venv) $ git add .
(venv) $ git commit -m 'Cache task entry fragment'
(venv) $ eb deploy
You should now observe an additional get hit for each task in your list whenever you reload the page (except the first reload).
Cache entire views
You can go one step further and cache the output of entire views in addition to fragments. This should be done carefully because it can result in unintended side effects if a view frequently changes or contains forms with CSRF tokens, as explained earlier. In your app, the cached view needs to be cleared when a task is added or deleted.
Cache the task list view with the @cache.cached() decorator in task_list/routes.py:
# task_list/routes.py
# ...

def is_post():
    return (request.method == 'POST')

@bp.route('/', methods=('GET', 'POST'))
@cache.cached(unless=is_post)
def index():
    # ...

# ...
The @cache.cached() decorator must be directly above the definition of the index() function (i.e., below the @bp.route() decorator).
Since it’s only desirable to cache the result of the index() function when you GET the view, the POST request is excluded with the unless parameter. You could alternatively separate the GET and POST routes into two different functions.
To delete a cached view, you first need its key. By default, the @cache.cached()
decorator uses a key of the form 'view/' + request.path,. The cached path is / in this case, so the key becomes view//. Open task_list/routes.py and call cache.delete('view//') when a task is added or deleted:
# task_list/routes.py
# ...
@bp.route('/', methods=('GET', 'POST'))
@cache.cached(unless=is_post)
def index():
    if request.method == 'POST':
        name = request.form['name']
        db.session.add(Task(name=name))
        db.session.commit()
        cache.delete_memoized(get_all_tasks)
        cache.delete('view//') # add this line

    tasks = get_all_tasks()
    return render_template('index.html', tasks=tasks)

@bp.route('/<int:id>/delete', methods=('POST',))
def delete(id):
    task = Task.query.get(id)
    if task != None:
        db.session.delete(task)
        db.session.commit()
        cache.delete_memoized(get_all_tasks)
        cache.delete('view//')  # add this line
    return redirect(url_for('task_list.index'))
To see the effect of view caching, deploy your application:
(venv) $ git add .
(venv) $ git commit -m 'Cache task list view'
(venv) $ eb deploy
On the first refresh, you should see the get hits counter increase according to the number of tasks you have and an additional get misses and Set Cmds, which correspond to the view that is now cached. Any subsequent reload will increase the get hits counter by just one because the entire view is retrieved with a single get command.
If you used the Recent Requests feature on the MemCachier analytics dashboard (available on plans > 1 GB), you would see logs like the following:
# output
# @cache.memoize()
2023-09-08T13:42:52Z SET  OK 63B  flask_cache_task_list.routes.get_all_tasks_memver
2023-09-08T13:42:52Z SET  OK 746B flask_cache_TtpwYB09R/H5laTRAXiPL1

# {% cache None, 'task-fragment', task['id']|string %}
2023-09-08T13:42:52Z SET  OK 255B flask_cache__template_fragment_cache_task-fragment_1
2023-09-08T13:42:52Z SET  OK 253B flask_cache__template_fragment_cache_task-fragment_2
2023-09-08T13:42:52Z SET  OK 253B flask_cache__template_fragment_cache_task-fragment_3

# @cache.cached(unless=is_post)
2023-09-08T13:42:54Z GETK OK 2KB  flask_cache_view//
Notice all Flask cache keys are prefixed with flask_cache_.
Note that view caching does not make the caching of expensive operations or Jinja snippets redundant. It is good practice to cache smaller operations within cached larger operations or smaller Jinja snippets within larger Jinja snippets. This technique (called Russian doll caching) helps with performance if a larger operation, snippet, or view is removed from the cache because the building blocks do not have to be recreated from scratch.
Using Memcache for session storage
Memcache works well for storing information for short-lived sessions that time out. However, because Memcache is a cache and therefore not persistent, long-lived sessions are better suited to permanent storage options, such as your database.
To store sessions in Memcache, you need Flask-Session, a Flask extension that allows you to store session data in different backends:
(venv) $ python -m pip install Flask-Session
(venv) $ pip freeze > requirements.txt
Then, configure Flask-Session in task_list/__init__.py:
import pylibmc
from flask_session import Session

# ...

def create_app():
    # ...

    if 'MEMCACHIER_SERVERS' in os.environ:
        # ...

        app.config.update(
            SESSION_TYPE = 'memcached',
            SESSION_MEMCACHED =
                pylibmc.Client(os.environ['MEMCACHIER_SERVERS'].split(','), binary=True,
                               username=os.environ['MEMCACHIER_USERNAME'], password=os.environ['MEMCACHIER_PASSWORD'],
                               behaviors={
                                    # Faster IO
                                    'tcp_nodelay': True,
                                    # Keep connection alive
                                    'tcp_keepalive': True,
                                    # Timeout for set/get requests
                                    'connect_timeout': 2000, # ms
                                    'send_timeout': 750 * 1000, # us
                                    'receive_timeout': 750 * 1000, # us
                                    '_poll_timeout': 2000, # ms
                                    # Better failover
                                    'ketama': True,
                                    'remove_failed': 1,
                                    'retry_timeout': 2,
                                    'dead_timeout': 30,
                               })
        )
    else:
        # ...

    Session(app)

    # ...
The behaviors settings mirror our recommended values used earlier when configuring your cache. See the pylibmc documentation to learn more.
Our task list app does not have any use for sessions, but you could test sessions in your app like so:
from flask import session
session['key'] = 'value'
session.get('key', 'not set')
This session import is part of Flask’s core functionality for session management. It provides access to the current user session within your Flask routes and views.
Again, if you used the MemCachier Recent Requests feature, you would see GETK and SET requests for keys like session:3e4c590b-8945-449c-a02f-bfbc008948e.
Profiling Memcache performance
In this guide, you learned how to cache expensive database queries, snippets, full views, and sessions. It is useful to know how our cache is performing as a whole and how individual parts work.
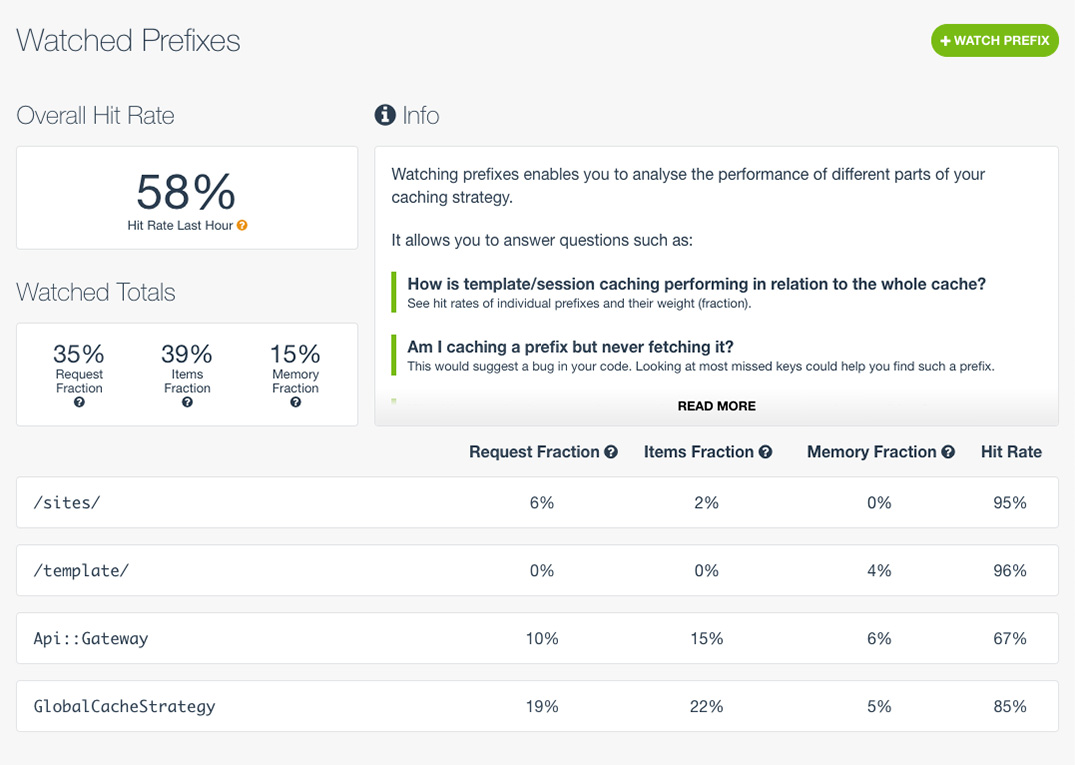
Notice in each caching strategy you implemented, keys had a prefix, flask_cache__template_fragment_cache_, flask_cache_view/ and session:. These key prefixes have the benefit of allowing you to profile cache performance. MemCachier’s paid plans (> 1 GB) come with a powerful feature set called Introspection, allowing you to track the performance of individual prefixes, giving you deep insight into your cache. For example, you could monitor the hit rate, or hit ratio, of any prefix.
Clean up
Once you’re done with this tutorial and no longer need your app, you can clean up your Elastic Beanstalk Application and Environment by using:
(venv) $ eb terminate --allOnly your Environment will be terminated without the -all option.
You can also destroy your MemCachier cache from the Caches dashboard if you no longer need it.