Configure W3 Total Cache to use Memcached with SASL Authentication on AWS Lightsail
In this tutorial, you’ll install WordPress on AWS Lightsail. You’ll then install the W3 Total Cache WordPress plugin and configure it to use Memcached with SASL authentication, using a Memcached-compliant cache provisioned by MemCachier. By the end of the tutorial, you will have a fully functional WordPress site running on Amazon Lightsail with enhanced performance thanks to the W3 Total Cache plugin and Memcached.
Outline
- Prerequisites
- Install WordPress on Amazon Lightsail
- Install the W3 Total Cache plugin
- Provision a Memcached-compliant cache with MemCachier
- Add a Lightsail firewall rule to allow it to connect to your cache
- Configure W3 Total Cache to use Memcached
- Configure the W3 Total Cache Object Cache
- Check Memcached is working
- Conclusion
Prerequisites
Before you complete the steps in this tutorial, make sure you have the following:
- Familiarity with WordPress.
- An AWS account.
Install WordPress on Amazon Lightsail
Lightsail is the easiest way to install WordPress on AWS. You’ll have a WordPress website up and running in a few clicks.
Log in to your AWS account and go to the Lightsail dashboard. You can use the search bar at the top of the AWS console to find it.
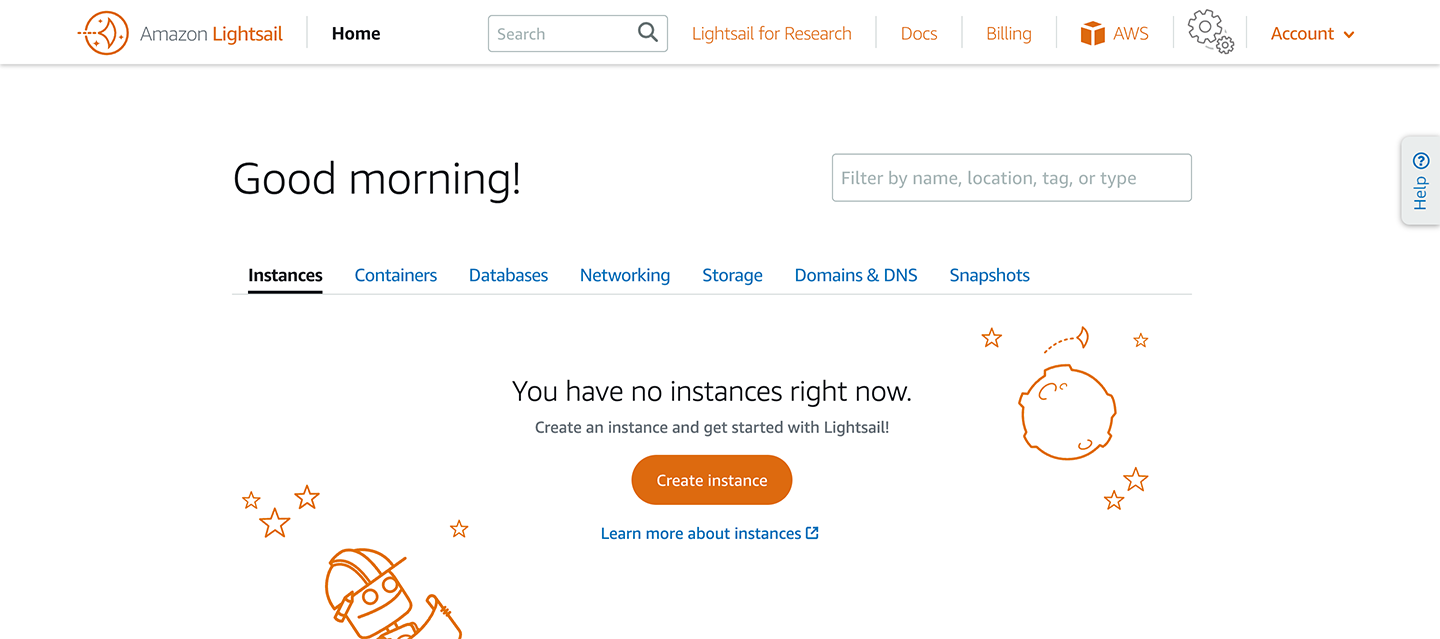
Next, on the Lightsail dashboard, click Create instance.
On the Create instance page, choose the following options. All of these are currently already the default settings, apart from setting a more descriptive instance name:
- Select your instance location. For this tutorial, I’ll use Virginia (us-east-1) and leave the Availability Zone as the default Zone A (us-east-1a).
- Select Linux/Unix as your platform.
- select WordPress as your blueprint.
- Leave the SSH key pair set to the default SSH key. The default SSH key allows you to use the Lightsail in-browser terminal feature later in this tutorial. You can set your own key pair if you’re familiar with connecting to an EC2 instance via SSH and wish to do so.
- Choose your instance plan next. The most inexpensive plan is more than sufficient for this tutorial.
- Under Identify your instance, enter a name. I’ll be using WordPress-Memcached.
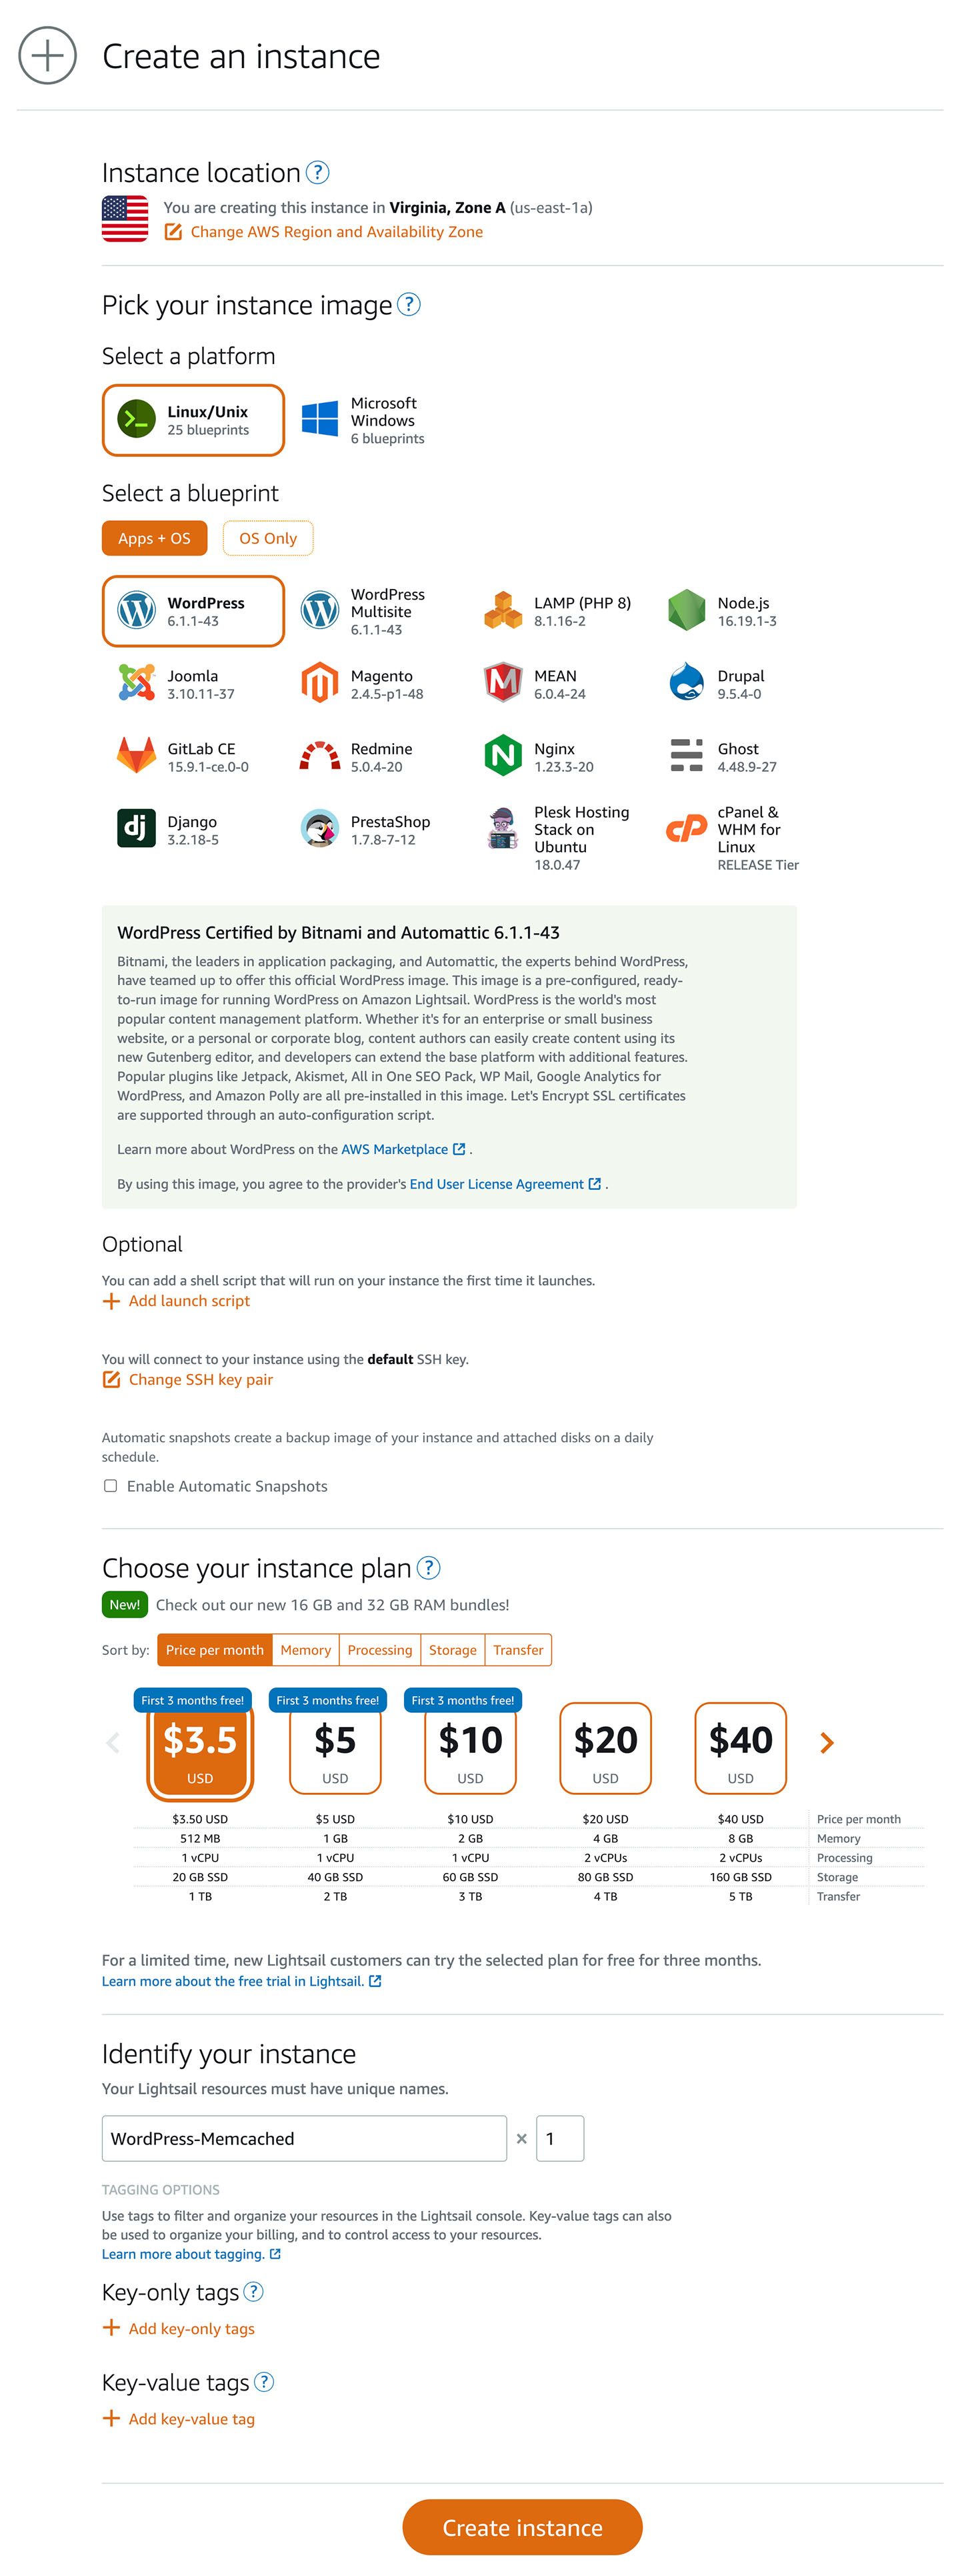
Finally, click Create instance.
You’ll be redirected to the Lightsail dashboard, where your new instance will appear with the status Pending. The status should change to Running within a minute or two. Your Lightsail instance has been provisioned with WordPress installed.
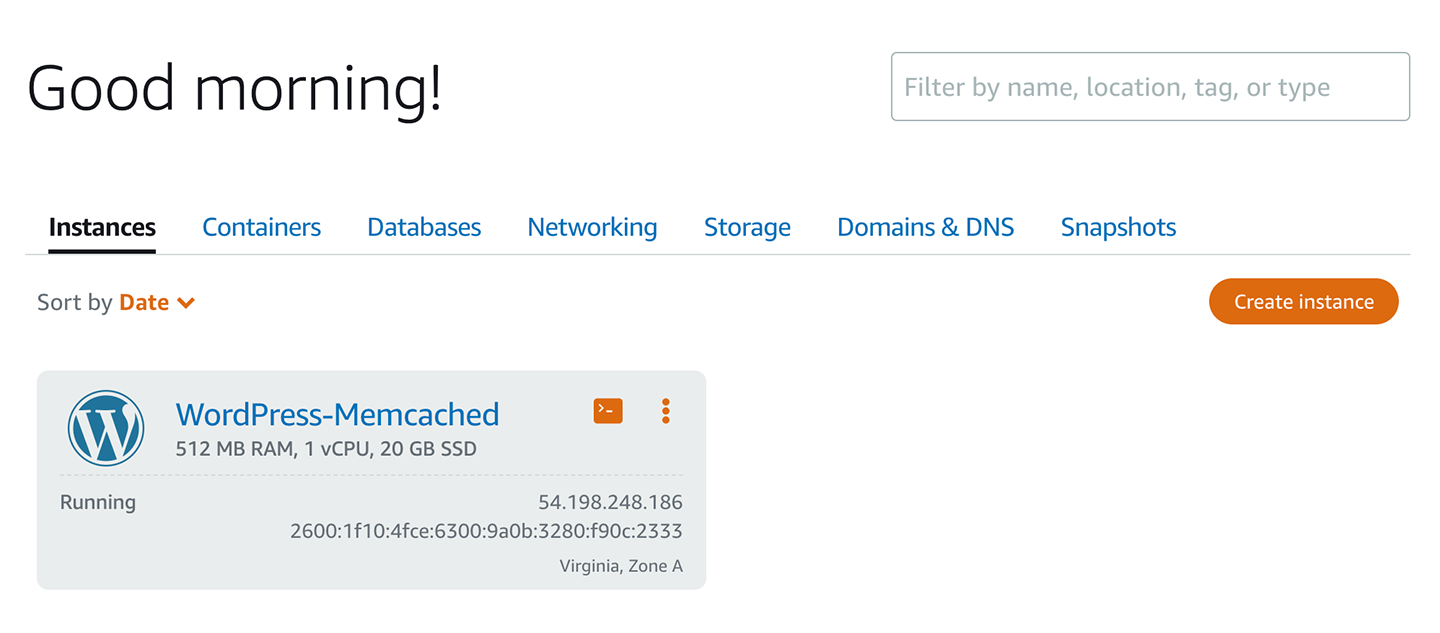
To finish setting up WordPress on Lightsail, you’ll attach a static IP to your instance and get your WordPress Admin password.
Attach a static IP to your Lightsail instance
In this step, you’ll attach a static IP to your Lightsail instance so it can always be accessed at the same IP. Without a static IP, your instance IP would change on server reboots.
To attach a static IP, click on the name of your WordPress-Memcached instance, then click the Networking tab.
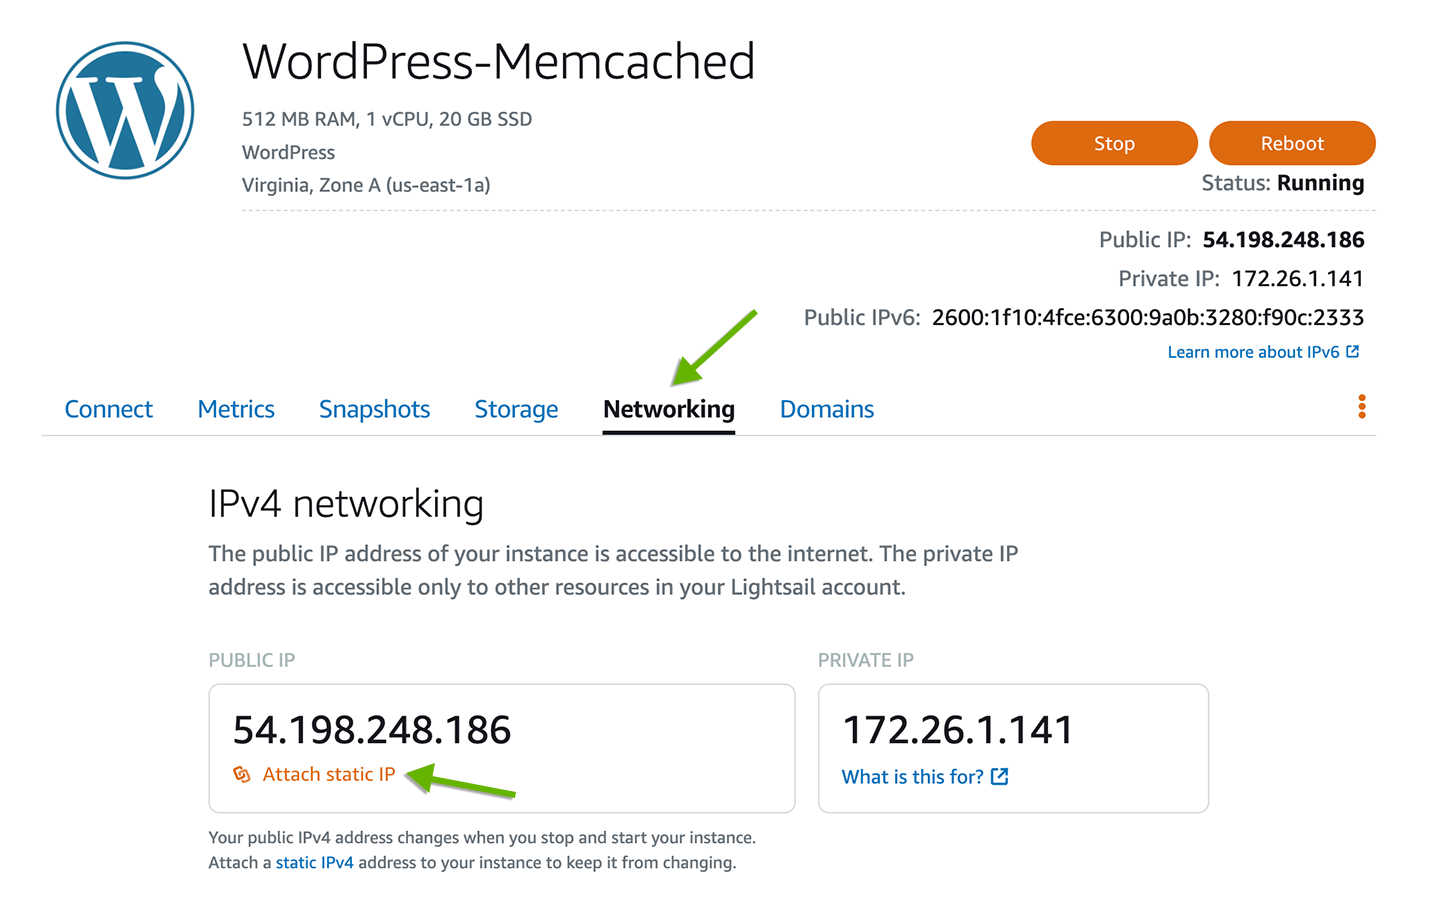
Under the PUBLIC IP card, you’ll see your current instance IP, and right underneath that, a link to Attach static IP. Click Attach static IP, and give the IP a name. I’ll use WordPress-Memcached-StaticIP. Then, click Create and attach.
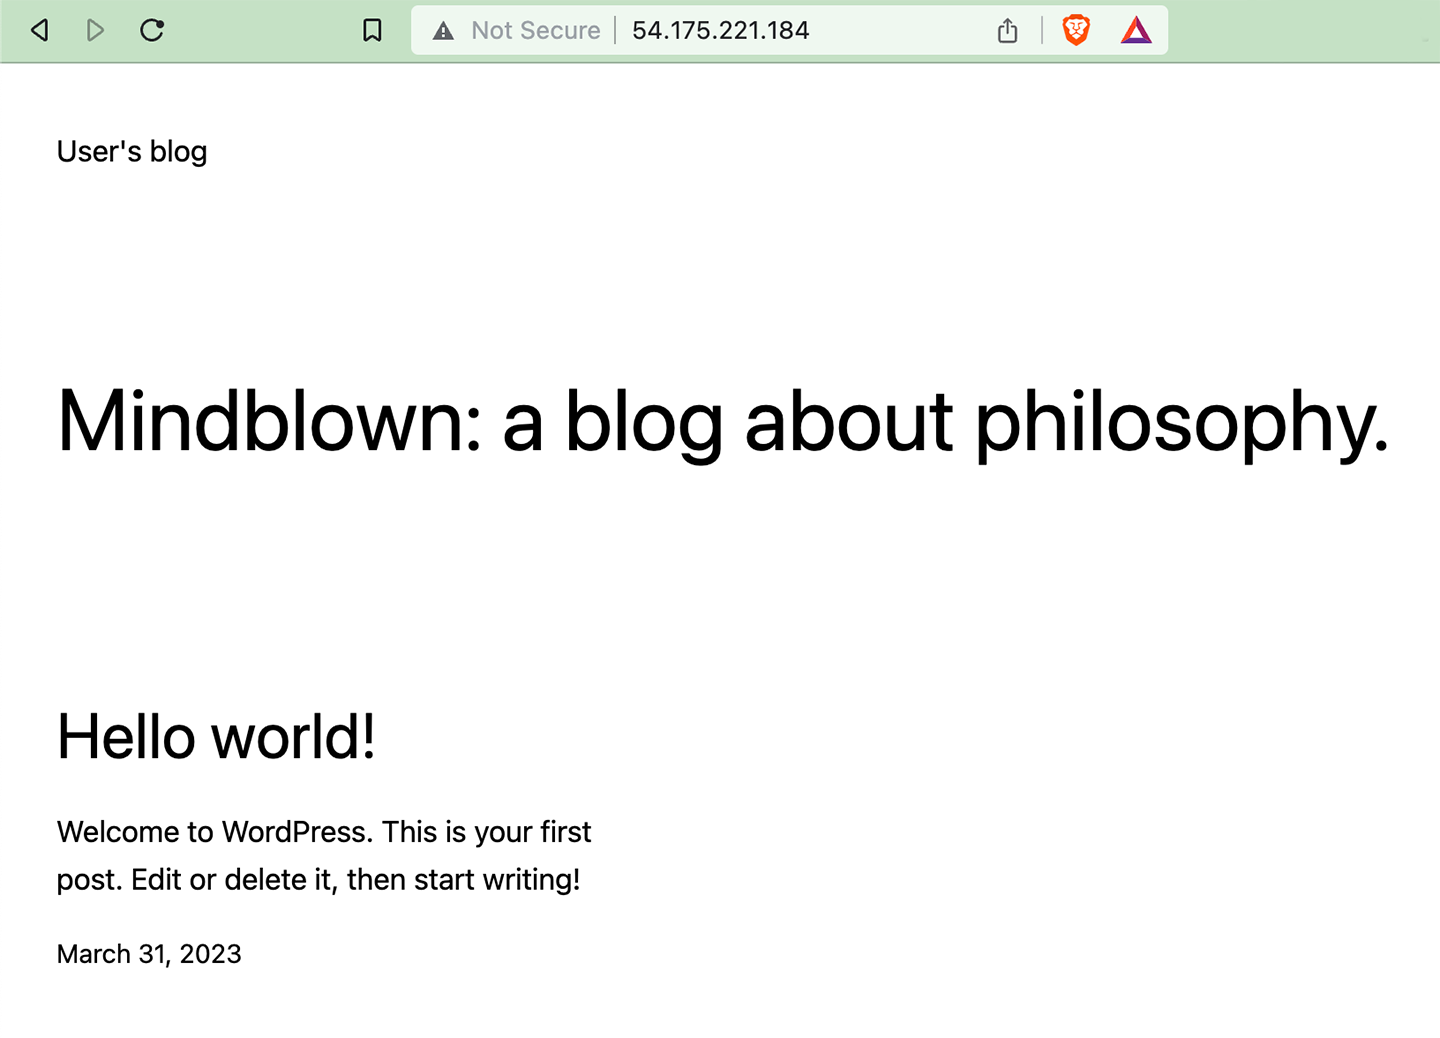
You’ll then see your new static IP, which will look something like 54.175.221.184. Copy and paste it into your browser address bar to visit your WordPress website.
Get your Lightsail WordPress password
An admin user, named user, is automatically created for you when Lightsail installs WordPress.
To retrieve your Bitnami WordPress Admin password, you must establish an SSH connection. Fortunately, Lightsail provides an in-browser terminal allowing you to connect directly to your instance from your Lightsail instance dashboard. Alternatively, you can connect to your instance via SSH from a standard terminal.
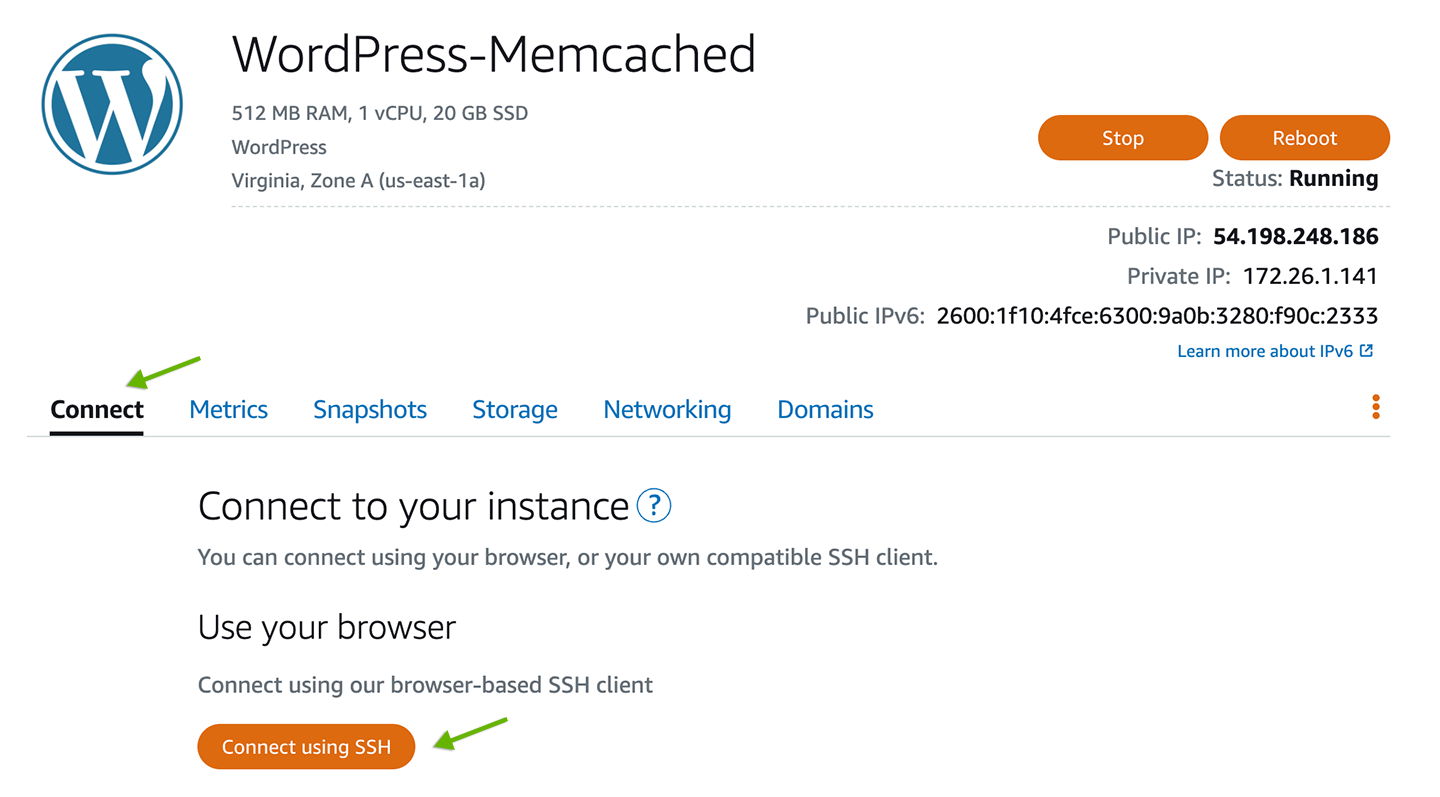
Still on your Lightsail instance dashboard, click the Connect tab. Then, click Connect using SSH to open up a terminal in a new browser window.
To get your password, enter the following command in the terminal and press the Enter key.
cat $HOME/bitnami_application_passwordIt will output your WordPress admin user’s password.
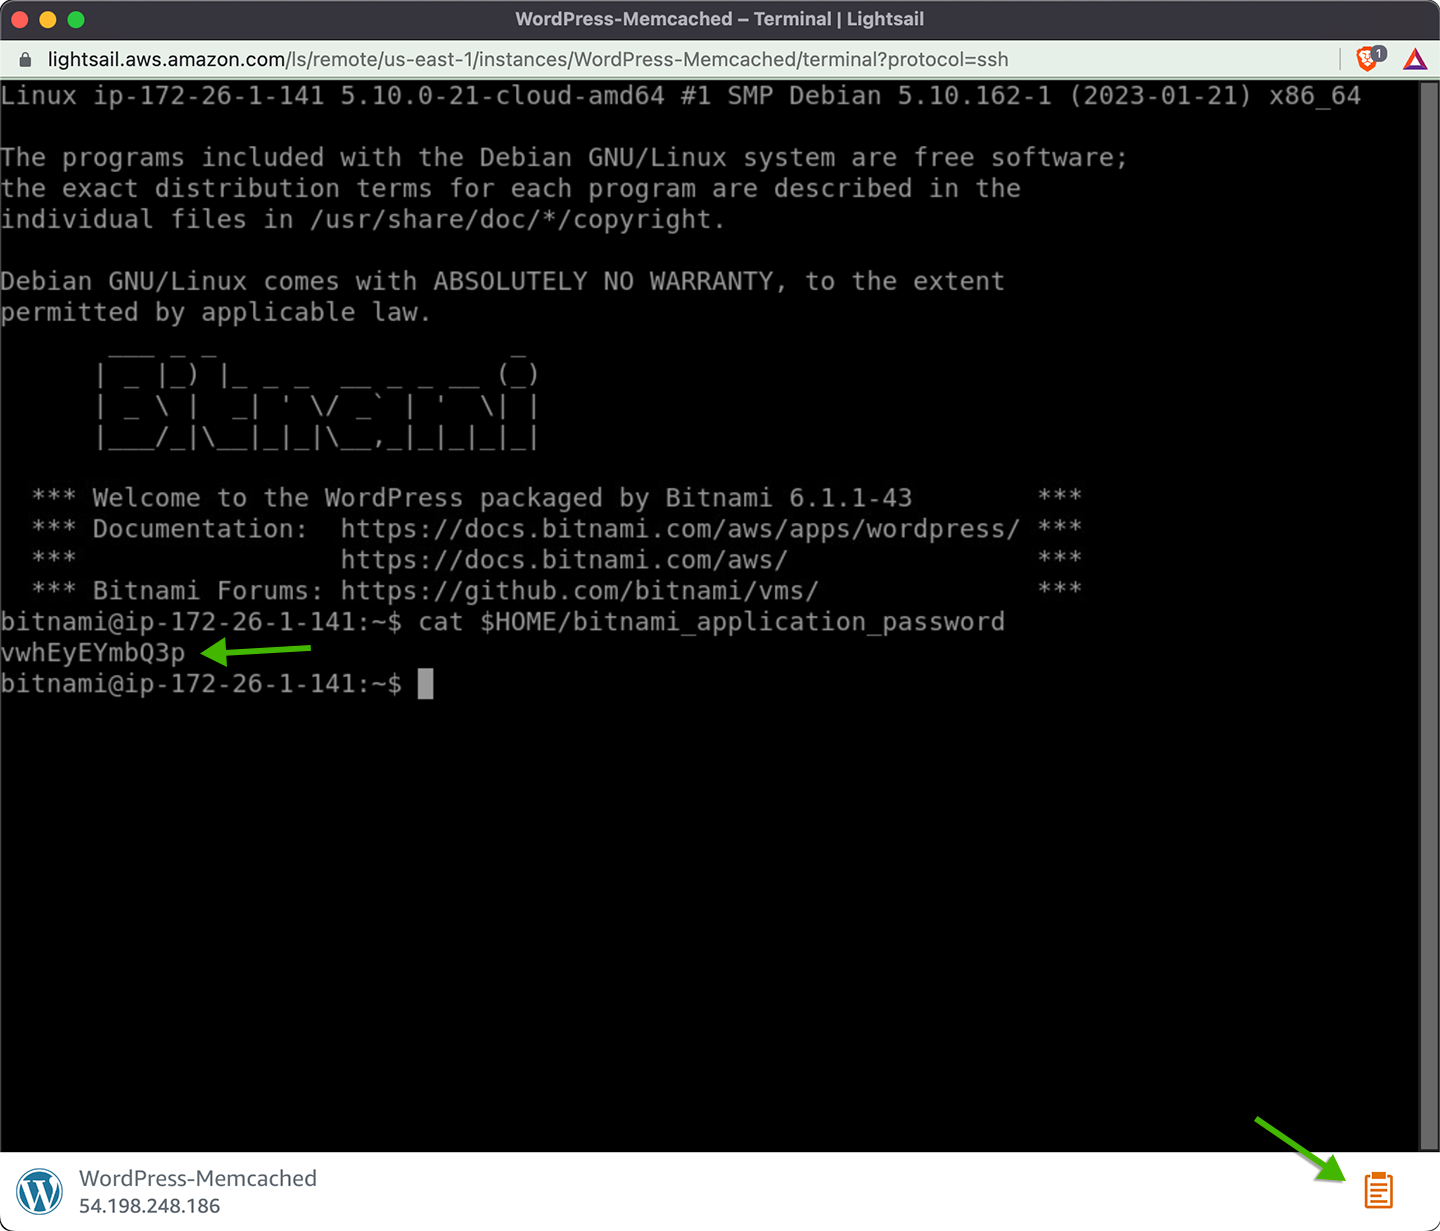
Because of limitations with the in-browser terminal window, you can’t highlight the password and copy it as usual. To copy the password, click the clipboard icon, which is found at the bottom-right of the terminal window. It will open up a remote clipboard with the password.
You can close the terminal once you’ve copied the password.
You now have everything you need to log in to the WordPress Admin.
Open the WordPress Admin in your browser at <your static IP>/wp-admin. For example, 54.175.221.184/wp-admin. Then, log in with your username, user, and the password you just copied from the terminal.
With that, your WordPress on Lightsail setup is complete.
Install the W3 Total Cache plugin
W3 Total Cache is a widely used WordPress plugin that provides website owners with various features to optimize site performance. The plugin improves website speed, user experience, and search engine rankings by caching pages and posts, minifying CSS and JavaScript, and integrating with content delivery networks (CDNs). By installing the W3 Total Cache plugin, website owners can significantly reduce page load times, enhance the site’s responsiveness, and ultimately provide a better browsing experience to their visitors.
To install the W3 Total Cache plugin, from the WordPress Admin, click on Plugins, then Add New.
Search for W3 Total Cache. At the time of writing, the W3 Total Cache plugin is installed by default in the WordPress Bitnami image that is used to install WordPress on Lightsail. Because of that, you’ll see an Activate button, which would otherwise be Install Now. If the plugin needs to be updated, you’ll see Update Now.

Click Update Now if present, then click Activate to activate the plugin.
Fix the wp-config.php write permissions error
After activating the plugin, you’ll likely see the following error messages. Both error messages originate from the same issue: the file wp-config.php is configured by the Bitnami WordPress image as not writable, and the W3 Total Cache plugin wants to write to it but is unable to do so.
FTP credentials don’t allow to write to file /opt/bitnami/wordpress/wp-config.php
And:
W3 Total Cache Error: Files and directories could not be automatically created to complete the installation. Please execute commands manually (View required changes) or use FTP form to allow W3 Total Cache make it automatically. (Update via FTP)

There are a couple of solutions to this issue.
One solution is to change permissions for wp-config.php to make it writeable. Then, refresh the WordPress Admin so W3 Total Cache can try to write to the file again. And finally, to revert permissions for wp-config.php.
A simpler and less error-prone method is to make the changes manually by editing wp-config.php. To do that, click the View required changes button. It should display the following instructions:
Edit file /opt/bitnami/wordpress/wp-config.php and add the following lines:
/** Enable W3 Total Cache */
define('WP_CACHE', true); // Added by W3 Total Cache

Copy those lines. Then, back on your Lightsail instance dashboard, from the Connect tab, click Connect using SSH again.
Edit wp-config.php by running the following command:
nano $HOME/stack/wordpress/wp-config.phpThat command will open wp-config.php in the nano text editor.
Use the down arrow key to move the cursor to the line // ** Database settings - You can get this info from your web host ** //. Just before that line, paste in the W3 Total Cache lines:
// wp-config.php
// ...

/** Enable W3 Total Cache */
define('WP_CACHE', true); // Added by W3 Total Cache

// ** Database settings - You can get this info from your web host ** //

// ...
For the sake of brevity, code that has been removed from the entire file is denoted with an ellipsis (...).
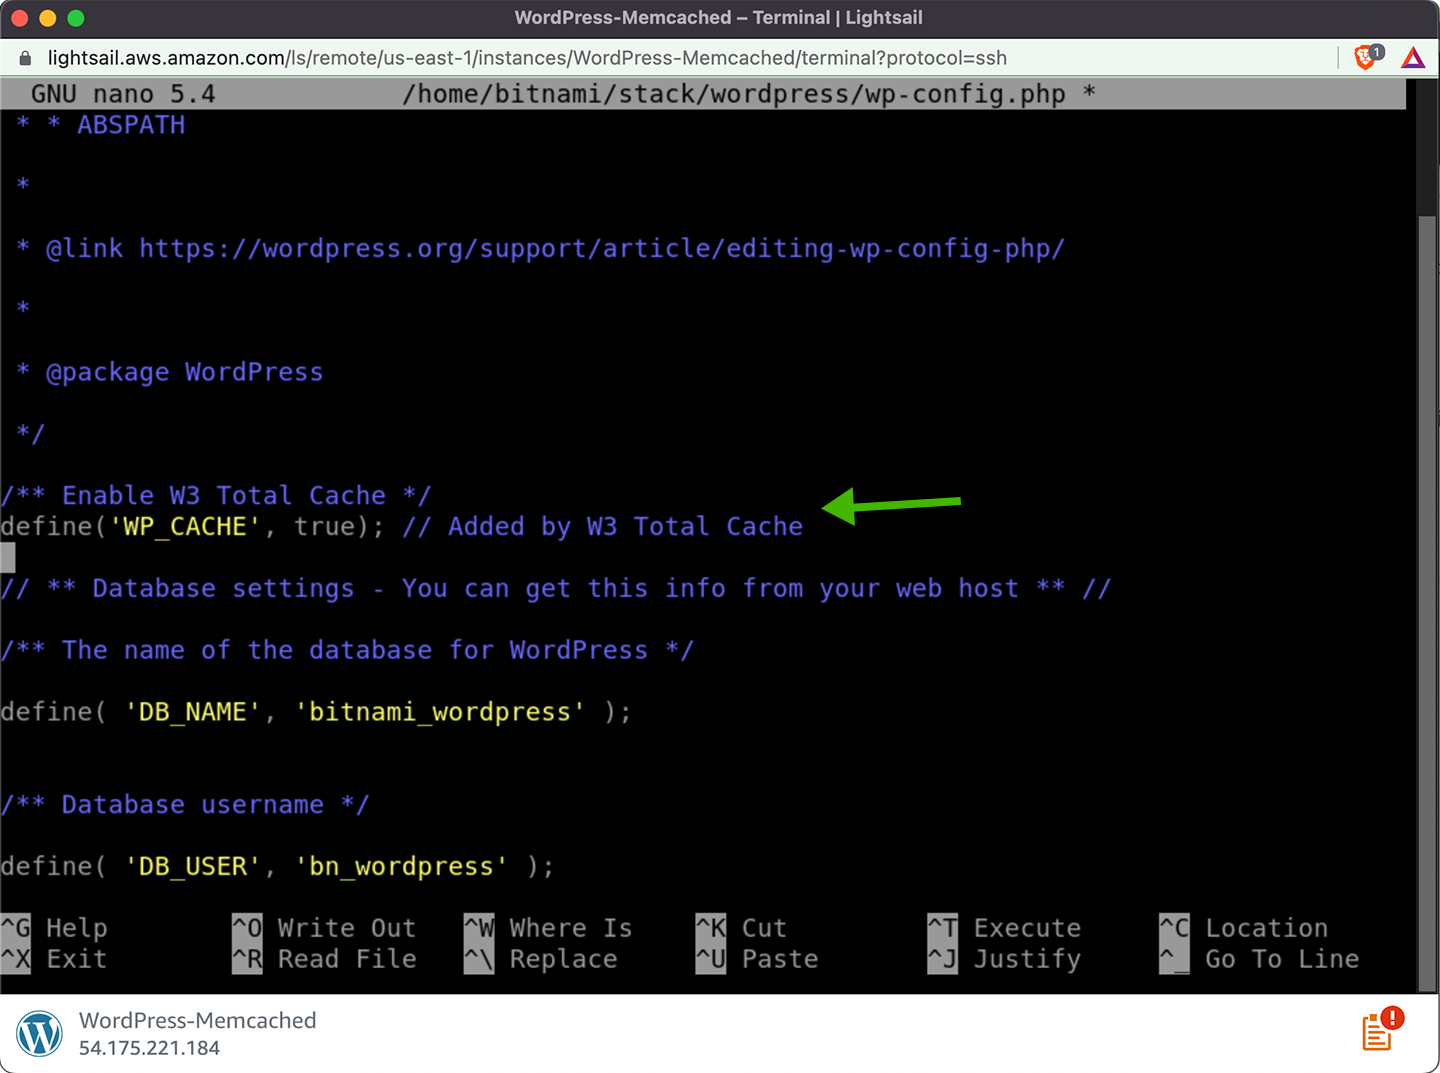
Save the file by pressing the keys CTRL + X, then press Y to confirm you want to save changes, and finally press ENTER to save.
Close the terminal browser window.
Back on the WordPress Admin Plugins page, refresh the window. The two error messages should now be gone.
You might still see the following notice:
/opt/bitnami/wordpress/wp-content is write-able. When finished installing the plugin, change the permissions back to the default: chmod 755 /opt/bitnami/wordpress/wp-content. Permissions are currently 775.

You can safely ignore this message by clicking Hide this message. W3 Total Cache expects different permissions than those set in the Bitnami WordPress image and so incorrectly assumes you have modified permissions to install the plugin.
W3 Total Cache is now installed. Next, you’ll configure it to use Memcached.
Provision a Memcached-compliant cache with MemCachier
To use Memcached with W3 Total Cache on AWS Lightsail, you must first provision a cache. You can get one quickly and easily for free from MemCachier.
MemCachier provides easy-to-use, performant caches compatible with the popular Memcached protocol and available in several AWS regions. It allows you to use a cache without setting up and maintaining actual Memcached servers yourself.
Head over to MemCachier and create an account.
Once logged in to your account, click NEW CACHE to create a new cache.
Enter a Nickname. I’ll be using Lightsail WordPress Memcached.
Then, select Amazon Web Services (EC2) as the provider.
Choose the same region your Lightsail instance is in. If you chose the same as me earlier, that is US East (N. Virginia).
If you need to find your Lightsail region, go to the Lightsail instance dashboard. Below the instance title, you’ll find its region and availability zone, e.g. Virginia, Zone A (us-east-1a).
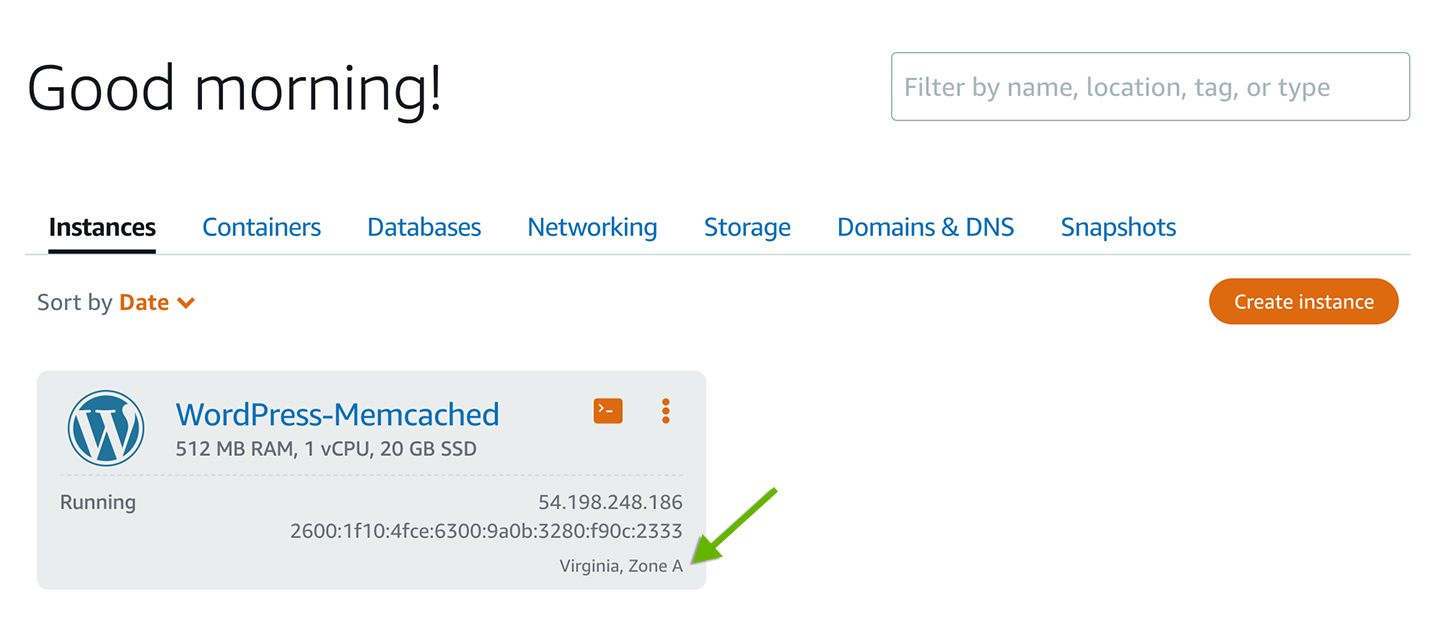
Next, choose a free development plan, $0.00/hour 25MB.
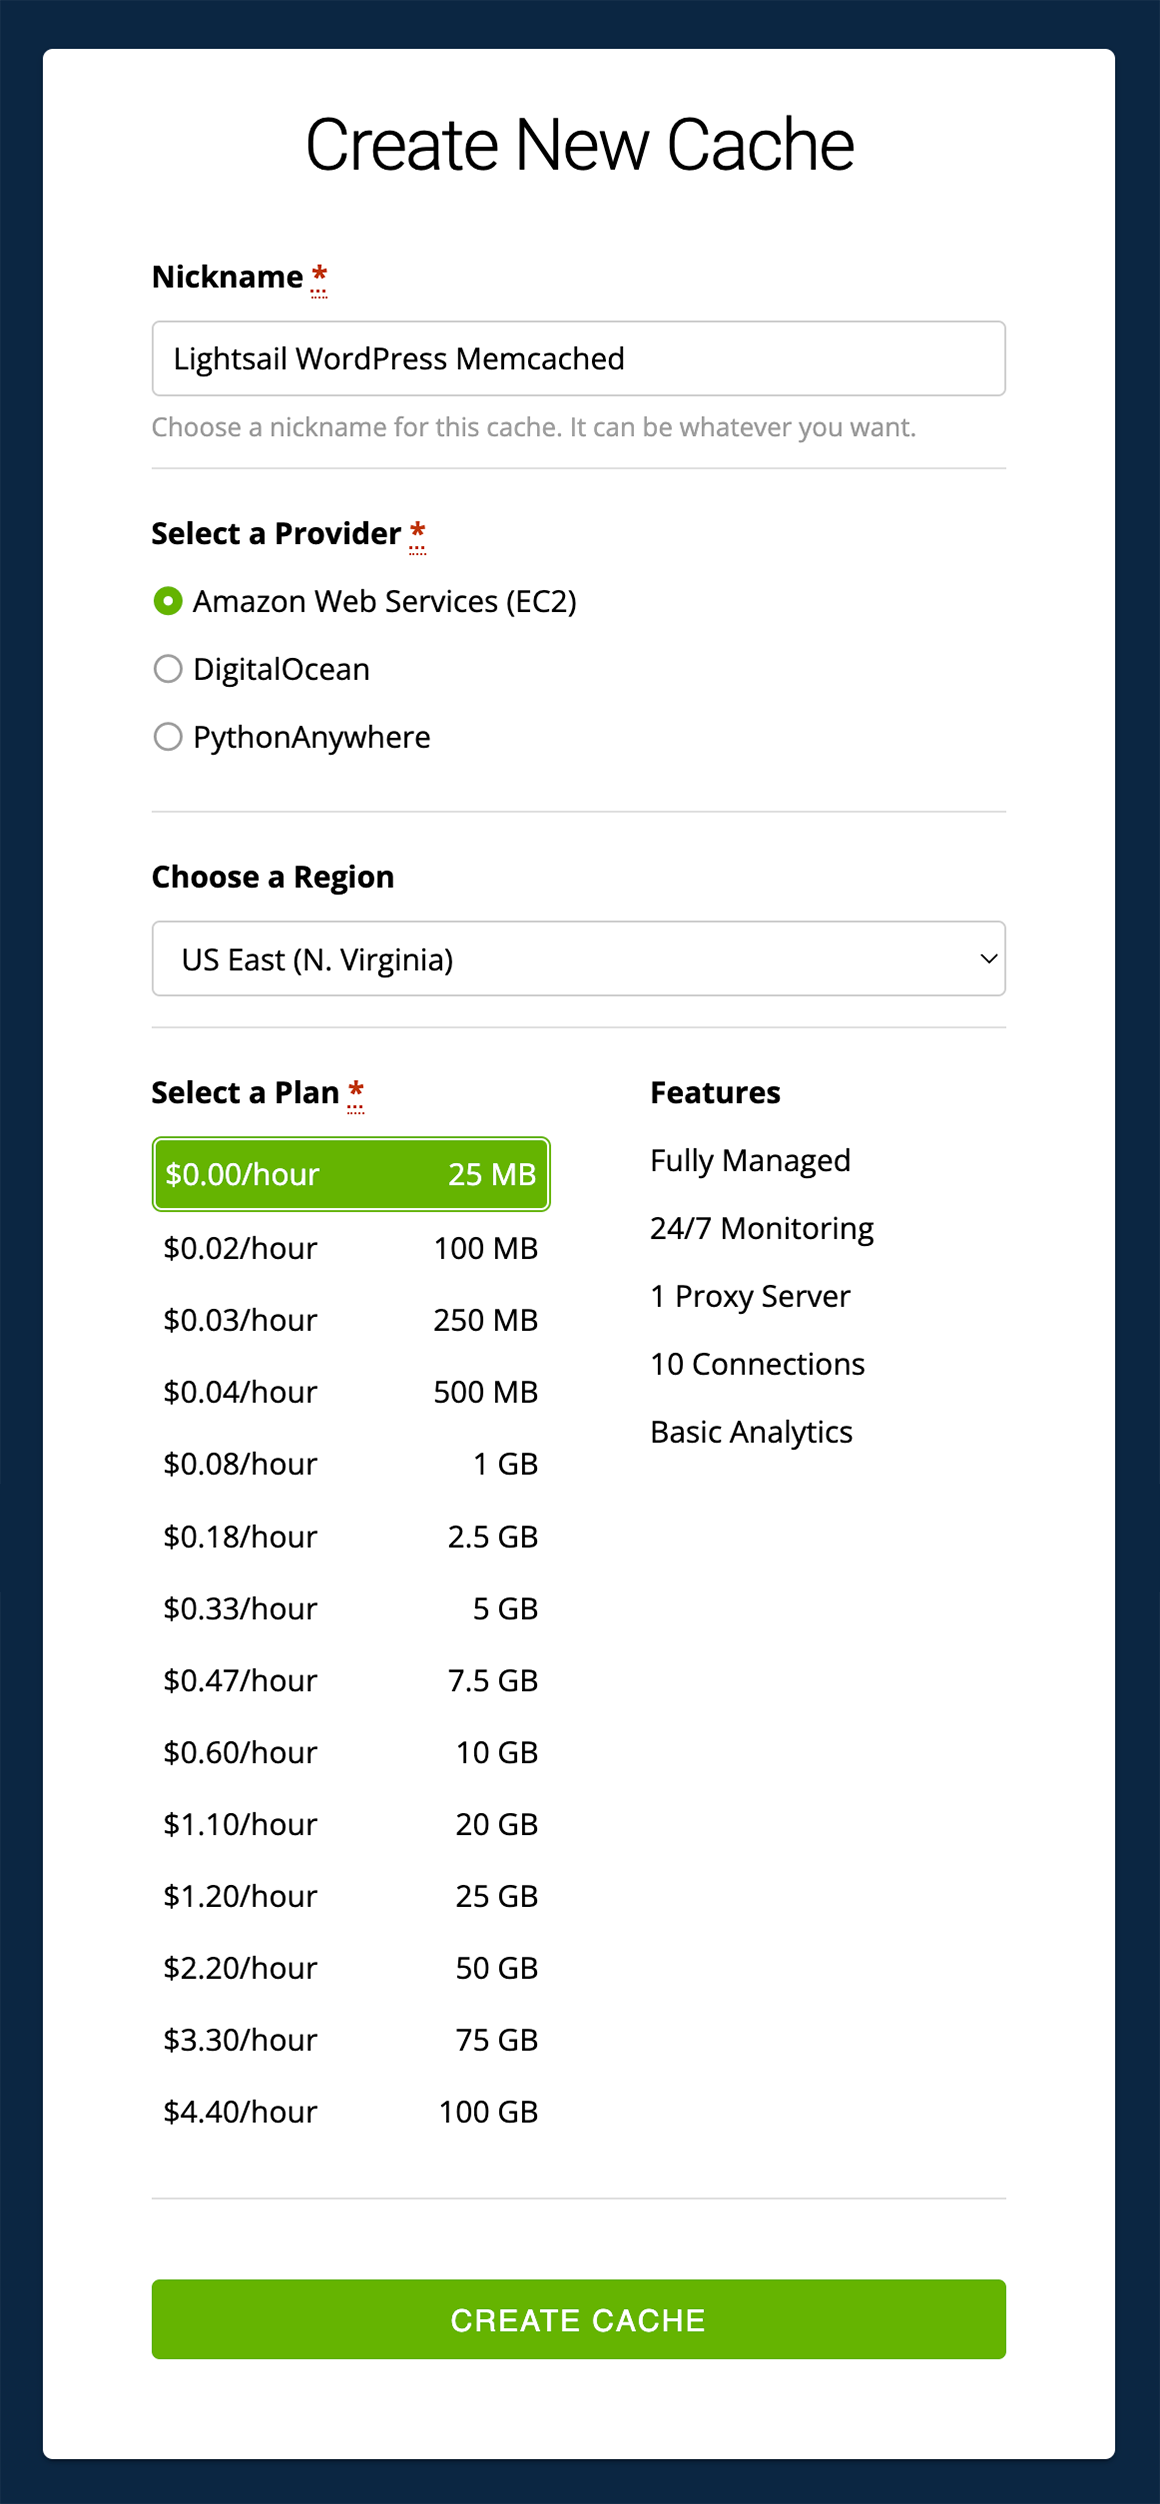
Finally, click CREATE CACHE.
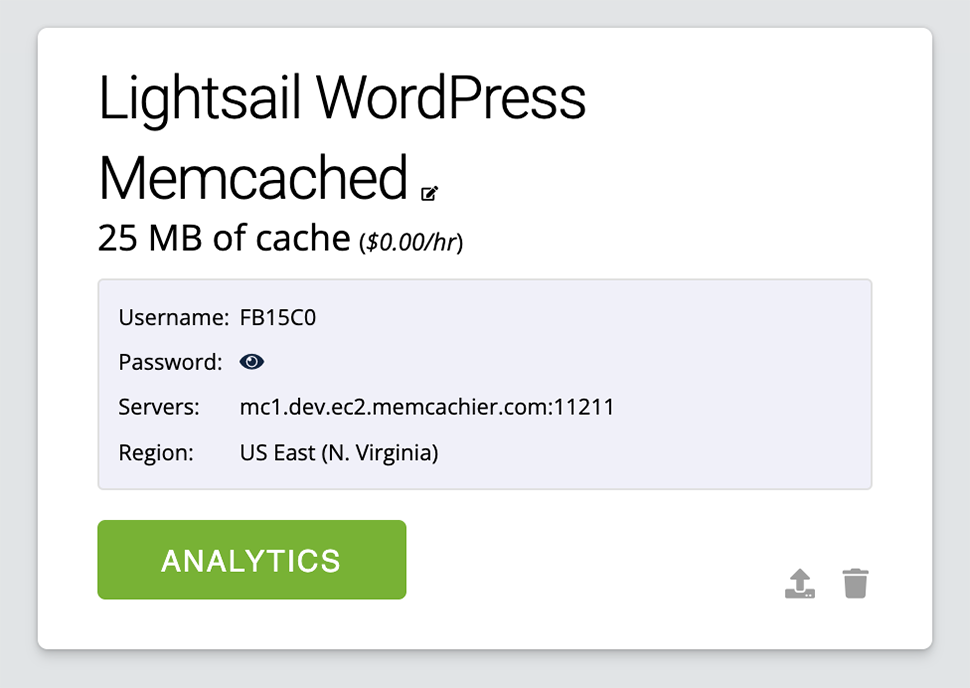
After creating your cache, note its Username, Password and Servers. You’ll use these when configuring W3 Total Cache next.
Add a Lightsail firewall rule to allow it to connect to your cache
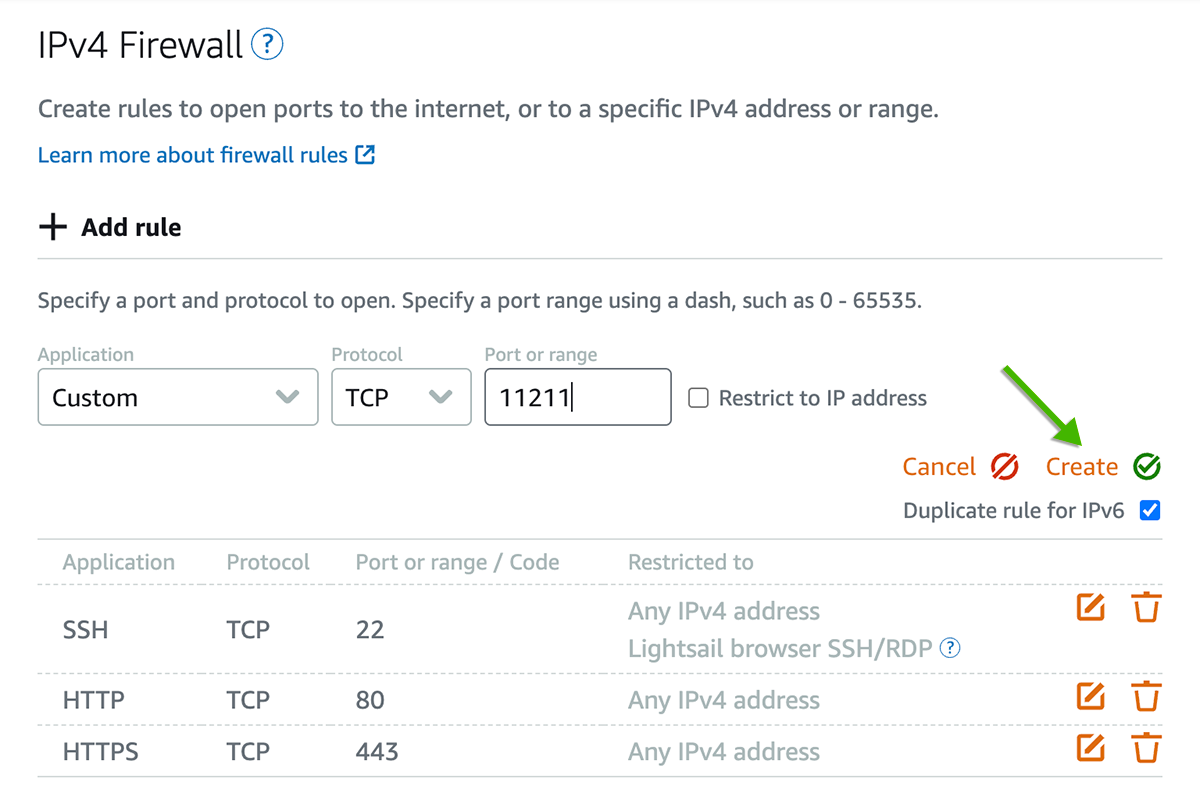
In this step, you’ll open up port 11211 in your Lightsail instance firewall so it can connect to your cache.
From your Lightsail instance dashboard, click on the Networking tab. Scroll to the IPv4 Firewall section and click Add rule.
Select Application: Custom, Protocol: TCP and Port or range: 11211, and click Create.
You now have a Memcached cache that Lightsail is configured to use. You’re ready to configure W3 Total Cache to use Memcached as a caching method.
Configure W3 Total Cache to use Memcached
To view the W3 Total Cache settings, click Performance on the WordPress Admin left-hand sidebar menu. When you do this for the first time, you’ll be redirected to the W3 Total Cache Setup Guide. For now, scroll down and click Skip at the bottom of that page. You can run it again anytime by clicking Setup Guide from the Performance sub-menu.
To use Memcached as a caching method, the Memcached PHP Extension must be installed and enabled. Thankfully, the Bitnami WordPress image Lightsail uses comes with the Memcached extension already installed. SASL authentication is also enabled, which is required to connect to your MemCachier cache. In simple terms, Memcached SASL authentication means connecting to a cache requires a username and password.
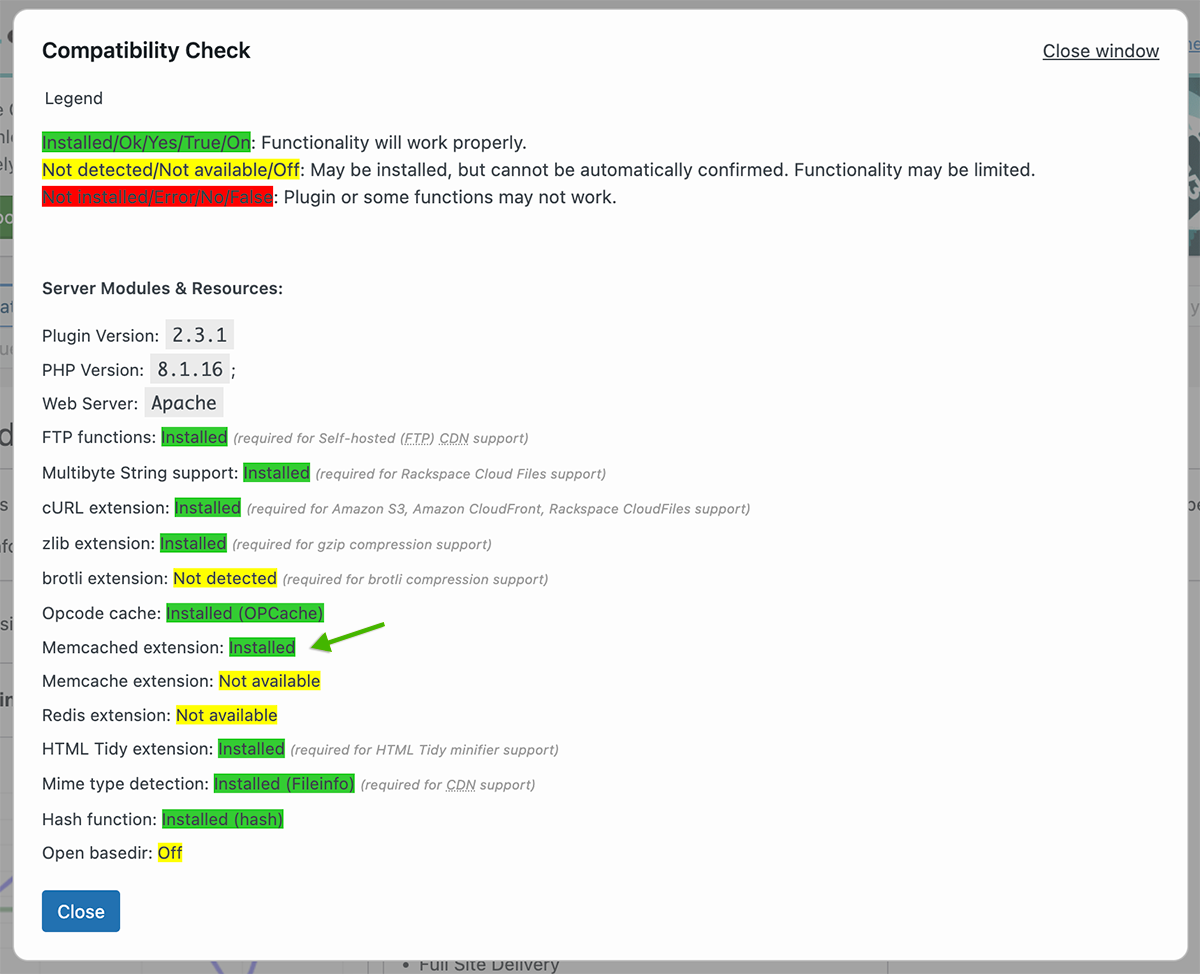
You can verify the Memcached PHP extension is installed by running the W3 Total Cache compatibility check. Click Performance, then Dashboard from the WordPress Admin left-hand menu. Then, from the W3 Total Cache dashboard, click compatibility check. Notice the Memcached PHP extension is shown as Installed.
Next, update the appropriate W3 Total Cache settings from WordPress Admin to use your MemCachier cache as its Memcached caching method.
Memcached can be used as a caching method for the following W3 Total Cache features:
- Object Cache
- Page Cache
- Minify
- Database Cache
Configuring each one involves the same two steps:
- Enable the feature, selecting Memcached as the caching method in General Settings.
- Configure the feature to use your MemCachier cache.
In the next section, you’ll configure the W3 Total Cache Object Cache. As mentioned, other Memcached-supported features require a very similar configuration process, so the following instructions should enable you to configure any of the other features.
Configure the W3 Total Cache Object Cache
To enable the Object Cache, from the WordPress Admin left-hand menu, click Performance, then General Settings. Then, scroll down to the Object Cache settings.
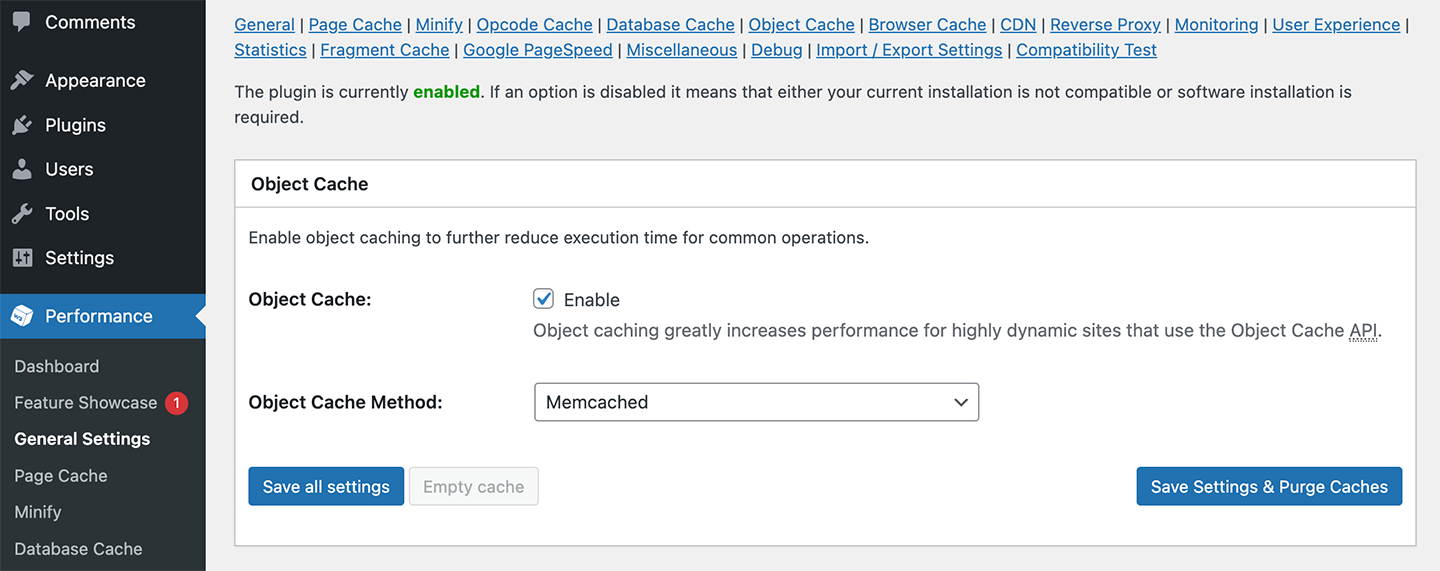
Check the Enable checkbox to enable the object cache. Then, select Memcached and click Save all settings.
You’ll now likely see the following warning:
The following memcached servers are not responding or not running:
Object Cache: 127.0.0.1:11211.
This message will automatically disappear once the issue is resolved.

That warning is because W3 Total Cache is configured by default to look for a Memcached server running on host 127.0.0.1 and port 11211.
Next, to configure your cache, click Performance, then Object Cache.
Under Advanced, enter your MemCachier cache’s server in Memcached hostname:port / IP:port.
Then, enter your MemCachier cache’s username and password in Memcached username and Memcached password, respectively.
Make sure Binary protocol is checked. The binary protocol is required to use SASL authentication with Memcached.
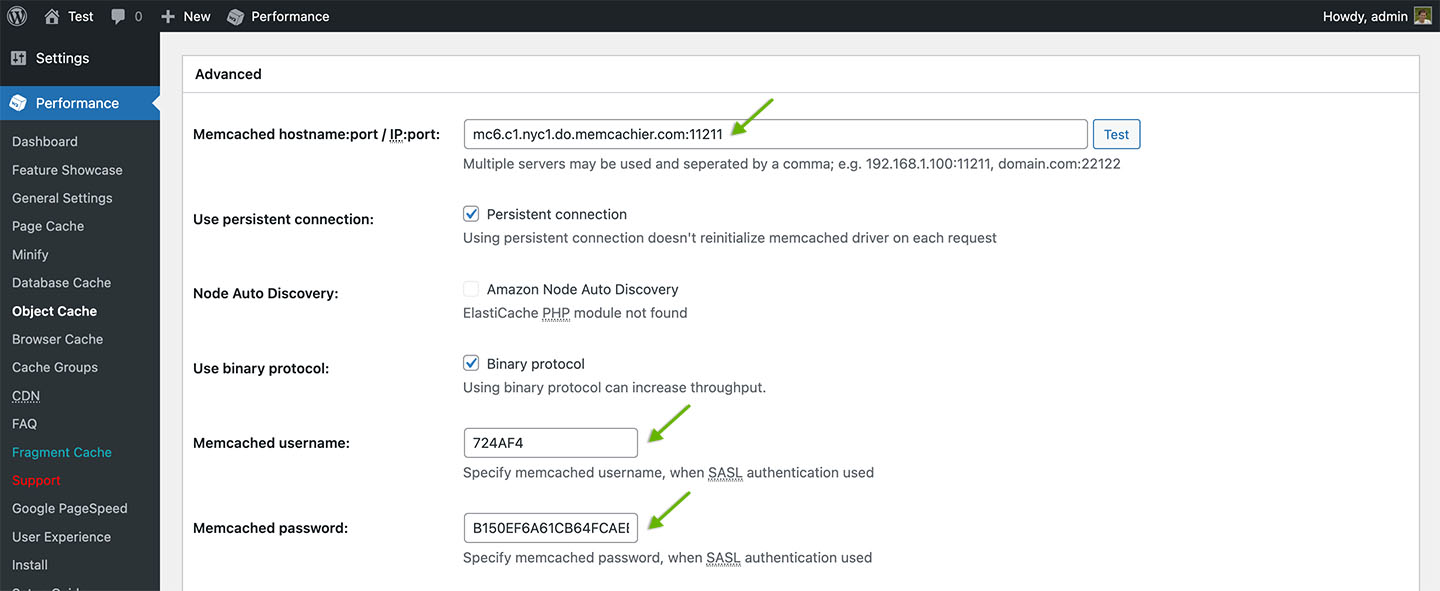
Finally, save the settings.
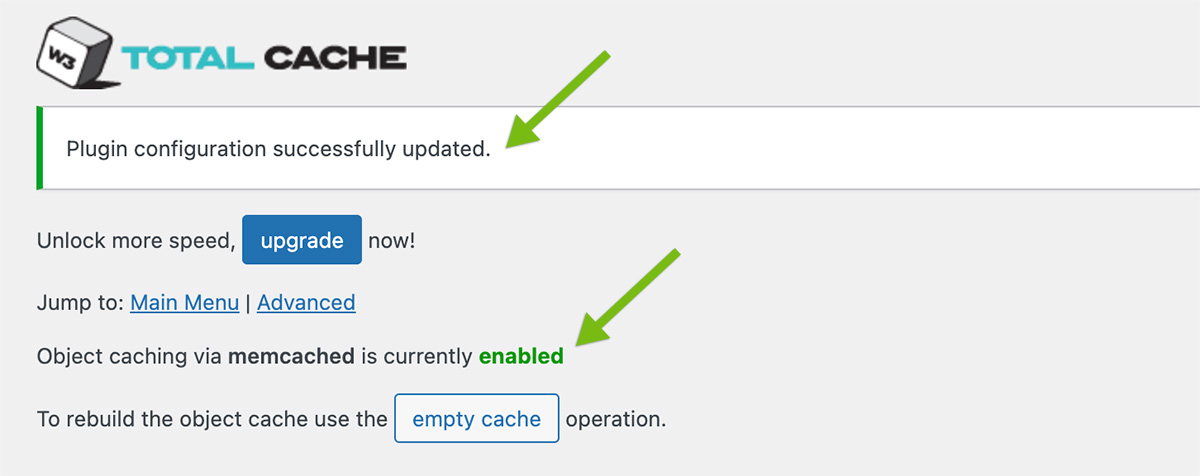
The W3 Total Cache Object Cache is now configured to use MemCachier. You’ll see the following notices at the top of the page:
Plugin configuration successfully updated.
Object caching via memcached is currently enabled
Repeat the same process for any other W3 Total Cache features supporting Memcached: Page Cache, Minify, and Database Cache. The W3 Total Cache Pro Fragment Cache feature also supports Memcached. W3 Total Cache Pro is a paid version of the plugin.
Note that a memcached testing bug was fixed in W3 Total Cache version 2.3.2, released on May 9, 2023.
The bug was related to testing Memcached using SASL authentication and would incorrectly show correctly configured and working caches as not working. When using older versions of the plugin, you will see the following notice after saving settings:
The following memcached servers are not responding or not running:
Object Cache: your_server.memcachier.com:11211.
This message will automatically disappear once the issue is resolved.

Also, due to the same bug, if you clicked the Test button beside Memcached hostname:port / IP:port, you would get an error notification, Test Failed.
Update the W3 Total Cache plugin to the latest version, and those errors will disappear.
Check Memcached is working
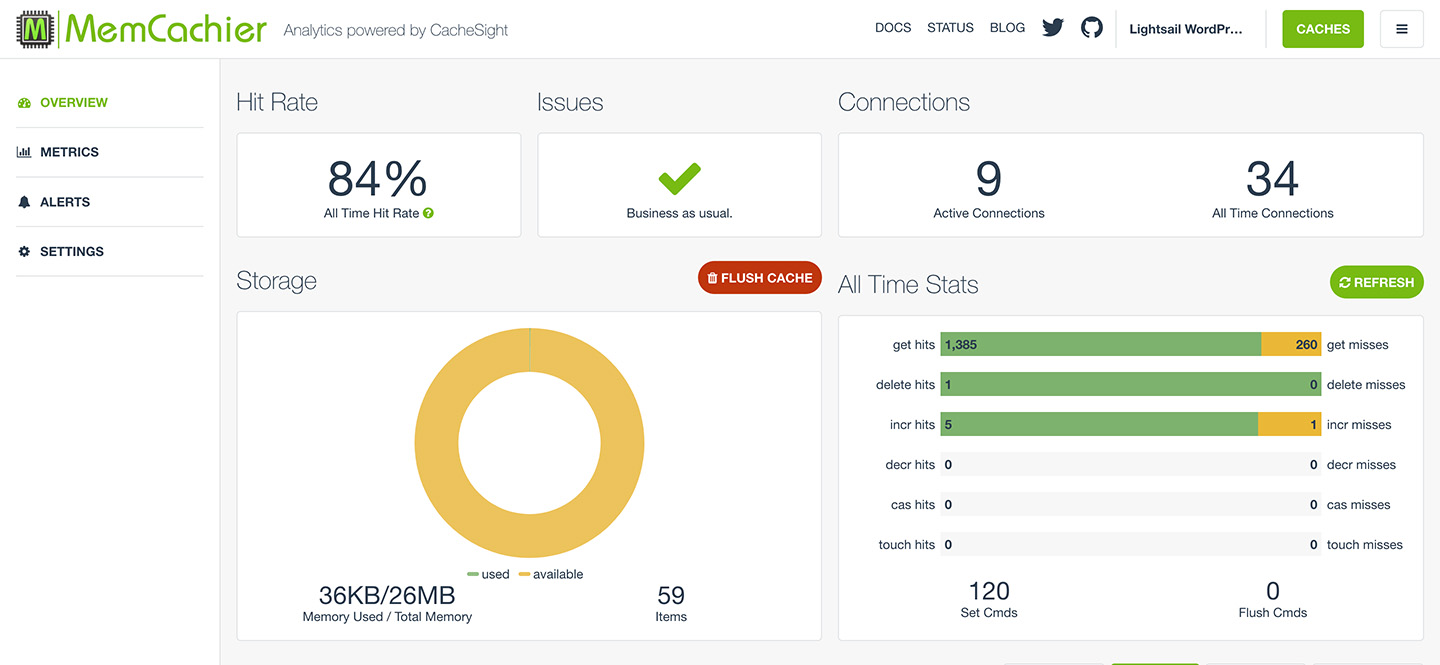
To verify your cache is working, check your MemCachier analytics dashboard. To open the analytics dashboard, while logged into your MemCachier account, view the Caches page, then click the ANALYTICS button for your cache.

Notice the stats change when you refresh your WordPress website. On the All Time Stats card, you’ll see misses increase initially as items are missed, then stored in your cache. Then, you’ll see hits increase as those items are served from the cache.
The MemCachier analytics dashboard displays your cache’s statistics so you can monitor performance and troubleshoot issues quickly and easily.
Conclusion
You now have a WordPress website installed on AWS Lightsail with optimized performance thanks to the W3 Total Cache plugin and Memcached.
Lightsail is the easiest way to install WordPress on AWS. It does some of the hard work in using Memcached as a caching method with the W3 Total Cache plugin, by coming with the Memcached PHP extension already installed and enabled. MemCachier offers the quickest and easiest way to set up a Memcached cache for AWS Lightsail while providing speedy performance and high availability. With AWS Lightsail, W3 Total Cache and MemCachier, you have a powerful combination to take your WordPress performance to the next level.
 Paddy
Paddy