Deploy a Django Application on AWS Elastic Beanstalk and scale it with Memcache
 Paddy
~ February 23, 2023
Paddy
~ February 23, 2023
Want to deploy a Django application on AWS Elastic Beanstalk that is ready to scale? In this tutorial, you’ll set up an Elastic Beanstalk environment, hook it up to a MySQL database, deploy a Django application, and finally use Memcache to speed it up.
Memcache is an in-memory key-value store, a technology that improves the performance and scalability of web apps and mobile app backends. You should consider using Memcache when your pages are loading too slowly or your app is having scalability issues. Even for small sites, Memcache can make page loads snappy and help future-proof your app.
Outline
- Prerequisites
- Initialize a Django project
- Create a Django app with task list functionality
- Configure Django for Elastic Beanstalk
- Deploy your Django app with Elastic Beanstalk
- Create and configure a cache
- Implement caching in Django
- Clean up
- Further reading and resources
Prerequisites
Before you complete the steps in this tutorial, make sure you have all of the following:
- Familiarity with Python (and ideally Django).
- An AWS account.
- The EB CLI installed and configured on your computer.
- Python 3.8 and Git installed on your computer.
At the time of writing, the latest version of the Python platform on Elastic Beanstalk uses Python 3.8. If you’re running a different version of Python on your machine, consider using a tool like pyenv so you can install and use multiple versions of Python.
Initialize a Django project
The following commands will create an isolated Python virtual environment and bootstrap a starter Django project.
Create a new folder for the project and change into that directory:
$ mkdir django-memcache && cd django-memcacheMake sure your terminal window is using Python 3.8, then create a new Python virtual environment:
$ python -m venv venvNote, your Python interpreter may work with the command python3, instead of python.
When you run this command, Python creates a new directory called venv. This allows you to install additional packages and dependencies into this virtual environment without affecting your system’s global Python installation. -m venv tells Python to use the venv module to create a new virtual environment. The final venv is the name of the directory where the virtual environment will be created. You can choose any name you like, but venv is a common convention.
Next, activate the Python virtual environment:.
$ source venv/bin/activateAfter running that command, you should see the name of the virtual environment displayed in your terminal prompt, e.g. (venv) ➜ django-memcache.
Install the latest version of Django (4.1 at the time of writing) using the pip package installer:
(venv) $ python -m pip install DjangoIn general, it’s a good idea to use python -m pip, instead of pip, to install packages, especially when working with virtual environments, to ensure that you are using the correct version of pip and installing packages into the correct environment.
Next, create a new Django project:
(venv) $ django-admin startproject myproject .This command creates a new Django project named myproject in the current directory (.). django-admin is Django’s command-line utility for administrative tasks.
Next, start the Django development server:
(venv) $ python manage.py runservermanage.py does the same thing as django-admin but also sets the DJANGO_SETTINGS_MODULE environment variable so that it points to your project’s settings.py file. That tells Django which settings to use for your project.
# Output
Watching for file changes with StatReloader
Performing system checks...

System check identified no issues (0 silenced).
You have 18 unapplied migration(s)...
...
Django version 4.1.7, using settings 'myproject.settings'
Starting development server at http://127.0.0.1:8000/
Quit the server with CONTROL-C.
Ignore the migrations warning for now, you’ll run migrations later in this tutorial.
Visit http://127.0.0.1:8000/ in your browser. You’ll see a Congratulations! page, with a rocket taking off.
Create a Django app with task list functionality
The Django application we are building is a task manager. In addition to displaying a list of tasks, it will have actions to add new tasks and to remove them. To accomplish this, we need to:
- Create a Django app.
- Create a
Taskmodel. - Run database migrations locally.
- Add the route, view, and controller logic for adding, removing, viewing a task, and viewing all tasks.
Create a Django app
Django has the concept of apps and we need to create one in order to add functionality. Create an app named myapp:
(venv) $ python manage.py startapp myappAdd myapp to the list of installed apps in myproject/settings.py:
# myproject/settings.py
# ...

INSTALLED_APPS = [
    'myapp.apps.MyappConfig',
    # ...
]

# ...
See the Configuring applications Django documentation for a detailed explanation of this configuration.
Create a Task model
Create a Task model in myapp/models.py:
# myapp/models.py
from django.db import models

class Task(models.Model):
    name = models.TextField()
    notes = models.TextField()
A Task has a name, and can have some notes, which we’ll make optional.
Next, create a migration for the myapp app:
(venv) $ python manage.py makemigrations myapp# Output
Migrations for 'myapp':
myapp/migrations/0001_initial.py
- Create model TaskRun database migrations locally
Run database migrations locally to create the myapp_task table, along with all other default Django tables:
(venv) $ python manage.py migrate# Output
Operations to perform:
Apply all migrations: admin, auth, contenttypes, myapp, sessions
Running migrations:
Applying contenttypes.0001_initial... OK
Applying auth.0001_initial... OK
Applying admin.0001_initial... OK
Applying admin.0002_logentry_remove_auto_add... OK
Applying admin.0003_logentry_add_action_flag_choices... OK
Applying contenttypes.0002_remove_content_type_name... OK
Applying auth.0002_alter_permission_name_max_length... OK
Applying auth.0003_alter_user_email_max_length... OK
Applying auth.0004_alter_user_username_opts... OK
Applying auth.0005_alter_user_last_login_null... OK
Applying auth.0006_require_contenttypes_0002... OK
Applying auth.0007_alter_validators_add_error_messages... OK
Applying auth.0008_alter_user_username_max_length... OK
Applying auth.0009_alter_user_last_name_max_length... OK
Applying auth.0010_alter_group_name_max_length... OK
Applying auth.0011_update_proxy_permissions... OK
Applying auth.0012_alter_user_first_name_max_length... OK
Applying myapp.0001_initial... OK
Applying sessions.0001_initial... OKWith the local database setup complete, you’re ready to add some functionality to your app.
Add views
Next, create the following four views:
index: display all tasks.detail: view a single task.add: add a task.remove: remove a task.
In myapp/views.py, replace the contents of the file with the following:
# myapp/views.py
from django.template.context_processors import csrf
from django.shortcuts import render, redirect
from myapp.models import Task

def index(request):
    tasks = Task.objects.order_by('id')
    context = {'tasks': tasks}
    return render(request, 'index.html', context)

def detail(request, task_id):
    task = Task.objects.get(id=task_id)
    context = {'task': task}
    return render(request, 'detail.html', context)

def add(request):
    if 'name' in request.POST:
        task = Task(name=request.POST['name'], notes=request.POST['notes'])
        task.save()
        return redirect('/')
    return render(request, 'add.html')

def remove(request):
    task = Task.objects.get(id=request.POST['id'])
    if task:
        task.delete()
return redirect('/')- The
indexview gets all tasks from the database and passes them as the template’s context. - The
detailview gets a task from the database and passes it as the template’s context. - The
addview checks if aPOSTvalue namednameis in the request. If so, a task is created and saved to the database, after which a redirect to theindexview happens. Otherwise, theaddview is rendered. - The
removeview gets a task from the database by ID. If the item exists, it is deleted. Then, a redirect to theindexview happens.
The render() function takes the request object as its first argument, a template name as its second argument, and a dictionary as its optional third argument. You will create the corresponding templates next.
Create the index.html template
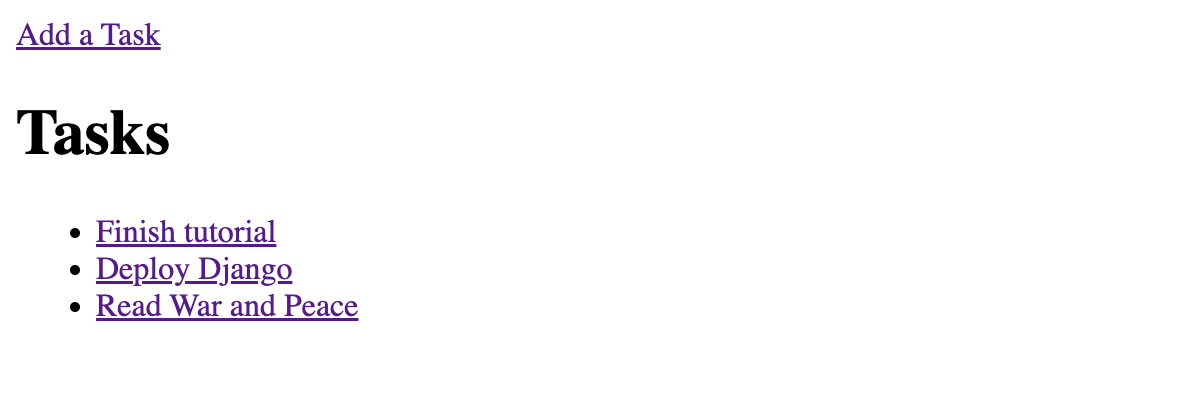
Now, create the template to display all tasks when the index view is requested. Create the file myapp/templates/index.html and add the following markup:
<!-- myapp/templates/index.html -->
<!DOCTYPE html>
<html lang="en">
  <head>
    <meta charset="utf-8" />
    <title>MemCachier Django tutorial</title>
    <meta name="viewport" content="width=device-width, initial-scale=1" />
  </head>
  <body>
    <a href="/add">Add a Task</a>

    <h1>Tasks</h1>
    {% if tasks %}
    <ul>
      {% for task in tasks %}
      <li>
        <a href="/detail/{{ task.id }}">{{ task.name }}</a>
      </li>
      {% endfor %}
    </ul>
    {% else %}
      <a href="/add">Add your first task</a>
    {% endif %}
  </body>
</html>
The template contains a link to the add task view, and has a list of existing tasks. If no tasks exist, a link to Add your first task is displayed.
Note, Django will automatically check an app’s templates folder for template files.
Create the detail.html template
Next, add a template for the detail view. Create the file myapp/templates/detail.html and add the following markup:
<!-- myapp/templates/detail.html -->
<!DOCTYPE html>
<html lang="en">
  <head>
    <meta charset="utf-8" />
    <title>MemCachier Django tutorial | Task View</title>
    <meta name="viewport" content="width=device-width, initial-scale=1" />
  </head>
  <body>
    <a href="/">Back to Tasks</a>
    <h1>{{ task.name }}</h1>
    <p>{{ task.notes }}</p>
    <form action="/remove" method="POST">
      {% csrf_token %}
      <input type="hidden" name="id" value="{{ task.id }}" />
      <button>Delete Task</button>
    </form>
  </body>
</html>
This template displays the name and notes for a task, as well as a form with a delete button for removing a task.
Create the add.html template
Finally, create the add view. Create the file myapp/templates/add.html and add the following markup:
<!-- myapp/templates/add.html -->
<!DOCTYPE html>
<html lang="en">
  <head>
    <meta charset="utf-8" />
    <title>MemCachier Django tutorial | Add a Task</title>
    <meta name="viewport" content="width=device-width, initial-scale=1" />
  </head>
  <body>
    <a href="/">Back to Tasks</a>
    <h1>New Task</h1>
    <form action="/add" method="POST">
      {% csrf_token %}
      <div>
        <label>
          Task Name:
          <input
            type="text"
            name="name"
            placeholder="e.g. Wash the car"
            required
          />
        </label>
      </div>
      <div>
        <label>
          Task Notes:
          <textarea name="notes"></textarea>
        </label>
      </div>
      <button>Add Task</button>
    </form>
  </body>
</html>
This template contains a form for creating a task, with fields for task name and optional notes.
Route views to URLs
To call these views, we need to map them to URLs by adding the following in myproject/urls.py:
# myproject/urls.py
# ...
from myapp import views

urlpatterns = [
    # ...
    path('', views.index),
    path('detail/<int:task_id>', views.detail),
    path('add', views.add),
    path('remove', views.remove),
]
Our task list is now functional. With the Django development server running, python manage.py runserver, visit http://127.0.0.1:8000/ in your browser and try it out. You should be able to add and delete tasks, to view all tasks, and to view a single task.
Configure Django for Elastic Beanstalk
In this step, you’ll configure Django to run on Elastic Beanstalk. First you’ll configure Django to use a MySQL database (you’ll provision one later with Elastic Beanstalk), then allow Django to serve your Elastic Beanstalk environment’s URL, and finally, configure Elastic Beanstalk to start your Django app.
Configure the MySQL database
To configure Django to use MySQL you’ll complete the following steps:
- Install the
mysqlclientpackage with Pip. - Configure Elastic Beanstalk to install the
mariadb-develpackage with YUM. - Update Django’s database settings to use MySQL.
- Configure Elastic Beanstalk to run database migrations.
Install the mysqlclient package with Pip
To use the MySQL database in Django, we need to install the mysqlclient package:
(venv) $ pip install mysqlclientThen, use pip freeze to write your dependencies to a file named requirements.txt:
(venv) $ pip freeze > requirements.txtThis file is required to tell Elastic Beanstalk what Python dependencies to install.
Configure Elastic Beanstalk to install the mariadb-devel package with YUM
For the MySQL database to interact with your app, you also need to install the mariadb-devel package on your Elastic Beanstalk instances.
To do that, create the file .ebextensions/packages.config and add the following:
# .ebextensions/packages.config
packages:
  yum:
    mariadb-devel: []
Update Django’s database settings to use MySQL
Next, configure the database in myproject/settings.py (replacing
current SQLite configuration):
# myproject/settings.py
# ...
import os

# ...

def get_db():
    try:
        return {
            'default': {
                'ENGINE': 'django.db.backends.mysql',
                'NAME': os.environ['RDS_DB_NAME'],
                'USER': os.environ['RDS_USERNAME'],
                'PASSWORD': os.environ['RDS_PASSWORD'],
                'HOST': os.environ['RDS_HOSTNAME'],
                'PORT': os.environ['RDS_PORT'],
                'OPTIONS': {
                    'init_command': "SET sql_mode='STRICT_TRANS_TABLES'",
                },
            }
        }
    except:
        return {
            'default': {
                'ENGINE': 'django.db.backends.sqlite3',
                'NAME': BASE_DIR / 'db.sqlite3',
            }
        }

DATABASES = get_db()

# ...
Notice the RDS_* variables. Later, you will provision an Amazon RDS for MySQL database with Elastic Beanstalk. When the database is provisioned, Elastic Beanstalk provides the connection information to your application. It does so by setting the environment variables for the database hostname, port, user name, password, and database name.
Configure Elastic Beanstalk to run database migrations
To run the database migrations when deploying on Elastic Beanstalk, create the file .ebextensions/container-commands.config and add the following:
# .ebextensions/container-commands.config
container_commands:
  01_migrate:
    command: "source /var/app/venv/*/bin/activate && python3 manage.py migrate"
    leader_only: true
That command will activate a Python virtual environment before running the migrations. The leader_only attribute states that a particular resource or action should be executed only on the environment’s leader instance. The leader instance is the instance that manages the Elastic Beanstalk environment, such as handling deployments, scaling, and managing other resources.
MySQL configuration is now complete.
Two more steps remain to prepare your Django app for deployment with Elastic Beanstalk:
- Update Django’s settings to allow it serve your EB URL.
- Configure EB to start your Django app.
Update Django’s settings to allow it serve your EB URL
For Django to serve a particular host or domain name, it must be defined in the ALLOWED_HOSTS setting. This is a security measure. Elastic Beanstalk generates a dynamic URL for your environment, e.g. django-memcache-env.eba-2twnfmjt.us-east-1.elasticbeanstalk.com. You could specify that domain name, but for convenience in development, you’ll allow any value.
Open up myproject/settings.py and update the ALLOWED_HOSTS setting:
# myproject/settings.py
# ...
ALLOWED_HOSTS = ['*']
# ...
Note, once you have a domain name for your app, you should use that instead of a wildcard.
Configure EB to start your Django app
Create the file .ebextensions/django.config. In that file, set WSGIPath so Elastic Beanstalk can start your application:
# .ebextensions/django.config
option_settings:
  aws:elasticbeanstalk:container:python:
    WSGIPath: myproject.wsgi:application
A Django application uses WSGI to communicate with the web server it runs on.
Your Django app is now configured and ready to be deployed to Elastic Beanstalk.
Deploy your Django app with Elastic Beanstalk
Deploying Django to Elastic Beanstalk involves the following steps:
- Commit your code with Git
- Initialize an Elastic Beanstalk application.
- Create an Elastic Beanstalk Environment.
- Run the deploy command.
Commit your code with Git
The EB CLI integrates with Git, allowing us to commit our code and deploy.
Create a .gitignore file to make sure you exclude unwanted files from your Git repository. Add the following to .gitignore:
# .gitignore
venv
*.pyc
db.sqlite3

# macOS file
.DS_Store
Now, initialize a Git repository, then stage and commit all files:
(venv) $ git init
(venv) $ git add .
(venv) $ git commit -m 'Initial commit'
# Output
[main (root-commit) 92ddac6] Initial commit
23 files changed, 388 insertions(+)
create mode 100644 .ebextensions/container-commands.config
create mode 100644 .ebextensions/django.config
create mode 100644 .ebextensions/packages.config
create mode 100644 .gitignore
create mode 100644 .python-version
create mode 100755 manage.py
create mode 100644 myapp/__init__.py
create mode 100644 myapp/admin.py
create mode 100644 myapp/apps.py
create mode 100644 myapp/migrations/0001_initial.py
create mode 100644 myapp/migrations/__init__.py
create mode 100644 myapp/models.py
create mode 100644 myapp/templates/add.html
create mode 100644 myapp/templates/detail.html
create mode 100644 myapp/templates/index.html
create mode 100644 myapp/tests.py
create mode 100644 myapp/views.py
create mode 100644 myproject/__init__.py
create mode 100644 myproject/asgi.py
create mode 100644 myproject/settings.py
create mode 100644 myproject/urls.py
create mode 100644 myproject/wsgi.py
create mode 100644 requirements.txtInitialize an Elastic Beanstalk application
Next, you’ll create Elastic Beanstalk Application. Back in your terminal, run:
(venv) $ eb init -p python-3.8 django-memcache --region us-east-1Python 3.8 is the latest version supported on the Elastic Beanstalk Python platform at the time of writing.
I’m using us-east-1 as my AWS region, you can specify another if you prefer.
Running eb init creates the directory and file .elasticbeanstalk/config.yml with the config you just specified and adds a few Elastic Beanstalk related entries to your .gitignore file.
It also creates an Application on Elastic Beanstalk. I find the EB Application naming a little confusing and prefer to think of it as a EB project. An EB Application can contain multiple Environments. Your Django application is run within an Environment: EB Application → EB Environment → My application.
Create an Elastic Beanstalk environment
Next, create an Elastic Beanstalk Environment and deploy your Flask application to it:
(venv) $ eb create django-memcache-env -db.engine mysql -db.i db.t2.microNotice, we’re adding a MySQL database to our EB environment with -db.engine mysql and are setting the database instance size to a t2.micro with -db.i db.t2.micro. A small size sufficient for our development purposes.
You’ll be prompted for a username and password for the database. You can set them to whatever you like, but note, when choosing your password, AWS does not handle symbols very well (! $ @ etc…), and using them can cause unexpected behavior. Stick to letters and numbers, and make sure the password is at least eight characters long.
This will create a AWS Relational Database Service (RDS) instance that is associated with this application. When you terminate this application, the database instance will be destroyed as well. If you need a RDS instance that is independent of your Elastic Beanstalk application, create one via the AWS RDS interface.
This environment creation process will take about five to fifteen minutes. Once it’s complete, run the following command to open your app in a browser:
(venv) $ eb openYour app should look and work the same as it does locally.
If you get a 50X error when you open the application, check the logs. They’re located in the EB console in the side menu labeled Logs. Or view them in your terminal with eb logs.
For subsequent deployments you will commit your code to Git and run eb deploy. eb create creates your EB environment and deploys your code.
Create and configure a cache
Memcache is an in-memory, distributed cache. Its primary API consists of two
operations: SET(key, value) and GET(key). Memcache is like a hashmap (or dictionary) that is spread across multiple servers, where operations are still performed in constant time.
The most common use for Memcache is to cache the results of resource-intensive computations, database queries and HTML renders so that these expensive operations don’t need to happen over and over again.
Create a MemCachier cache
To use Memcache in Django, you first need to provision an actual Memcached cache. You can easily get one for free from MemCachier. MemCachier provides easy to use, performant caches that are compatible with the popular Memcached protocol. It allows you to use a cache without having to setup and maintain actual Memcached servers yourself.
Head over to MemCachier, sign up for an account, and create a free
development cache, selecting Amazon Web Services as the provider, and choosing the same region as your Elastic Beanstalk environment. If you chose the same as me earlier, that is US East (N. Virginia), us-east-1.
If you need to find your EB region, open .elasticbeanstalk/config.yml and look for the default_region property. It’s important your cache is in the same region as your app so latency is as low as possible.
You’ll need three configuration variables for your application to connect to your cache: MEMCACHIER_SERVERS, MEMCACHIER_USERNAME, and MEMCACHIER_PASSWORD. You need to add these as Elastic Beanstalk environment variables.
Configure Elastic Beanstalk to use your cache
In your terminal window, set your MemCachier configuration values as Elastic Beanstalk environment variables with the following command:
(venv) $ eb setenv MEMCACHIER_USERNAME=<username> MEMCACHIER_PASSWORD=<password> MEMCACHIER_SERVERS=<servers>For example, eb setenv MEMCACHIER_USERNAME=1E4630 MEMCACHIER_PASSWORD=E9692E5BA662E5AD55477ED1FC5EF9B3 MEMCACHIER_SERVERS=mc3.dev.ec2.memcachier.com:11211
To add multiple servers, comma-separate values. For example, MEMCACHIER_SERVERS=mc3.prod.ec2.memcachier.com:11211,mc4.prod.ec2.memcachier.com:11211.
We can confirm that they’ve been set by running:
(venv) $ eb printenvThen we need to install the pylibmc Python package as a dependency.
(venv) $ pip install pylibmcThen update your requirements.txt file again:
(venv) $ pip freeze > requirements.txtWe’ll also need to configure Elastic Beanstalk to install the libmemcached-devel package with YUM, which pylibmc depends on. Add the package in .ebextensions/packages.config:
# .ebextensions/packages.config
packages:
  yum:
    # ...
    libmemcached-devel: []
Configure Django to use your cache
Configure Django to use your MemCachier cache by adding the following to the end of
myproject/settings.py:
# myproject/settings.py
# ...
def get_cache():
  try:
    servers = os.environ['MEMCACHIER_SERVERS']
    username = os.environ['MEMCACHIER_USERNAME']
    password = os.environ['MEMCACHIER_PASSWORD']
    return {
      'default': {
        'BACKEND': 'django.core.cache.backends.memcached.PyLibMCCache',
        # TIMEOUT is not the connection timeout! It's the default expiration
        # timeout that should be applied to keys! Setting it to `None`
        # disables expiration.
        'TIMEOUT': None,
        'LOCATION': servers,
        'OPTIONS': {
          'binary': True,
          'username': username,
          'password': password,
          'behaviors': {
            # Enable faster IO
            'no_block': True,
            'tcp_nodelay': True,
            # Keep connection alive
            'tcp_keepalive': True,
            # Timeout settings
            'connect_timeout': 2000, # ms
            'send_timeout': 750 * 1000, # us
            'receive_timeout': 750 * 1000, # us
            '_poll_timeout': 2000, # ms
            # Better failover
            'ketama': True,
            'remove_failed': 1,
            'retry_timeout': 2,
            'dead_timeout': 30,
          }
        }
      }
    }
  except:
    return {
      'default': {
        'BACKEND': 'django.core.cache.backends.locmem.LocMemCache'
      }
    }

CACHES = get_cache()
This configures the cache for both development and production. If the MEMCACHIER_* environment variables exist, the cache will be setup with pylibmc, connecting to MemCachier. Whereas, if the MEMCACHIER_* environment variables don’t exist—hence development mode—Django’s simple in-memory cache is used instead.
Implement caching in Django
You’ll now implement several caching techniques in Django: caching expensive database queries, template fragments, entire views, and sessions.
Cache expensive database queries
Memcache is often used to cache expensive database queries. Our simple task list app doesn’t include any resource-intensive queries, but for the sake of learning, let’s imagine that getting all tasks from the database is an expensive operation.
The task list database query code in myapp/views.py can be modified
to check the cache first like so:
# myapp/views.py
# ...
from django.core.cache import cache
import time

TASKS_KEY = 'tasks.all'

def index(request):
    tasks = cache.get(TASKS_KEY)
    if not tasks:
        time.sleep(2) # simulate a slow query
        tasks = Task.objects.order_by('id')
        cache.set(TASKS_KEY, tasks)
    context = {'tasks': tasks}
    return render(request, 'index.html', context)

# ...
The above code first checks the cache to see if the tasks.all key exists in the cache. If it does not, a database query is executed and the result is cached. Subsequent page loads will use the cached value instead of querying the database. The time.sleep(2) exists to simulate a slow
query.
Re-deploy the app to Elastic Beanstalk with:
(venv) $ git add .
(venv) $ git commit -m 'Add query caching'
(venv) $ eb deploy
View Memcache statistics
To help demystify Memcache caching operations, it’s useful to be able to visualize what’s going on under the hood.
One way to do that, though very cumbersome, is to telnet into a Memcached server and run the stats command to see changes as operations are performed on your cache.
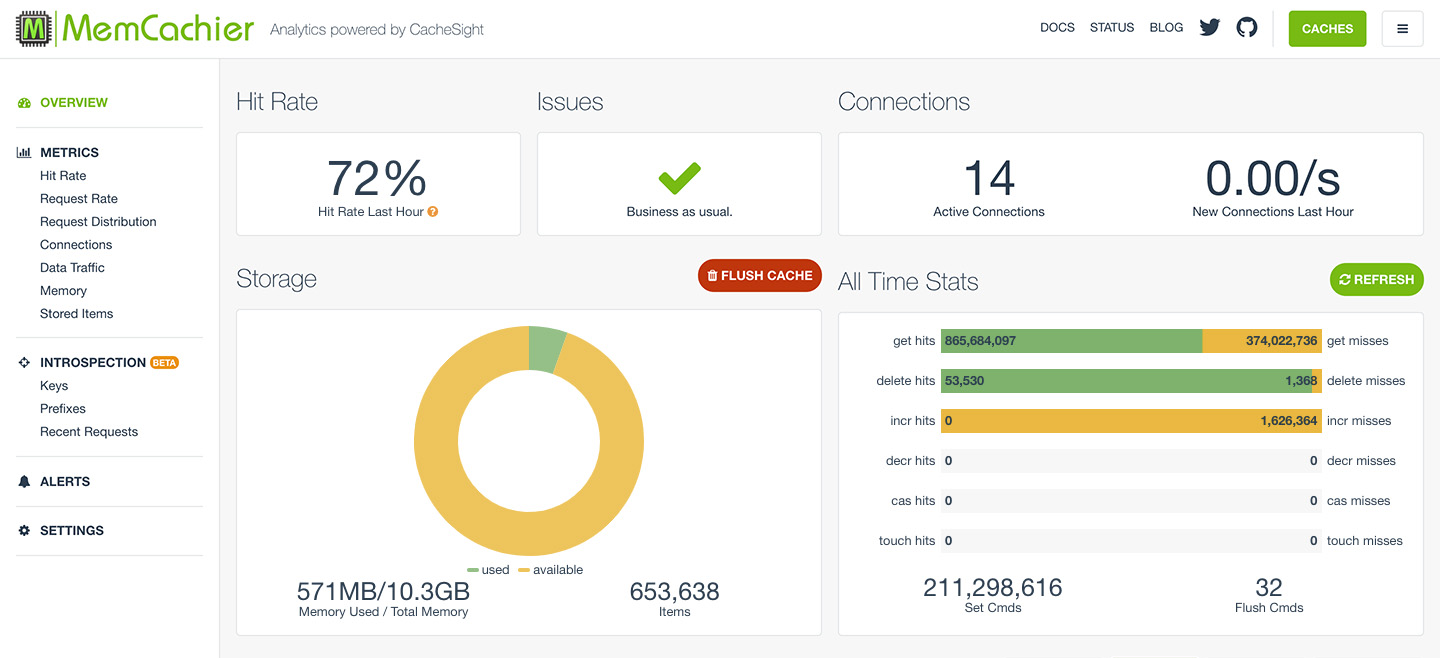
With MemCachier however, you get an analytics dashboard that displays your cache’s statistics so you can monitor performance and troubleshoot issues quickly and easily.
To open your MemCachier analytics dashboard, log in to your MemCachier account, click Caches, then click the Analytics button for your cache.
Add a task and the following should happen:
cache.get(TASKS_KEY)is called, but the task list is not yet in the cache (get misses+1)cache.set(TASKS_KEY, tasks)then stores the task list in the cache (Set Cmds+1)
Now, if you refresh the page:
cache.get(TASKS_KEY)successfully gets the task list from the cache (get hits+1)
The cache is working, but there is still a major problem. Add a new task and see what happens. No new task appears on the current tasks list! The new task was created in the database, but the app is serving the stale task list from the cache.
Clear stale data
There are many techniques for dealing with an out-of-date cache. You’ll learn about four options:
- Time-based expiration.
- Deleting the cached value.
- Key-based expiration.
- Updating the cached value.
1. Time-based expiration
The easiest way to make sure the cache does not get stale is by setting an expiration time. The cache.set method can take an optional third argument, which is the time in seconds that an item should stay in the cache. If this option is not specified, it defaults to the TIMEOUT argument of the appropriate backend in the CACHES setting in settings.py.
You could modify the cache.set method to look like this, caching the item for 5 seconds:
cache.set(TASKS_KEY, tasks, 5)This functionality only works when it is known for how long the cached value is valid. In our case however, the cache gets stale upon adding or removing a task so this technique is not appropriate.
2. Delete the cached value
A straight forward strategy is to invalidate the tasks.all key when you know
the cache is out of date—namely, to modify the add and remove views to
delete the tasks.all key:
# myapp/views.py
# ...
def add(request):
    if 'name' in request.POST:
        task = Task(name=request.POST['name'], notes=request.POST['notes'])
        task.save()
        cache.delete(TASKS_KEY)
        return redirect('/')
    return render(request, 'add.html')

def remove(request):
    task = Task.objects.get(id=request.POST['id'])
    if task:
        task.delete()
        cache.delete(TASKS_KEY)
    return redirect('/')
Now, whenever a task is added or removed, the cached tasks will be deleted and will be re-cached the next time the task list is viewed.
3. Key-based expiration
Another technique to invalidate stale data is to change the key:
# myapp/views.py
# ...
import random
import string

def _hash(size=16, chars=string.ascii_letters + string.digits):
    """
    Generate a random string of specified length and character set.

    Args:
        size (int): Length of the string to be generated. Default value is 16.
        chars (str): Set of characters to be used for generating the string. Default is the set of ASCII letters and digits.

    Returns:
        str: A random string of specified length and character set.
    """
    # Use random.choice() to randomly select characters from the specified character set
    # Repeat this process for the specified length of the string
    # Use join() to concatenate all the randomly selected characters into a single string
    return ''.join(random.choice(chars) for _ in range(size))

def _new_tasks_key():
    return 'tasks.all.' + _hash()

TASKS_KEY = _new_tasks_key()

# ...

def add(request):
    if 'name' in request.POST:
        task = Task(name=request.POST['name'], notes=request.POST['notes'])
        task.save()
        global TASKS_KEY
        TASKS_KEY = _new_tasks_key()
        return redirect('/')
    return render(request, 'add.html')

def remove(request):
    task = Task.objects.get(id=request.POST['id'])
    if task:
        task.delete()
        global TASKS_KEY
        TASKS_KEY = _new_tasks_key()
    return redirect('/')
The upside of key based expiration is that you do not have to interact with the cache to expire the value. The LRU (Least Recently Used) eviction of Memcache will clean out the old keys eventually. LRU eviction is a technique used in Memcache to remove the least recently used items from cache memory when the memory limit is reached.
4. Update the cached value
Instead of invalidating the key, a cached item’s value can be updated:
# myapp/views.py
# ...

def add(request):
    if 'name' in request.POST:
        task = Task(name=request.POST['name'], notes=request.POST['notes'])
        task.save()
        cache.set(TASKS_KEY, Task.objects.order_by('id'))
        return redirect('/')
    return render(request, 'add.html')

def remove(request):
    task = Task.objects.get(id=request.POST['id'])
    if task:
        task.delete()
        cache.set(TASKS_KEY, Task.objects.order_by('id'))
    return redirect('/')
This approach is simpler to implement than key based expiration, but as performant. And it means the task list is immediately re-cached, so the next time the task list is loaded, a database query and cache.set call are unnecessary.
Choose option 2, 3, or 4 to make sure the cache will never be out-of-date. I’m using option 4, updating the cached value, for this tutorial.
As usual, commit your changes and redeploy the app:
(venv) $ git add .
(venv) $ git commit -m 'Add query caching invalidation'
(venv) $ eb deploy
Now, when you add or remove a task, all the tasks you’ve added since implementing caching will appear.
If you’ve implemented option 4 to clear stale cache data, each time you add or remove a task the following should happen:
cache.set(TASKS_KEY, ...)updates the cached task list (Set Cmds+1)cache.get(TASKS_KEY)fetches the updated cached task list (get hits+1)
Cache template fragments
Django allows you to cache template fragments. This is similar to snippet caching in Flask. To enable fragment caching add {% load cache %} to the top of your template.
Do not cache fragments that include forms with CSRF tokens. If you cache a template that includes a CSRF token, that token will be reused for all subsequent requests for all sessions. That means the token would be valid for a single request for the user whose token was cached. All other requests would include the invalid token and would be rejected.
To cache a rendered set of task items, we use a {% cache <timeout> <key> <optional arguments> %} statement in myapp/templates/index.html:
<!-- myapp/templates/index.html -->
{% load cache %}
<!DOCTYPE html>
<!-- ... -->
  <ul>
    {% for task in tasks %}
      {% cache None taskfragment task.id %}
      <li>
        <a href="/detail/{{ task.id }}">{{ task.name }}</a>
      </li>
      {% endcache %}
    {% endfor %}
  </ul>
<!-- ... -->
</html>
Here the timeout is None and the key is taskfragment. Because this fragment has dynamic data (the task ID and name) you pass an additional argument task.id to uniquely identify each fragment.
As long as task IDs are never reused, this is all there is to caching fragments in Django. The MySQL database we use on Elastic Beanstalk does not reuse IDs, so we’re all set.
If you use a database that does reuse IDs, you need to delete the fragment when its respective task is deleted. You can do this by adding the following code to the remove view in myapp/views.py:
# myapp/views.py
# ...
from django.core.cache.utils import make_template_fragment_key

# ...

def remove(request):
    task = Task.objects.get(id=request.POST['id'])
    if task:
        task.delete()
        # ...
        key = make_template_fragment_key('taskfragment', [request.POST['id']])
        cache.delete(key)
    return redirect('/')
Deploy your changes:
(venv) $ git add .
(venv) $ git commit -m 'Add fragment caching'
(venv) $ eb deploy
Let’s see the effect of caching the fragments in our application. The next time you refresh the tasks list view the following will happen:
- Django checks if each fragment is in the cache. No fragments are currently cached (
get misses+1 per task) - Django stores each fragment in the cache (
Set Cmds+1 per task)
And on subsequent page refreshes:
- Django checks if each fragment is in the cache. All fragments are now cached (
get hits+1 per task)
Cache views
We can go one step further and cache the output of entire views in addition to fragments. This should be done with care, because it can result in unintended side effects if a view frequently changes or contains forms with CSRF tokens, as explained earlier. In our app, the task list changes each time a task is added or deleted so the cached view needs to be cleared after both of those actions.
Remember, do not cache views that include forms with CSRF tokens.
You can cache the task list view with the @cache_page(<timeout>) decorator in
myapp/views.py:
# myapp/views.py
# ...
from django.views.decorators.cache import cache_page

# ...

@cache_page(None)
def index(request):
    # ...

# ...
Whenever we add or remove a task, we need to delete the cached view. This is not trivial. We need to learn the key when the view is cached to delete it:
# myapp/views.py
# ...
from django.utils.cache import learn_cache_key

# ...

VIEW_KEY = ''

@cache_page(None)
def index(request):
    # ...
    context = {'tasks': tasks}
    response = render(request, 'index.html', context)
    global VIEW_KEY
    VIEW_KEY = learn_cache_key(request, response)
    return response

def add(request):
    if 'name' in request.POST:
        # ...
        cache.delete(VIEW_KEY)
        return redirect('/')
    return render(request, 'add.html')

def remove(request):
    # ...
    if task:
        # ...
        cache.delete(VIEW_KEY)
    return redirect('/')
We use the Django cache util learn_cache_key to get the key when the view is cached. Then, delete the item from the cache when adding or deleting a task.
Deploy the changes:
(venv) $ git add .
(venv) $ git commit -m 'Add view caching'
(venv) $ eb deploy
@cache_page stores the page in two items, one for headers, and one for the page. The keys for those items look something like this:
# Headers
:1:views.decorators.cache.cache_header..7822c3f267e735391510ed308a3a0176.en-us.UTC

# Page
:1:views.decorators.cache.cache_page..GET.7822c3f267e735391510ed308a3a0176.d41d8cd98f00b204e9800998ecf8427e.en-us.UTC
On the first refresh the following will happen:
@cache_pagetries to fetch the header item, but it’s not yet cached (get misses+1)@cache_pagestores the header item in the cache (Set Cmds+1)@cache_pagestores the page item in the cache (Set Cmds+1)learn_cache_key()also stores the header item in the cache (Set Cmds+1)
On subsequent page loads the following happens:
@cache_pagefetches the header item from the cache (get hits+1)@cache_pagefetches the page item from the cache (get hits+1)
Note, view caching does not make the caching of expensive operations or template fragments redundant. It’s good practice to cache smaller operations within larger cached operations, or smaller fragments within larger fragments. This technique (called Russian doll caching) helps with performance if a larger operation, fragment, or view is removed from the cache, because the building blocks do not have to be recreated from scratch.
Advanced Memcache Debugging
In this case, with three caching strategies in place (query, fragment and view) it can be challenging to determine exactly what cache activity is happening.
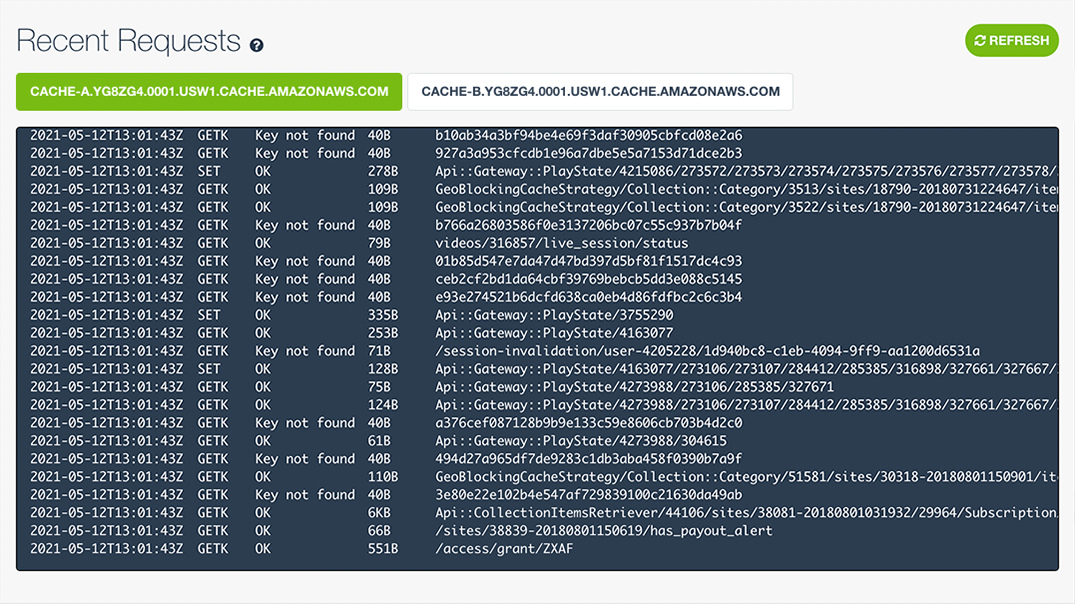
Our analytics dashboard also comes with advanced cache Introspection features (Prefixes, Keys and Recent Requests), available starting with our Advanced plan (1 GB+). These tools can prove invaluable for debugging, troubleshooting, and just making sure things are working as expected.
When writing this tutorial, I regularly referred to the Recent Requests view to verify the cache commands being executed. That view shows the last 100 lines of logs for each of your cache servers.
Here are some logged commands you would expect to see with Django, with my comments added:
# Try to get tasks. "Key not found", not in cache (`get misses` +1)
2023-02-23T14:18:12Z GETK Key not found 12B  :1:tasks.all
# Store tasks. "OK", stored successfully (`Set Cmds` +1)
2023-02-23T14:18:14Z SET  OK            1KB  :1:tasks.all

# Try get fragment. Not in cache (`get misses` +1)
2023-02-23T14:39:17Z GETK Key not found 63B  :1:template.cache.taskfragment.691513953ea19e01a0e7881a339ce106
# Store fragment. Stored successfully (`Set Cmds` +1)
2023-02-23T14:39:17Z SET  OK            144B :1:template.cache.taskfragment.691513953ea19e01a0e7881a339ce106

# Try get view. Not in cache (`get misses` +1)
2023-02-23T14:18:12Z GETK Key not found 82B  :1:views.decorators.cache.cache_header..7822c3f267e735391510ed308a3a0176.en-us.UTC
# Store view header. Stored successfully (`Set Cmds` +1)
2023-02-23T14:18:14Z SET  OK            95B  :1:views.decorators.cache.cache_header..7822c3f267e735391510ed308a3a0176.en-us.UTC
# Store view page. Stored successfully (`Set Cmds` +1)
2023-02-23T14:18:14Z SET  OK            1KB  :1:views.decorators.cache.cache_page..GET.7822c3f267e735391510ed308a3a0176.d41d8cd98f00b204e9800998ecf8427e.en-us.UTC
Use Memcache for session storage
Memcache works well for storing information for short-lived sessions that time out. However, because Memcache is a cache and therefore not persistent, long-lived sessions are better suited to permanent storage options, such as your database.
For short-lived sessions configure SESSION_ENGINE to use the cache backend. Add the following to the end of myproject/settings.py:
# myproject/settings.py
# ...
SESSION_ENGINE = 'django.contrib.sessions.backends.cache'
For long-lived sessions, Django allows you to use a write-through cache, backed
by a database. This is the best option for performance while guaranteeing
persistence. To use the write-through cache, configure the SESSION_ENGINE in
myproject/settings.py like so:
SESSION_ENGINE = 'django.contrib.sessions.backends.cached_db'For more information on how to use sessions in Django, please see the Django Session Documentation.
Clean up
Once you’re done with this tutorial and no longer need your app, you can clean up your Elastic Beanstalk Application and Environment by using:
(venv) $ eb terminate --allWithout the -all option, only your Environment will be terminated.
You can also destroy your MemCachier cache from the Caches dashboard if you no longer need it.