Deploy Laravel on Elastic Beanstalk and Scale with Memcache (Updated 2024)
 Sascha
~ Updated: January 16, 2024
Sascha
~ Updated: January 16, 2024
This tutorial guides you through developing and deploying a Laravel 10 application on AWS Elastic Beanstalk (EB), with a focus on enhancing performance using Memcache. You’ll learn to build a simple Laravel task list app and leverage Memcache for improved speed and efficiency.
Memcache is an in-memory caching system, a tool that significantly enhances the efficiency and scalability of web applications. Consider integrating Memcache if your pages exhibit sluggish load times or your application faces scaling challenges. Regardless of your app’s size, Memcache has the potential to quicken page loads and help future-proof your app.
Outline
- Create a Laravel project
- Create a Laravel task list app
- Configure Laravel for Elastic Beanstalk
- Deploy Laravel to Elastic Beanstalk
- Set up caching in Laravel
- Implement caching strategies in Laravel
Prerequisites
Before you complete the steps in this guide, make sure you have all of the following:
- Familiarity with PHP and, ideally, Laravel.
- An AWS account.
- The EB CLI installed and configured on your computer.
- PHP, Composer, and Git installed on your computer.
Create a Laravel project
To start, create a new Laravel project. In your terminal, run the following command:
composer create-project laravel/laravel laravel_memcacheThat command will use the latest version of Laravel, which at the time of writing v10.3.2.
# output
Creating a "laravel/laravel" project at "./laravel_memcache"
Installing laravel/laravel (v10.3.2)
  - Installing laravel/laravel (v10.3.2): Extracting archive
Created project in /<YOUR_LOCAL_PATH>/laravel_memcache
> @php -r "file_exists('.env') || copy('.env.example', '.env');"
Loading composer repositories with package information
Updating dependencies
Lock file operations: 111 installs, 0 updates, 0 removals
  - Locking brick/math (0.11.0)
  - Locking carbonphp/carbon-doctrine-types (2.1.0)
...
Next, change to the directory just created:
cd laravel_memcacheThen, install Laravel’s NPM dependencies:
npm installAnd start Laravel’s development server using the Artisan CLI serve command:
php artisan serveOnce you have started the development server, you can view the Laravel skeleton app in your web browser at http://localhost:8000.
Create a Laravel task list app
In this step, you’ll add a task list to the app, enabling users to view, add, and delete tasks. To accomplish this, you need to:
- Set up a local database.
- Create the
Taskmodel. - Create the view and controller logic to add, view, and delete tasks.
Set up a local database (Optional)
To test your app locally, use a SQLite database. Install SQLite on your computer if necessary.
Add the database by creating the file database/database.sqlite in your project root directory.
To use this connection locally, update DB_CONNECTION and remove DB_DATABASE in your app’s .env file:
# .env
# ...
DB_CONNECTION=sqlite
# ...
# DB_DATABASE=laravel
# ...
You remove the DB_DATABASE variable because the default SQLite config looks for it before defaulting to the desired database.sqlite database. If you look at the SQLite configuration in config/database.php, you’ll find 'database' => env('DB_DATABASE', database_path('database.sqlite')).
Create the Task model
To create and store tasks, you need to do three things:
First, create a migration that will create the tasks table:
php artisan make:migration create_tasks_table --create=tasksThat command creates a migration named create_tasks_table.
Tasks should have names, so add a name field to the tasks table schema in the newly created database/migrations/<date>_create_tasks_table.php file. Note the date in your filename will be generated depending on when you run the command. It will look something like 2024_01_11_160452_create_tasks_table.php:
// database/migrations/<date>_create_tasks_table.php
// ...
Schema::create('tasks', function (Blueprint $table) {
    $table->id();
    $table->string('name'); // Add this line
    $table->timestamps();
});
// ...
Second, create a Task model to easily interact with the tasks table from our code:
php artisan make:model TaskThis command creates an empty Task model in app/Task.php. Laravel automatically infers the Task model fields from the migration you created in the previous step.
Third, run the migrations:
php artisan migrateAdd a view for the task list
To see the tasks stored in the database, create a view that displays all tasks.
Create the file resources/views/layouts/app.blade.php, open it in your editor, and add the following:
<!-- resources/views/layouts/app.blade.php -->
<!DOCTYPE html>
<html lang="en">
    <head>
        <meta charset="utf-8">
        <title>MemCachier Laravel Tutorial</title>
        <meta name="viewport" content="width=device-width, initial-scale=1">

        @vite('resources/css/app.css')
    </head>

    <body>
        @yield('content')

        @vite('resources/js/app.js')
    </body>
</html>
Note you’ll include the app.css and app.js files generated with a new Laravel project, though you won’t add any CSS or JavaScript in this guide.
Now, create the task list view as a child view of the app.blade.php layout:
Create the file resources/views/tasks.blade.php, open it in your editor, and add the following:
<!-- resources/views/tasks.blade.php -->
@extends('layouts.app')

@section('content')
    <!-- TODO: New Task Card -->

    <!-- Current Tasks -->
    @if (count($tasks) > 0)
        <h2>Current Tasks</h2>
        <ul>
            @foreach ($tasks as $task)
                <li>
                    <!-- Task Name -->
                    <div>{{ $task->name }}</div>
                    <!-- TODO Delete Button -->
                </li>
            @endforeach
        </ul>
    @endif

@endsection
Ignore the TODOs for now. You’ll fill them out later.
To access this view, connect it to the root route, GET /, in routes/web.php:
// routes/web.php
use Illuminate\Support\Facades\Route;
use App\Models\Task;

// ...

// Show Tasks
Route::get('/', function () {
    $tasks = Task::orderBy('created_at', 'asc')->get();

    return view('tasks', [
        'tasks' => $tasks
    ]);
});
With these changes, you import the Task model. Then, in the root route, you get tasks ordered by their creation date and pass that task data to the view.
Enable task creation
Next, add the ability to create tasks. Open up resources/views/tasks.blade.php and replace the <!-- TODO: New Task Card --> comment with the following:
<!-- resources/views/tasks.blade.php -->
<!-- ... -->

<!-- New Task Card -->
<div>
    <h2>New Task</h2>

    <!-- New Task Form -->
    <form action="{{ url('tasks') }}" method="POST">
        {{ csrf_field() }}

        <label>
            Task Name: <input type="text" name="name" placeholder="e.g. Wash the dishes" required>
        </label>

        <button>Add Task</button>
    </form>
</div>

<!-- Current Tasks -->
<!-- ... -->
For security, validating user input, such as when a task is added, is essential. However, you’ll forego validating data to concentrate on the primary objectives of this tutorial: deploying Laravel on EB and caching with Memcache.
Let’s add these new views to routes/web.php:
// routes/web.php
// ...

use Illuminate\Support\Facades\Route;
use App\Models\Task;
use Illuminate\Http\Request;

// ...

// Show Tasks
// ...

// Add New Task
Route::post('/tasks', function (Request $request) {
    // Create task
    $task = new Task;
    $task->name = $request->name;
    $task->save();

    return redirect('/');
});
Enable task deletion
To complete your task list functionality, you’ll add the ability to delete a task. Add a Delete button to each item in the task list to delete a task. In resources/views/tasks.blade.php, replace the <!-- TODO Delete Button --> comment with the following changes:
<!-- resources/views/tasks.blade.php -->

<!-- ... -->

<!-- Delete Button -->
<form action="{{ url('tasks/'.$task->id) }}" method="POST">
    {{ csrf_field() }}
    {{ method_field('DELETE') }}

    <button>Delete</button>
</form>

<!-- ... -->
Then, wire this functionality to the appropriate route in routes/web.php:
// routes/web.php
// ...

// Show Tasks & Add New Task
// ...

// Delete Task
Route::delete('/tasks/{task}', function (Task $task) {
    $task->delete();

    return redirect('/');
});
If you have set up your app locally, it’s time to see how it works in the browser.
Now that you include assets with the @vite directive, you must run the Vite development server for the Laravel development server to work. Open a new terminal tab or window and start the Vite development server to build and live reload your assets:
npm run devYou can now start a web server if you have set up the app locally. In your terminal, run the following:
php artisan serveIf you forget to run npm run dev, you’ll get an error Vite manifest not found at: <YOUR_LOCAL_PATH>/public/build/manifest.json.
Finally, view the app at localhost:8000. You should now be able to add, view, and delete tasks.
Configure Laravel for Elastic Beanstalk
In this section, you’ll prepare your app to be deployed to Elastic Beanstalk.
- Configure Nginx for Redirection
- Configure environment
- Configure EB to run migrations
- Configure the MySQL database
- Build assets with Vite
- Commit your code with Git
Configure Nginx for Redirection
At the time of writing, your Elastic Beanstalk environment will launch an EC2 instance with Amazon Linux 2023, running Nginx. Laravel requires Nginx to be configured for redirection. Otherwise, the app’s home page will display, but visiting any other URL will give you a 404 page not found.
Create the file .platform/nginx/conf.d/elasticbeanstalk/laravel.conf, and all sub directories. Open the file and add the following configuration:
# .platform/nginx/conf.d/elasticbeanstalk/laravel.conf
location / {
  try_files $uri $uri/ /index.php?$query_string;
}
Configure environment
Create the file .ebextensions/01-environment.config, open it in your editor, and include the following PHP config and environment variables:
# .ebextensions/01-environment.config
option_settings:
  aws:elasticbeanstalk:container:php:phpini:
    document_root: /public
    composer_options: --no-dev
  aws:elasticbeanstalk:application:environment:
    APP_ENV: production
    APP_KEY: <YOUR_APP_KEY>
Generate your own APP_KEY on the command line with:
php artisan key:generate --showBy default, Elastic Beanstalk serves your project’s root at the app’s root path. For Laravel, however, the default page, index.php, is one level down in the public folder, so set document_root to /public.
The Composer --no-dev option prevents installation of development packages. Those packages are defined in require-dev in your composer.json.
Configure EB to run migrations
For EB to run the migrations upon deployment, you must include another config file telling it to do so.
Create the file .ebextensions/02-migrations.config, open it in your editor, and add the following:
# .ebextensions/02-migrations.config
container_commands:
  01-migrate:
    command: "php artisan migrate --force"
The --force flag bypasses the safety prompt, which usually requires manual confirmation when migrating.
Configure the MySQL database
Our EB environment already has a MySQL database initialized, but your app needs to be configured to connect to it.
To use the database, update the mysql configuration in config/database.php:
// config/database.php
// ...

return [

  // ...

  'default' => env('DB_CONNECTION', 'mysql'),

  'connections' => [

    // ...

    'mysql' => [
        'driver' => 'mysql',
        'url' => env('DATABASE_URL'),
        'host' => env('RDS_HOSTNAME', '127.0.0.1'),
        'port' => env('RDS_PORT', '3306'),
        'database' => env('RDS_DB_NAME', ''),
        'username' => env('RDS_USERNAME', ''),
        'password' => env('RDS_PASSWORD', ''),
        'unix_socket' => env('DB_SOCKET', ''),
        'charset' => 'utf8mb4',
        'collation' => 'utf8mb4_unicode_ci',
        'prefix' => '',
        'prefix_indexes' => true,
        'strict' => true,
        'engine' => null,
        'options' => extension_loaded('pdo_mysql') ? array_filter([
              PDO::MYSQL_ATTR_SSL_CA => env('MYSQL_ATTR_SSL_CA'),
          ]) : [],
    ],

    // ...
  ],
  // ...
];
The database configuration is based on the RDS_* environment variables, which Elastic Beanstalk sets automatically whenever a database instance is created.
The database is now ready to use.
Build assets with Vite
Now that Laravel uses Vite to bundle assets, deploying requires a build step. There are a few options, such as using CodePipeline to run CodeBuild and deploy to Elastic Beanstalk.
However, to keep things simple for this tutorial, you’ll build locally and tell Elastic Beanstalk to deploy the built files while keeping them out of your Git repo.
To this, create the file .ebignore, open it in your code editor, and copy and paste the contents of your .gitignore file into .ebignore.
Then, remove the line /public/build from .ebignore.
I would also add a comment to the top of .ebignore documenting the change:
# .ebignore
# This file is identical to .gitignore apart from one line; it does not
# ignore `/public/build`, allowing the `build` directory to be deployed
# ...
If assets have not been built with Vite, after deploying your Laravel app to Elastic Beanstalk, you will get an error, “Vite manifest not found …”.
With that in place, build the app’s NPM dependencies:
npm run buildRemember, whenever you make CSS or JavaScript changes, you’ll need to run npm run build before deploying.
Commit your code with Git
To deploy your app, initialize a Git repository, optionally rename your primary branch to main, and commit your changes. Note the new Laravel project already comes with a .gitignore file.
In the terminal:
git init
git branch -M main
git add .
git commit -m 'Initial commit: new Laravel project'
Deploy Laravel to Elastic Beanstalk
Deploying your app to EB involves two steps:
Initialize an Elastic Beanstalk application
Next, you’ll initialize an Elastic Beanstalk Application. Back in your terminal, run:
eb init --platform php --region us-east-1 laravel-memcache --keyname <YOUR_KEY_NAME>--keyname is optional, but useful to have SSH access to the EC2 instance EB deploys. You can conveniently SSH into an EB EC2 instance with eb ssh.
Setting the platform to php will install the latest default version of PHP that Elastic Beanstalk uses. At the time of writing, it uses PHP version 8.2.9;
I’m using us-east-1 as my AWS region. You can specify another if you prefer.
Running eb init creates the directory and file .elasticbeanstalk/config.yml with the config you specified and adds a few Elastic Beanstalk-related entries to your .gitignore file.
It also creates an Application on Elastic Beanstalk. I find the EB Application naming confusing and prefer to consider it an EB project. An EB Application can contain multiple Environments. Your Laravel application will be run within an Environment that lives in an Application: EB Application → EB Environment → My application.
# output
Application laravel-memcache has been created.
You have just set up a new Elastic Beanstalk application called laravel-memcache.
Create and deploy an Elastic Beanstalk environment
Next, create an Elastic Beanstalk environment to run our application in:
eb create laravel-memcache-env -db.engine mysqlNotice that you’re adding a MySQL database to our EB environment. You’ll be prompted for a username and password for the database. You can set them to whatever you like, but note that when choosing your password, AWS does not handle symbols very well (! $ @, etc.), and using them can cause some unexpected behavior. Stick to letters and numbers, and make sure the password is at least eight characters long.
The eb create ... command will create an AWS Relational Database Service (RDS) instance associated with this application. When you terminate this application, the database instance will also be destroyed. If you need an RDS instance independent of your Elastic Beanstalk application, create one via the AWS RDS interface.
By default, AWS regions have default VPCs. However, if, for some reason, the AWS region you’re creating in does not have a default VPC, creation will fail with an error like:
'CREATE_FAILED' Reason: The following resource(s) failed to create: [AWSEBLoadBalancer]. Default VPC not found. The solution is to create a default VPC in the region.
This environment creation process will take about five to fifteen minutes. Once it’s complete, run the following command to open your app in a browser:
(venv) $ eb openYour app should look and work the same as it does locally.
For subsequent deployments, you will commit your code to Git and run eb deploy. eb create creates your EB environment and deploys your code, so there’s no need to run eb deploy after eb create if no changes have been made.
Test the application by adding a few tasks.
If you get a 500 error when you open the application, check the logs. They’re in the EB console in the’ Logs’ side menu. Check your environment variables to make sure they’re set correctly.
You could also set the environment variable APP_DEBUG to true to enable debugging for Laravel with eb setenv APP_DEBUG=true.
You now have a Laravel app running on Elastic Beanstalk. With this complete, you can improve your app’s performance by adding caching.
Set up caching in Laravel
- Create a Memcached-compatible cache
- Configure Elastic Beanstalk to use your cache
- Install
libmemcachedon Amazon Linux 2023 - Install the
memcachedPHP extension - Configure Laravel to use Memcached
Memcache is an in-memory, distributed cache. Its primary API consists of SET(key, value) and GET(key). Memcache is like a hashmap (or dictionary) spread across multiple servers, where operations are still performed in constant time.
The most common use for Memcache is to cache expensive database queries, and HTML renders so these expensive operations don’t need to happen repeatedly.
Create a Memcached-compatible cache
In this step, you’ll create a free Memcached-compatible cache with MemCachier.
MemCachier is a fully managed caching service that simplifies setting up and using Memcached in your web applications. Built for seamless integration with cloud services like Elastic Beanstalk, MemCachier offers developers a streamlined and hassle-free way to implement high-performance caching in their applications without worrying about the complexities of managing a cluster of Memcached servers.
To begin, create a new MemCachier cache. Choose Amazon Web Services (EC2) as the provider. Choose the same region as your Elastic Beanstalk Application. If you chose the same as me earlier, that is US East (N. Virginia), us-east-1. If you need to find your EB region, open .elasticbeanstalk/config.yml and look for the default_region property. Your cache must be in the same region as your app, so latency is as low as possible.
Choose the Free plan. Finally, click CREATE CACHE.
After creating your cache, you’ll find its configuration settings (Username, Password, Servers) on the CACHES dashboard.
You’ll need to add these variables as Elastic Beanstalk environment variables.
Configure Elastic Beanstalk to use your cache
In your terminal window, set your MemCachier configuration values as Elastic Beanstalk environment variables with the following command:
eb setenv MEMCACHIER_USERNAME=<username> MEMCACHIER_PASSWORD=<password> MEMCACHIER_SERVERS=<servers>For example, eb setenv MEMCACHIER_USERNAME=1E4630 MEMCACHIER_PASSWORD=E9692E5BA662E5AD55477ED1FC5EF9B3 MEMCACHIER_SERVERS=mc3.dev.ec2.memcachier.com:11211
You can confirm that they’ve been set by running:
eb printenvYou should see your MemCachier environment variables along with all other existing variables.
Install libmemcached on Amazon Linux 2023
You must also install libmemcached, which the memcached PHP extension depends on. In Amazon Linux 2 and earlier, that could be achieved by adding libmemcached-devel as a package to be installed in an .ebextensions config file. However, Amazon Linux 2023 does not include a libmemcached package, so libmemcached must be installed from source.
To install libmemcached on Amazon Linux 2023, create the file .ebextensions/03-libmemcached.config and add the following:
# .ebextensions/03-libmemcached.config
packages:
  yum:
    cyrus-sasl.x86_64: []
    cyrus-sasl-devel: []
    libevent-devel.x86_64: []
    cmake.x86_64: []
    bison.x86_64: []
    flex.x86_64: []
commands:
  command block:
    command: |
      wget https://github.com/awesomized/libmemcached/archive/refs/heads/v1.x.zip
      unzip v1.x.zip
      mkdir build-libmemcached
      cd $_
      cmake -DENABLE_SASL=ON ../libmemcached-1.x
      make
      sudo make install
      cd ..
      sudo rm -rf build-libmemcached libmemcached-1.x v1.x.zip
These commands will be run before the application and web server are set up. EB extension commands differ from container commands, which run after the application and web server have been set up. For example, you used a container command in .ebextensions/02-migrations.config when php artisan migrate is run. Read more about customizing software on Linux servers on EB.
libmemcached-awesome is an open source C/C++ client library and tools for the memcached server. It is a resurrection of the original work from Brian Aker at libmemcached.org and is actively maintained.
I recommend you verify the ZIP URL is up to date by going to the libmemcached-awesome GitHub page, clicking the green <> Code button, then copy the Download ZIP link.
The following explains each libmemcached install command:
- wget …: Fetch the source code as a ZIP file from the libmemcached-awesome GitHub repo.
- unzip v1.x.zip: Unzip the downloaded ZIP file.
- mkdir build-libmemcached: Create a folder for building libmemcached from source.
- cd $_: Change into the newly created folder.
- cmake -DENABLE_SASL=ON ../libmemcached-1.x: Configure and generate build files with SASL enabled.
- make: Compile and build.
- sudo make install: Install.
- cd ..: Move to the parent directory.
- sudo rm -rf …: Clean up.
Install the memcached PHP extension
To install the memcached PECL extension in your EB environment, create the file .ebextensions/04-memcached-php-extension.config, open it in your editor, and add the following:
# .ebextensions/04-memcached-php-extension.config
commands:
  01_install_memcached:
    command: /usr/bin/yes 'no'| /usr/bin/pecl install --configureoptions 'enable-memcached-sasl="yes"' memcached
    test: "! /usr/bin/pecl info memcached"
  02_remove_extension:
    command: /bin/sed -i -e '/extension="memcached.so"/d' /etc/php.ini
  03_create_conf:
    command: /bin/echo 'extension="memcached.so"' > /etc/php.d/41-memcached.ini
Those commands do the following:
- Install the
memcachedPHP extension with SASL support if not installed. - Clean up the main
php.inifile by removing existing lines that load thememcachedextension. - Create a dedicated configuration file for the memcached extension, ensuring it is loaded properly.
If libmemcached wasn’t installed in the previous step, you’ll get the error configure: error: memcached support requires libmemcached.
Configure Laravel to use Memcached
Next, configure your cache by updating the memcached settings in config/cache.php:
// config/cache.php
//..

'default' => env('CACHE_DRIVER', 'memcached'),

// ...

'stores' => [
  // ...

  'memcached' => [
      'driver' => 'memcached',
      'persistent_id' => 'memcached_pool_id',
      'sasl' => [
          env('MEMCACHIER_USERNAME'),
          env('MEMCACHIER_PASSWORD'),
      ],
      'options' => [
          // some nicer default options
          // - nicer TCP options
          Memcached::OPT_TCP_NODELAY => TRUE,
          Memcached::OPT_NO_BLOCK => FALSE,
          // - timeouts
          Memcached::OPT_CONNECT_TIMEOUT => 2000,    // ms
          Memcached::OPT_POLL_TIMEOUT => 2000,       // ms
          Memcached::OPT_RECV_TIMEOUT => 750 * 1000, // us
          Memcached::OPT_SEND_TIMEOUT => 750 * 1000, // us
          // - better failover
          Memcached::OPT_DISTRIBUTION => Memcached::DISTRIBUTION_CONSISTENT,
          Memcached::OPT_LIBKETAMA_COMPATIBLE => TRUE,
          Memcached::OPT_RETRY_TIMEOUT => 2,
          Memcached::OPT_SERVER_FAILURE_LIMIT => 1,
          Memcached::OPT_AUTO_EJECT_HOSTS => TRUE,

      ],
      'servers' => array_map(function($s) {
          $parts = explode(":", $s);
          return [
              'host' => $parts[0],
              'port' => $parts[1],
              'weight' => 100,
          ];
        }, explode(",", env('MEMCACHIER_SERVERS', 'localhost:11211')))
  ],

  // ...
],

//
The code above configures Laravel’s caching engine with MemCachier, which allows you to use your Memcache in a few different ways:
- Directly access the cache via
get,set,delete, and so on - Cache results of functions with the
rememberForeverfunction - Use Memcache for session storage
- Cache entire responses
Implement caching strategies in Laravel
In this section, you’ll implement several caching techniques in Laravel:
- Caching resource-intensive database queries
- Using Memcache for session storage
- Caching entire responses
Cache expensive database queries
Memcache is often used to cache the results of expensive database queries. Of course, our simple task list does not have any resource-intensive queries, but let’s assume that fetching all the tasks from the database is a slow operation for this tutorial.
The rememberForever function makes it easy to add caching to Laravel. You provide two arguments for it:
- A cache key
- A function that queries your database and returns results
The rememberForever function looks up the key in your cache. If the key is present, its corresponding value is returned. Otherwise, the database function you provided is called. Whatever that function returns is stored in the cache with the corresponding key for future lookups.
The first time you call rememberForever, the resource-intensive database function is called, but every successive call to rememberForever obtains the value from the cache.
Use the rememberForever function to add caching to the task view
controller in routes/web.php:
// routes/web.php
// ...
use Illuminate\Http\Request;
use Illuminate\Support\Facades\Cache;

// ...

// Show Tasks
Route::get('/', function () {
  $tasks = Cache::rememberForever('all_tasks', function () {
    return Task::orderBy('created_at', 'asc')->get();
  });

  return view('tasks', [
    'tasks' => $tasks
  ]);
});
As you might have noticed, you now have a problem if you add or remove a task. Because rememberForever fetches the task list from the cache, any changes to the database won’t be reflected in the task list. For this reason, whenever you change the tasks in the database, you must invalidate the cache:
// routes/web.php
// Add New Task
Route::post('/tasks', function (Request $request) {
    // ...
    $task->save();

    Cache::forget('all_tasks');

    return redirect('/');
});

// Delete Task
Route::delete('/tasks/{task}', function (Task $task) {
  $task->delete();

  Cache::forget('all_tasks');

  return redirect('/');
});
Commit your changes and deploy the app to EB with the following:
git add .
git commit -m 'Add expensive database query caching'
eb deploy
View Memcache statistics
To help demystify Memcache caching operations, it’s invaluable to visualize what’s going on under the hood.
Though very cumbersome, one way to do that is to telnet into a Memcached server and run the stats command to see changes as operations are performed on your cache.
With MemCachier, however, you get an analytics dashboard that displays your cache’s statistics to monitor performance and troubleshoot issues quickly and easily.
To open your MemCachier analytics dashboard, log in to your MemCachier account, click Caches, then click the Analytics button for your cache.
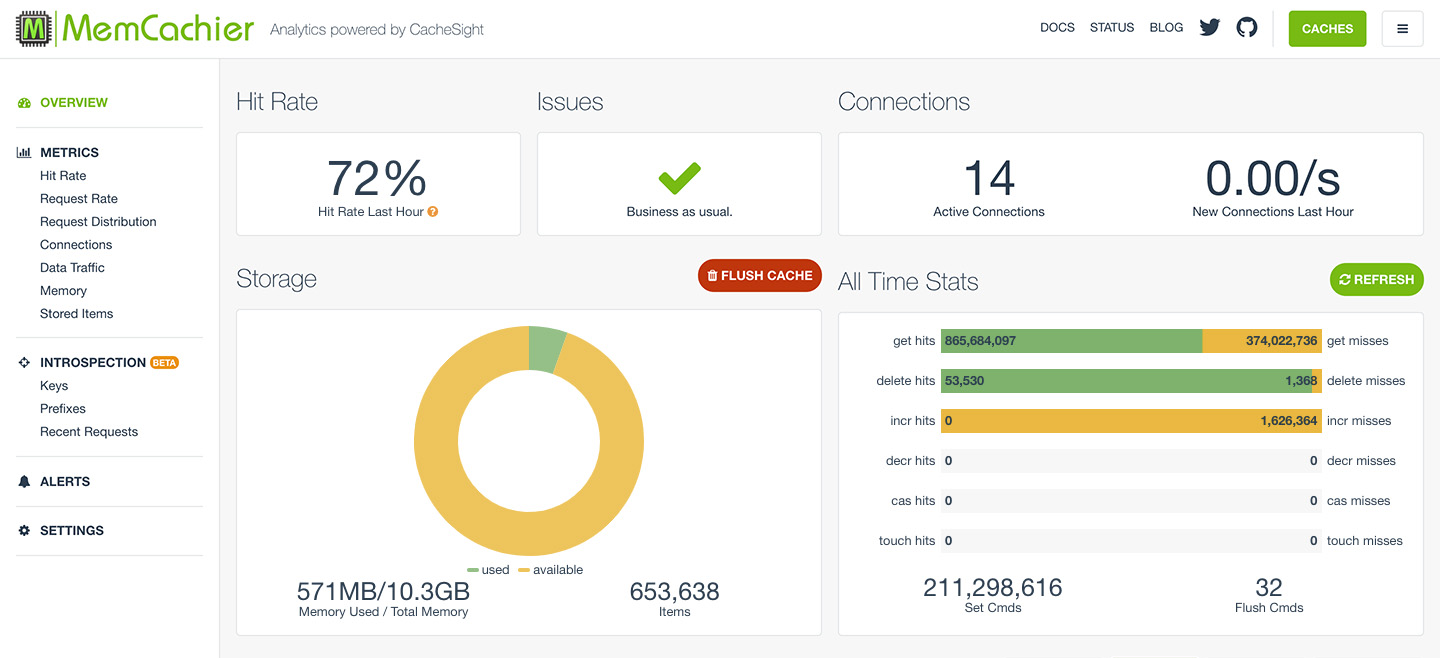
You can see that the first time you access the page, the get misses increases by one. This is because the first time rememberForever is called, the task list is not in the cache. The Set Cmds also increases because the task list is saved to the cache. If you refresh the page, the misses stay the same, but the get hits increases because the task list is served from the cache.
When you add a new task or delete a task, your misses will increase again because the cache was invalidated.
Using Memcache for session storage
Memcache works well for storing information for short-lived sessions that time out. However, because Memcache is a cache and therefore not persistent, long-lived sessions are better suited to permanent storage options, such as your database.
Changing the session store from file (default) to memcached is done by setting the SESSION_DRIVER config variable:
eb setenv SESSION_DRIVER=memcachedNow, the next time you load your app, get misses will increase by an additional one, and your session will be cached. On subsequent page loads, get hits will increase by an additional one, giving you two get hits in total: one for the cached session and one for the cached tasks query.
Laravel session config can be found in config/session.php. Notice you have set the driver option by setting the SESSION_DRIVER environment variable. You can read more in the Laravel HTTP Session documentation.
Caching entire responses
In Laravel, it’s easy to cache the entire responses using
the laravel-responsecache package. Response caching in Laravel
is similar to view caching in Ruby on Rails. By default, laravel-responsecache will cache all successful GET requests that return text-based content (such as HTML and JSON) for one week.
Even though your create task form includes a CSRF token, laravel-responsecache includes Replacers for replacing dynamic content in a cached response. By default, a CSRF replacer is included and works without additional configuration. Custom Replacers can also be written.
To use laravel-responsecache, first, install the package:
composer require spatie/laravel-responsecacheNext, install the provided middleware \Spatie\ResponseCache\Middlewares\CacheResponse::class and \Spatie\ResponseCache\Middlewares\DoNotCacheResponse in the http kernel:
// app/Http/Kernel.php

// ...

protected $middlewareGroups = [
   'web' => [
       // ...
       \Spatie\ResponseCache\Middlewares\CacheResponse::class,
   ],

// ...

protected $middlewareAliases = [
   ...
   'doNotCacheResponse' => \Spatie\ResponseCache\Middlewares\DoNotCacheResponse::class,
];
And finally, set the RESPONSE_CACHE_DRIVER environment variable to memcached.
eb setenv RESPONSE_CACHE_DRIVER=memcachedCommit and deploy your code:
git add .
git commit -m 'Add response caching'
eb deploy
Notice that tasks can no longer be added or deleted. This is because the cached response is not invalidated when its contents change. The response must be invalidated as when you cached the tasks query.
To invalidate or clear the cached response, make the following changes to routes/web.php:
// routes/web.php
...
use Illuminate\Support\Facades\Cache;
use Spatie\ResponseCache\Facades\ResponseCache;

...

// Add New Task
Route::post('/tasks', function (Request $request) {
    ...

    Cache::forget('all_tasks');
    ResponseCache::forget('/');

    return redirect('/');
});

// Delete Task
Route::delete('/tasks/{task}', function (Task $task) {
    ...

    Cache::forget('all_tasks');
    ResponseCache::forget('/');

    return redirect('/');
});
With those changes, you clear the cache for a specific URI, /. Several other options exist for invalidating the cache explained in the laravel-responsecache documentation.
Note, at this point, caching the tasks query (which you did earlier to simulate caching an expensive computation) doesn’t add any additional caching benefit, as response caching takes care of caching that query. However, you could imagine a view using data from multiple queries. If one dataset changed, it would still be beneficial for the other unmodified queries to remain cached so that regenerating a response happens more quickly.
Profiling Memcache performance
In this guide, you’ve learned how to cache expensive database queries, sessions, and full-page responses. It’s useful to know not just how our cache is performing as a whole, but how individual parts of it are working.
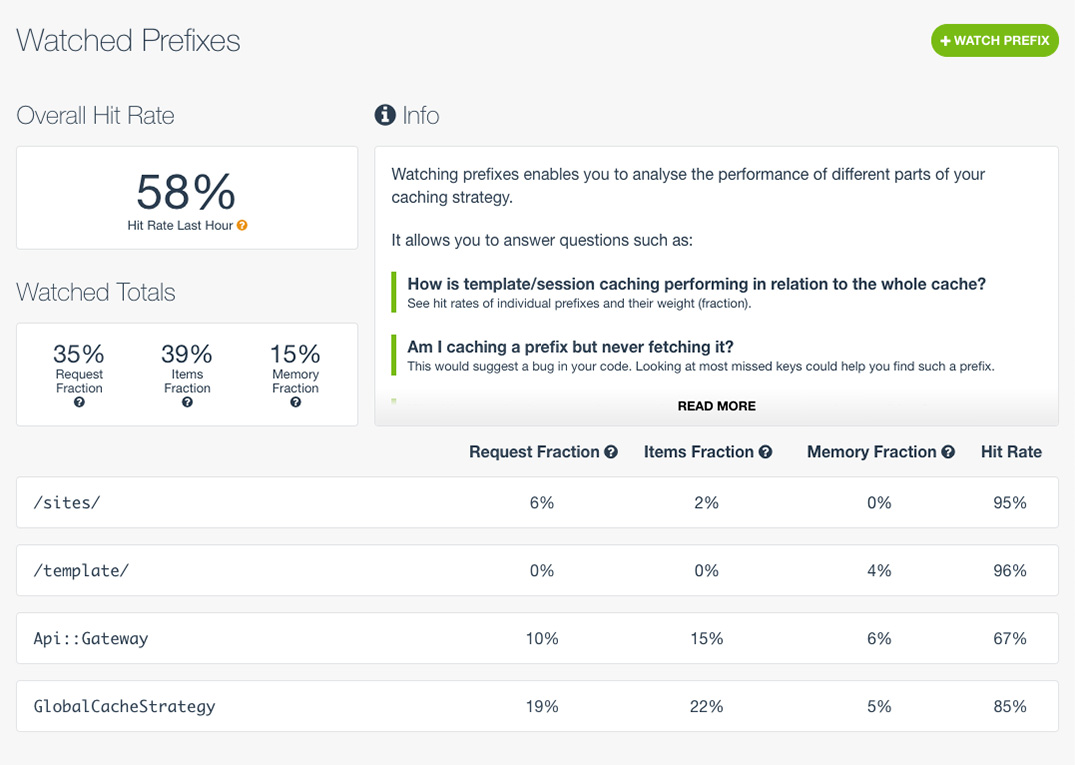
Imagine in each caching strategy you implemented, keys had a prefix, query_, session_ and response_. Such key prefixes would allow you to profile cache performance. MemCachier’s paid plans come with a powerful feature set called Introspection, allowing you to track the performance of individual prefixes and giving you deep insight into your cache. For example, you could monitor the hit rate, or hit ratio, of any prefix.
Clean up
Once you’re done with this tutorial and no longer need your app, you can clean up your Elastic Beanstalk Application and Environment by using:
eb terminate --allWithout the -all option, only your Environment will be terminated.
You can also destroy your MemCachier cache from the Caches dashboard if you no longer need it.