Scaling an Express.js Application with Memcache on Amazon Elastic Beanstalk
 Lindsey
~ July 9, 2018
Lindsey
~ July 9, 2018
This post is out of date. Instead, read Deploy an Express.js application on AWS Elastic Beanstalk and scale it with Memcached.
In this guide, we’ll explore how to create a simple Express 4 application, deploy it using Amazon Elastic Beanstalk, then add Memcache to alleviate a performance bottleneck.
Memcache is a technology that improves the performance and scalability of web apps and mobile app backends. You should consider using Memcache when your pages are loading too slowly or your app is having scalability issues. Even for small sites, Memcache can make page loads snappy and help future-proof your app.
Prerequisites
Before you complete the steps in this guide, make sure you have all of the following:
- Familiarity with Node.js (and ideally Express.js)
- An AWS account. If you haven’t used AWS before, you can set up an account here.
- The AWS CLI installed and configured on your computer.
- Node.js,
npm,git, and the EB CLI installed on your computer.
Deploying an Express.js application to Elastic Beanstalk
Express.js is a minimalist framework that doesn’t require an application
skeleton. To make things easier for you, we’ve got a basic example application
set up here.
If you’d like to follow along, go ahead and clone that to your local machine,
and cd into the expressjs-elastic-beanstalk-tutorial directory.
$ git clone git@github.com:memcachier/expressjs-elastic-beanstalk-tutorial.git
$ cd expressjs-elastic-beanstalk-tutorial
Next, install all of the required packages using:
$ npm installTo simplify development, we’ve use a template engine, ejs, but you can use
whichever engine you prefer, including mustache, pug, or nunjucks.
Now that we’ve installed all the packages we need, we can add our app code. We’ll create a page that calculates the largest prime number that’s smaller than a number a visitor submits.
Open up app.js and add the following code into the section
labeled ADD THE DIY CODE HERE:
/* ADD THE DIY CODE HERE */

// Super simple algorithm to find largest prime <= n
var calculatePrime = function(n){
  var prime = 1;
  for (var i = n; i > 1; i--) {
    var is_prime = true;
    for (var j = 2; j < i; j++) {
      if (i % j == 0) {
        is_prime = false;
        break;
      }
    }
    if (is_prime) {
      prime = i;
      break;
    }
  }
  return prime;
}

// Set up the GET route
app.get('/', function (req, res) {
  if(req.query.n) {
    // Calculate prime and render view
    var prime = calculatePrime(req.query.n);
    res.render('index', { n: req.query.n, prime: prime});
  }
  else {
    // Render view without prime
    res.render('index', {});
  }
});

/* END DIY CODE */
Now let’s add a corresponding view. Open up the file views/index.ejs and copy
the following ejs-enhanced HTML into it:
<!-- ADD DIY INDEX.HTML CODE HERE -->
<!DOCTYPE html>
<html lang="en">
  <head>
    <meta charset="utf-8">
    <meta name="viewport" content="width=device-width, initial-scale=1, shrink-to-fit=no">

    <link rel="stylesheet" href="https://maxcdn.bootstrapcdn.com/bootstrap/4.0.0/css/bootstrap.min.css">

    <title>Express.js caching example</title>
  </head>

  <body>
    <div class="container">
      <h1>
        Express.js caching example
      </h1>

      <p class="lead">For any number N (max 10000), we'll find the largest prime number
        less than or equal to N.
      </p>
      <!-- Form to submit a number -->
      <form class="form-inline" action="/">
        <input type="text" class="form-control" name="n" />
        <input type="submit" class="btn btn-primary" value="Find Prime" />
      </form>

      <hr>
      <!-- Show the result -->
      <% if (locals.prime) { %>
        <div class="alert alert-primary">
          <p class="lead">Largest prime less or equal than <%= n %> is <%= prime %></p>
        </div>
      <% } %>

      <!-- TODO: Error handling -->

    </div>
  </body>
</html>
You now have a working app that you can start locally by running npm start.
Deploying with Elastic Beanstalk
To deploy the app to Elastic Beanstalk (EB), it needs to live in a Git
repository. We’ve already created a .gitignore file with the following lines
in it:
node_modules/
.elasticbeanstalk/
This prevents any secret or unwanted configuration information ending up in Git.
Let’s go ahead and commit the initial changes we’ve made to the app:
$ git add .
$ git commit -m 'Added initial DIY code.'
Next, we’ll need to create a EB CLI repository with enough information so EB
knows how to run it. Start by creating the repository using eb init:
$ eb init --platform node.js --region us-west-2
# Application expressjs-elastic-beanstalk-tutorial has been created.
Then create an environment running a sample application:
$ eb create --sample node-express-envDon’t worry too much about the sample app. This just gives you all of the
boiler plate for a basic Amazon Elastic Beanstalk setup. For now it’s running a
default application. If you would like to see it when environment creation
completes, use the eb open command to open the environment’s URL in the
default browser.
$ eb openBut that doesn’t do us any good. We want our own application up and running. In
order to do that we’ll need to set up a node configuration file to tell EB the
npm start command. So create a folder called .ebextensions/ and add the
file nodecommand.config to it.
$ mkdir .ebextensions
$ touch .ebextensions/nodecommand.config
Then add the following code to nodecommand.config
# expressjs-elastic-beanstalk-tutorial/.ebextensions/nodecommand.config
option_settings:
  aws:elasticbeanstalk:container:nodejs:
    NodeCommand: "npm start"
Then stage this file in git, and deploy the changes:
$ git add .
$ git commit -m "Adding nodecommand.config"
$ eb deploy
If you haven’t already, run eb open and checkout your shiny new application!
Learn to write Express.js middleware
Our prime-calculating app works, but it has one mayor flaw: a user can submit invalid input, such as a string of letters. To validate the input, we’ll create middleware in Express.
There are several validation middleware packages available for Express, and you should use one of those in most cases. In this tutorial, we create our own validation for demonstration purposes.
Express middleware typically consists of a chain of functions that inspect and potentially modify the details of a request and its corresponding response. Each function takes three parameters:
- The
requestobject - The
responseobject - A
nextfunction that represents the next middleware function in the chain
Each middleware function can modify the request and response objects as
necessary. After doing so, it can either call the next middleware function or
return to terminate the chain prematurely.
For our app, we create a validation middleware function that parses the submitted query and checks whether it’s a number below 10000.
- If it is, the function calls
next. - If it isn’t, the function
returns an error response.
Add this function to app.js and call it when processing the GET route:
// ...

var validate = function(req, res, next) {
  if(req.query.n) {
    number = parseInt(req.query.n, 10);
    if(isNaN(number) || number < 1 || number > 10000){
      res.render('index', {error: 'Please submit a valid number between 1 and 10000.'});
      return;
    }
    req.query.n = number;
  }
  next();
}

app.get('/', validate, function (req, res) {
  // ...
})
// ...
The validation middleware might return an error message, which we need to display in the index.ejs view:
<!-- Show the result -->
<!-- ... -->

<!-- Error handling -->
<% if (locals.error) { %>
  <div class="alert alert-danger">
    <p class="lead"><%= error %></p>
  </div>
<% } %>
Commit and deploy your changes:
$ git commit -am 'Add input validation'
$ eb deploy
Open the app and submit some invalid queries to see the error message in action.
Adding caching to Express
Memcache is an in-memory, distributed cache. Its primary API consists of two
operations: SET(key, value) and GET(key). Memcache is like a hashmap
(or dictionary) that is spread across multiple servers, where operations are
still performed in constant time.
The most common use for Memcache is to cache expensive database queries and HTML renders so that these expensive operations don’t need to happen over and over again.
Set up Memcache
To use Memcache in Express, you first need to provision an actual Memcache
cache. MemCachier provides a fast and flexible
multi-tenant cache system that’s compatible with the protocol used by the
popular memcached software. When you create a
cache with MemCachier, you’re provided with one or more endpoints that you can
connect to using the memcached protocol, accessing your cache just as if you
had set up your own memcached server. So head over to
https://www.memcachier.com, sign up for an account, and create a free
development cache. If you need help getting it set up,
follow the directions here.
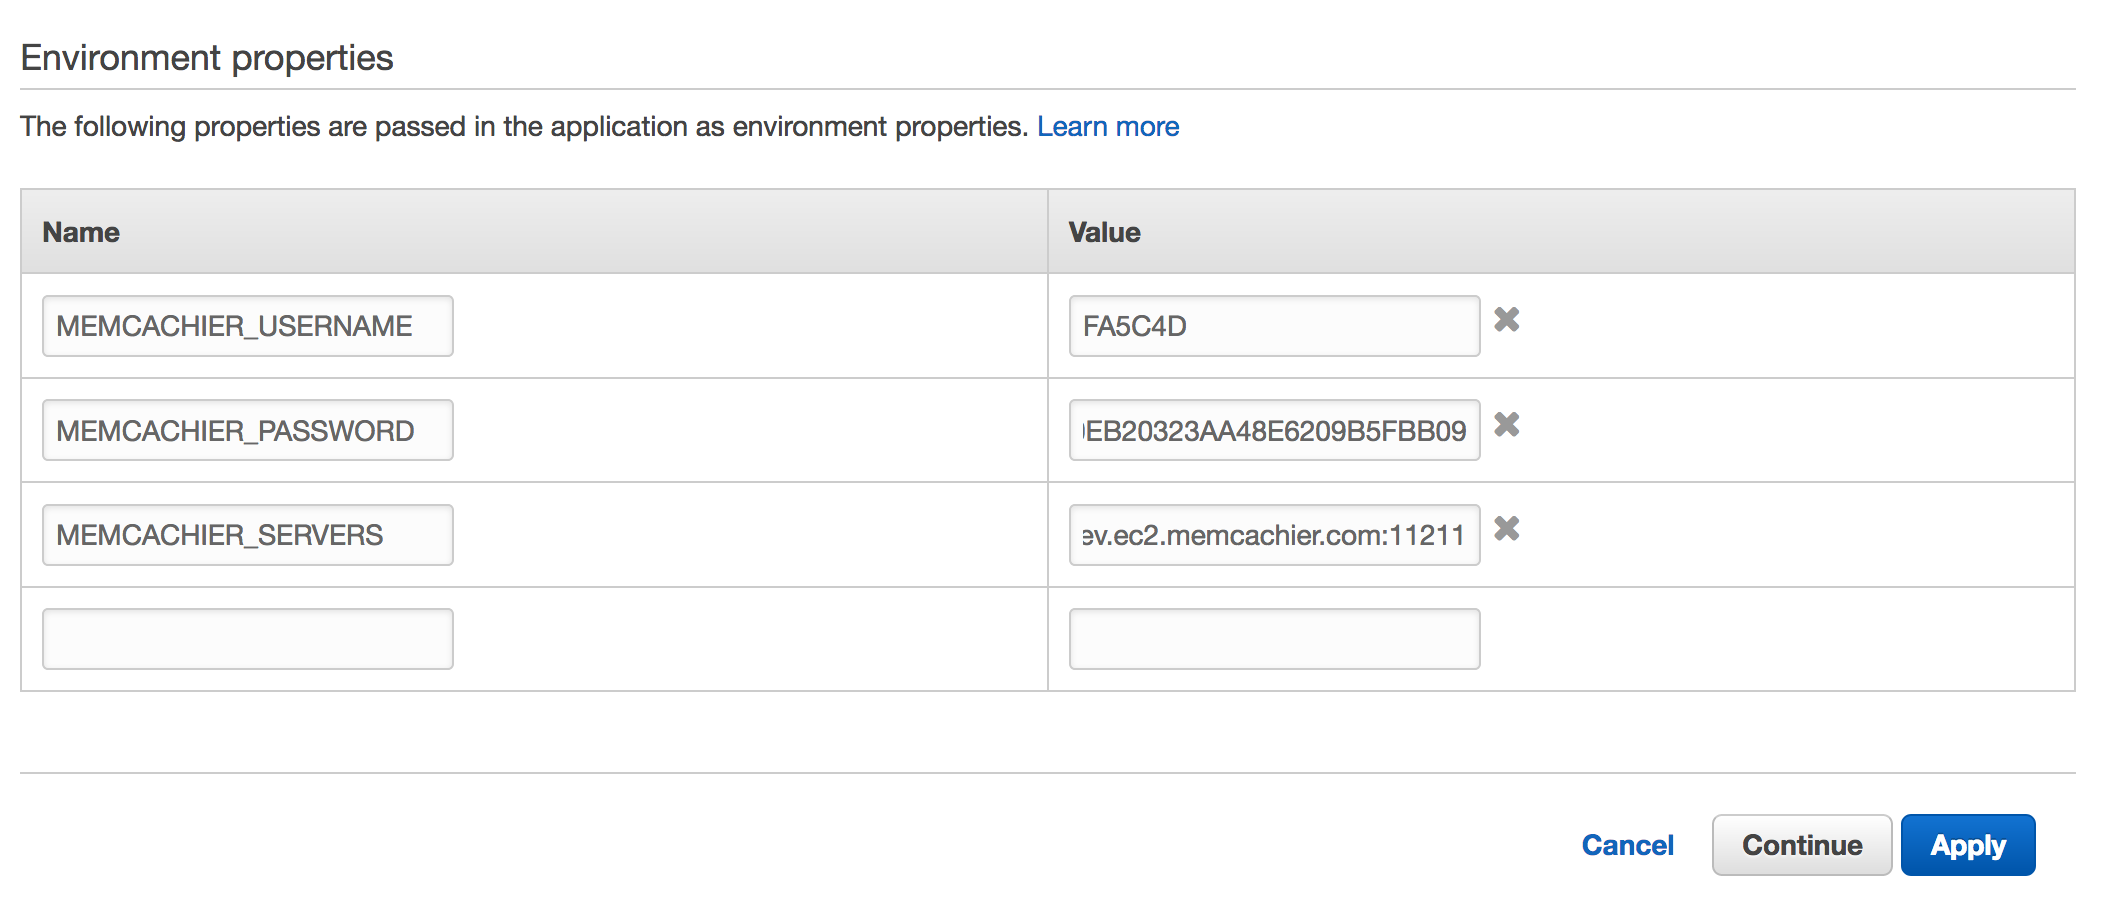
There are three config vars to you’ll need for your application to be able to
connect to your cache: MEMCACHIER_SERVERS, MEMCACHIER_USERNAME, and
MEMCACHIER_PASSWORD. You can either add these variables through the
management console, or using the EB CLI.
EB provides an in-browser management tool for your application. To access it, run:
$ eb consoleThis will open the management console in your default browser. Once there, click
on Configuration in the left side menu. Then select modify under the
Software portion. If you scroll to the bottom, you’ll see an Environment properties section. This is where we’ll add our environment variables.
If you’d prefer to keep everything running in the console, we can do that too.
$ eb setenv MEMCACHIER_USERNAME=<username> MEMCACHIER_PASSWORD=<password> MEMCACHIER_SERVERS=<servers>We can confirm that they’ve been set by running:
$ eb printenv
Environment Variables:
     MEMCACHIER_SERVERS = mc1.dev.ec2.memcachier.com:11211
     MEMCACHIER_USERNAME = <your-cache-username>
     MEMCACHIER_PASSWORD = <your-cache-password>
Once your environment variables are set up, next step is to install memjs
with npm so we can use caching in Express.
$ npm install memjsand configure it in app.js:
// ...

var memjs = require('memjs')
var mc = memjs.Client.create(process.env.MEMCACHIER_SERVERS, {
  failover: true,  // default: false
  timeout: 1,      // default: 0.5 (seconds)
  keepAlive: true  // default: false
})

// ...
Caching expensive computations
There are two reasons why caching the results of expensive computations is a good idea:
- Pulling the results from the cache is much faster, resulting in a better user experience.
- Expensive computations use significant CPU resources, which can slow down the rest of your app.
Our prime number calculator doesn’t really have any expensive computations, because we limit the input value to 10000. For the sake of the tutorial, however, let’s assume that calculating the prime is an expensive computation we would like to cache.
To achieve this, let’s modify the GET route in app.js as follows:
// ...

app.get('/', validate, function (req, res) {
  if(req.query.n) {
    var prime;
    var prime_key = 'prime.' + req.query.n;
    // Look in cache
    mc.get(prime_key, function(err, val) {
      if(err == null && val != null) {
        // Found it!
        prime = parseInt(val)
      }
      else {
        // Prime not in cache (calculate and store)
        prime = calculatePrime(req.query.n)
        mc.set(prime_key, '' + prime, {expires:0}, function(err, val){/* handle error */})
      }
      // Render view with prime
      res.render('index', { n: req.query.n, prime: prime });
    })
  }
  else {
    // Render view without prime
    res.render('index', {});
  }
});

// ...
Deploy these changes with eb and submit some numbers to find primes:
$ git commit -am 'Add caching'
$ eb deploy
The page should work just as before. However, under the hood, already calculated primes are now cached. To see what’s going on in your cache, open the MemCachier dashboard (which is where you found your environment variables.)
On the dashboard you can refresh the stats each time you request a prime.
The first time you enter a number, the get misses will increase. For any
subsequent request of the same number, you should get an additional get hit.
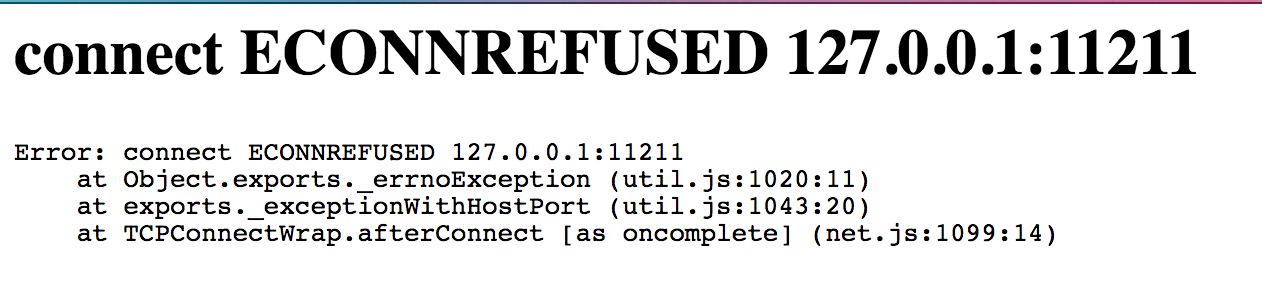
Check and make sure that your MEMCACHIER_* ENV variables are set correctly.
Caching rendered views
Rendering HTML views is generally an expensive computation, and you should
cache rendered views whenever possible. In Express, you can achieve this easily
with middleware. Let’s add a cacheView middleware function to app.js that
checks whether the view for a given URL (including query parameters) is in the
cache.
- If it is, the view is sent immediately from the cache.
- If not, we wrap the
sendfunction in the response object to cache the rendered view and call thenextfunction.
// ...

var cacheView = function(req, res, next) {
  var view_key = '_view_cache_' + req.originalUrl || req.url;
  mc.get(view_key, function(err, val) {
    if(err == null && val != null) {
      // Found the rendered view -> send it immediately
      res.send(val.toString('utf8'));
      return;
    }
    // Cache the rendered view for future requests
    res.sendRes = res.send
    res.send = function(body){
      mc.set(view_key, body, {expires:0}, function(err, val){/* handle error */})
      res.sendRes(body);
    }
    next();
  });
}

app.get('/', validate, cacheView, function (req, res) {
  // ...
});
//..
This is easy enough and works well. However, if the view ever changes, we need
to be careful. To illustrate the case of a changing page, let’s add a “Like”
button to each number and its calculated largest prime. Let’s put the button
just below the calculated prime in the index.ejs file:
<!-- ... -->

<!-- Show the result -->
<% if (locals.prime) { %>
  <div class="alert alert-primary">
    <p class="lead">Largest prime less or equal than <%= n %> is <%= prime %></p>
    <p>Likes: <%= likes %></p>
    <form method='POST'>
      <input type="hidden" name="n" value="<%= n %>" />
      <input type="submit" class="btn btn-primary" value="Like!" />
    </form>
  </div>
<% } %>

<!-- ... -->
The like is submitted via POST request, and to parse its input we need
the body-parser package:
$ npm install body-parserWe can now create a controller for the POST route in app.js and store the
posted like in a variable.
Storing likes in a variable is a bad idea. Each time the app restarts, it wipes all likes. We do this here only for convenience. In a production application, you should store such information in a database.
// ...

var bodyParser = require('body-parser');
app.use(bodyParser.json());
app.use(bodyParser.urlencoded({ extended: true }));

// Like storage (in a serious app you should use a permanent storage like a database)
var likes = {}

app.post('/', function (req, res) {
  likes[req.query.n] = (likes[req.query.n] || 0) + 1
  res.redirect('/?n=' + req.query.n)
});

// ...
In addition, we also need to make sure the likes are passed to the render
function in the GET controller:
// ...

// Render view with prime
res.render('index', { n: req.query.n, prime: prime, likes: likes[req.query.n] || 0 });

// ...
To illustrate the problem with changing pages, let’s commit our current implementation and test it:
$ git commit -am 'Add view caching'
$ eb deploy
If you submit a number, you will now get the largest prime below it, together with a Like button. However, when you click Like!, the like count doesn’t increase. This is because the view is cached.
To resolve this, we need to invalidate the cached view whenever it is updated:
// ...

app.post('/', function (req, res) {
  mc.delete('_view_cache_/?n=' + req.body.n, function(err, val){/* handle error */});
  likes[req.query.n] = (likes[req.query.n] || 0) + 1
  res.redirect('/?n=' + req.query.n)
});

// ...
Deploy again to Elastic Beanstalk:
$ git commit -am 'Fix view caching'
$ eb deploy
Now you can see the number of likes increase.
Session Caching
Memcache works well for storing information for short-lived sessions that time out. However, because Memcache is a cache and therefore not persistent, long-lived sessions are better suited to permanent storage options, such as your database.
To use sessions in Express, you need express-session. To store the sessions
in Memcache, you need connect-memjs:
$ npm install express-session connect-memjsThe configuration in app.js is easy enough:
//...

var session = require('express-session');
var MemcachedStore = require('connect-memjs')(session);

// Session config
app.use(session({
  secret: 'ClydeIsASquirrel',
  resave: 'false',
  saveUninitialized: 'false',
  store: new MemcachedStore({
    servers: [process.env.MEMCACHIER_SERVERS],
    prefix: '_session_'
  })
}));

//...
Now you can now use sessions as you please. For more information about session usage in Express, check out the express-session documentation.
Clean up
Once you’re done with this tutorial and don’t want to use it anymore, you can clean up your EB instance by using:
$ eb terminateThis will clean up all of the AWS resources.