Deploy an Express.js application on AWS Elastic Beanstalk and scale it with Memcached
 Paddy
~ January 6, 2023
Paddy
~ January 6, 2023
Express is a massively popular framework for Node and is a tried and tested choice for building fast web apps and APIs. AWS Elastic Beanstalk is a service for deploying and scaling web applications and services. It offers a quick and efficient way to deploy your Express app.
In this tutorial, you’ll deploy an Express application using Elastic Beanstalk, and then scale it by adding caching with Memcached. You’ll first build an Express app that calculates a prime number, features a like button, and uses a template engine. Those features will enable you to later implement several caching strategies. You’ll then push your app’s code to Elastic Beanstalk to deploy it. Finally, you’ll implement three object caching techniques to make your app faster and more scalable.
By the end of this tutorial, you’ll be able to deploy an Express application using Elastic Beanstalk, implementing techniques for caching expensive computations, rendered views, and sessions.
Prerequisites
- A basic understanding Express, including middleware and template engines.
- An AWS account.
- The EB CLI installed and configured on your machine.
- Node.js installed on your machine.
- git installed on your machine.
Create an Express server
Set up the project
First, open your terminal window and create a new project directory:
mkdir express-memcacheThen, change into to the newly created directory:
cd express-memcacheInitialize a new npm project:
npm init -yAnd install Express:
npm install express@4.18.2Create the server
Now Express is installed, create a new file, server.js, and open it with your code editor. Then, add the following:
// server.js
const express = require('express');

const app = express();
The first line is imports the Express package you installed and stores it as a variable. That express variable is a function, which you then call and assign to the app variable. This approach allows you to create multiple apps, each with its own requests and responses. You’ll create just a single app for this tutorial.
Next, add a route for your app’s root path:
// server.js
const express = require('express');

const app = express();

app.get('/', (req, res) => {
  res.send('Success!');
});
These lines of code tell our server how to handle a GET request to the URL /. The second parameter of the app.get method is a callback for the handler, also known as a controller. In this case, you send a response, Success!.
Finally, start the server. Add the new lines:
// server.js
const express = require('express');

const app = express();

app.get('/', (req, res) => {
  res.send('Success!');
});

const port = process.env.PORT || 3000;
app.listen(port, () =>
  console.log(`Server is listening on port ${port}.`)
);
The port defaults to 3000 if a PORT environment variable is not set.
Back in the terminal, run your app with:
node server.jsNow, visit localhost:3000 in your web browser. Your browser will display, ‘Success!’. Your terminal window will display, Server is listening on port 3000..
Set up a template rendered view
In this step, you’ll install a template engine, create a template for your app’s root route (GET /), and update the route to use that template. Although not essential for a simple Express app, a template engine will enable you to cache rendered views later.
Install the Embedded JavaScript templates (ejs) library. If you prefer, you could use one of the other template engines that Express supports, like Mustache, Pug or Nunjucks.
Back in the terminal, run:
npm install ejsNow that ejs is installed, configure your Express app to use it.
Open the file server.js in your editor. Then, add the following to set the application setting property view engine to ejs:
// server.js
...

const app = express();

app.set('view engine', 'ejs'); // add

...
Another useful setting to be aware of is views. It tells an Express app where to look for template files. The default value is ./views.
Next, create a views directory. Then, create the file views/index.ejs and open it in your editor.
Add the starting template markup to that file:
<!-- views/index.ejs -->
<!DOCTYPE html>
<html lang="en">
  <head>
    <meta charset="utf-8">
    <meta name="viewport" content="width=device-width, initial-scale=1">
    <title>Find the largest prime number</title>
  </head>
  <body>
    <h1>Find the largest prime number</h1>

    <p>
      For any number N, find the largest prime number less than or equal to N.
    </p>
  </body>
</html>
With the template created, you will update your route to use it.
Open the file server.js and update the res.send line:
// server.js
...

app.get('/', (req, res) => {
  res.render('index'); // update
});

...
The response render method takes the name of a template as its first parameter. In this case, index matches the file views/index.ejs.
Restart your app to see the changes. Revisit your terminal window. Stop the server if it’s running by pressing CTRL+C. Then start the server again:
node server.jsVisit localhost:3000 in your web browser and it will now display the contents of your template.

Your app now has a template rendered view, but it doesn’t do anything yet. You’ll add functionality to find a prime number next.
Add functionality to your app
Find a prime number
In this step, you’ll add a function to your app that finds the largest prime number less than or equal to N, where N refers to any number.
N will be submitted via a form with the GET method to the root route (/), with N appended as a query parameter: localhost:3000/?n=10. The root route can have multiple URLs that produce rendered views, which can each be cached individually.
In views/index.ejs, add a form with an input element for entering N:
<!-- views/index.ejs -->
...

<p>
  For any number N, find the largest prime number less than or equal to N.
</p>

<form action="/" method="get">
  <label>
    N
    <input type="number" name="n" placeholder="e.g. 10" required>
  </label>
  <button>Find Prime</button>
</form>

...
The form’s action submits to /, which is handled by the home route, app.get('/' ...) in server.js. As the form’s method is set to get, the data n will be appended to the action URL as a query parameter.
Next, when a request is made with a query parameter of n, you’ll pass that data to the template.
In server.js, update the controller for the GET / route:
// server.js
...

app.get('/', (req, res) => {
  const n = req.query.n;

  if (!n) {
    res.render('index');
    return;
  }

  const locals = { n };
  res.render('index', locals);
});

...
These new lines check if the request has a query parameter named n. If so, you render the index view and pass the value of n to it. Otherwise, you just render the index view without data as before.
Note, user input can’t always be trusted, so in a production ready app a best practice would be to validate the input. For example, with a library like Joi.
The render method has a second optional parameter, locals. This parameter defines local variables that are passed to a template to render a view. A shorthand property name is used to define the n property of the locals object. When a variable has the same name as the object property it’s being assigned to, the variable name can be omitted. So { n: n } can be written as just { n }.
Now that the template has some data, you can display it.
In views/index.ejs, add the new lines to display the value of N:
<!-- views/index.ejs -->
...

<form action="/" method="get">
  <label>
    N
    <input type="number" name="n" placeholder="e.g. 10" required>
  </label>
  <button>Find Prime</button>
</form>

<% if (locals.n) { %>
  <p>N: <%= n %></p>
<% } %>

...
If a local variable n exists for this view, display it.
Restart your server to refresh the app. The form will now load with a button to Find Prime.

Submit any number to the form. After submitting the form, the URL will change to include an n query parameter, such as http://localhost:3000/?n=40 if you put in 40. The value you submitted will also load under the form as N: 40.

Now that a value for N can be submitted and displayed, you’ll add a function to find the largest prime number less than or equal to N. Then, you’ll display that result in your view.
Create a utils directory. Then, create the file utils/findPrime.js.
Open findPrime.js in your editor and add the prime number finding function:
// utils/findPrime.js
/**
 * Find the largest prime number less than or equal to `n`
 * @param {number} n A positive integer greater than the smallest prime number, 2
 * @returns {number}
 */
module.exports = function (n) {
  let prime = 2; // initialize with the smallest prime number
  for (let i = n; i > 1; i--) {
    let isPrime = true;
    for (let j = 2; j < i; j++) {
      if (i % j == 0) {
        isPrime = false;
        break;
      }
    }
    if (isPrime) {
      prime = i;
      break;
    }
  }
  return prime;
};
In case you absolutely must know how this function works, here’s an explanation. To begin, a JSDoc comment documents the function. The algorithm says, start with the first prime number, 2. Then, loop through numbers, starting at n, decrementing the number by 1 each loop. Continue looping and searching for a prime number until the number is 2, the smallest prime number. In each loop, assume the current number is indeed a prime number, then test the assumption. Check if the current number has a factor other than 1 and itself. If the current number can be divided, without a remainder, by any number greater than 1 and less than itself, then it is not a prime number. Try the next number.
Next, import the find prime function into server.js:
// server.js
const express = require('express');
const findPrime = require('./utils/findPrime'); // add

...
Update your home route controller to find a prime number and pass its value to the template. Still in server.js, add the prime variable and add it to the locals object:
// server.js
...

app.get('/', (req, res) => {
  const n = req.query.n;

  if (!n) {
    res.render('index');
    return;
  }

  const prime = findPrime(n); // add

  const locals = { n, prime }; // update
  res.render('index', locals);
});

...
Now, add code to display the result in your template. In views/index.ejs, display the value of N.
Replace these lines:
<!-- views/index.ejs -->
...

<% if (locals.n) { %>
  <p>N: <%= n %></p>
<% } %>
...
With this:
<!-- views/index.ejs -->
...

<% if (locals.n && locals.prime) { %>
  <p>
    The largest prime number less than or equal to <%= n %> is <strong><%= prime %></strong>.
  </p>
<% } %>
...
Now restart the server.
To test the functionality, submit any number. As an example, this tutorial will use 10. If you submit the number 10, you will receive a response stating The largest prime less or equal to 10 is 7..
Your app can now take a number, then find and display a prime number. Next, you’ll add a like button. While liking prime numbers might not seem like the most exciting feature in the world, it will prove useful in explaining an important caveat when caching rendered views.
Add a Like button
Currently, your app can produce different views based on each number N submitted. Apart from updating text, the content of those views is unlikely to change frequently. The like button you’ll add next will provide a way to update the content of a view. This will be beneficial later when caching rendered views because it will demonstrate the need for invalidating a cached view when its contents change.
To have a like button, the app needs somewhere to store likes. Persistent storage would be ideal, but because implementing a database is out of scope for this tutorial, you will store likes in memory. As such, the data will be ephemeral, meaning when the server stops, all data is lost: obviously not an option for a production-ready app.
Open server.js to add the following variable:
// server.js
...

app.set('view engine', 'ejs');

/**
 * Key is `n`
 * Value is the number of 'likes' for `n`
 */
const likesMap = {};

...
The likesMap object is used as a map to store likes for all requested numbers. The key is n and its values are the number of likes for n.
Likes for a number needs to be initialized when a number is submitted. Still in the server.js, add the new lines initialize likes for N:
// server.js
...

  const prime = findPrime(n);

  // Initialize likes for this number when necessary
  if (!likesMap[n]) likesMap[n] = 0;

  const locals = { n, prime };
  res.render('index', locals);

...
This checks if likes for the current number exists. If it doesn’t, then initialize it to zero.
Next, add likes as a local variable for the view:
// server.js
...

  const prime = findPrime(n);

  // Initialize likes for this number when necessary
  if (!likesMap[n]) likesMap[n] = 0;

  const locals = { n, prime, likes: likesMap[n] }; // update
  res.render('index', locals);

...
Now that the view has data for likes, you can display its value and add a like button.
In views/index.ejs, add the like button markup:
<!-- views/index.ejs -->
...

<% if (locals.n && locals.prime) { %>
  <p>
    The largest prime number less than or equal to <%= n %> is <strong><%= prime %></strong>.
  </p>

  <form action="/like" method="get">
    <input type="hidden" name="n" value="<%= n %>">
    <input type="submit" value="Like"> <%= likes %>
  </form>
<% } %>
...
Restart the server, then submit a number. A like button will appear after the prime number result with a like count of 0.
Clicking the Like button sends a GET request to /like, with the current value of N as a query parameter via a hidden input. For now, you’ll receive a 404 error with Cannot GET /like, because your app does not yet have a corresponding route.
You’ll now add the route to handle the request.
Back in server.js, add the route:
// server.js
...

app.get('/', (req, res) => {
  ...
});

app.get('/like', (req, res) => {
  const n = req.query.n;

  if (!n) {
    res.redirect('/');
    return;
  }

  likesMap[n]++;

  res.redirect(`/?n=${n}`);
});

...
This new route checks if n exists. If not, it redirects home. Otherwise, it increments likes for this number. Finally, it redirects back to the view where the Like button was clicked.
Restart the app and test the Like button again. You’ll see the likes count incrementing.
Note, an argument could be made for using the POST method instead of GET for this route. It would be more RESTful because an update is being made to a resource. For the sake of simplicity though, GET is used so introducing form POST request body handling can be avoided in favor of working with the now familiar request query parameters.
Your app is now feature complete! You can prepare to deploy it with Elastic Beanstalk. In the next step, you’ll commit the app’s code with git.
Commit your code to git
In this step, you’ll commit your code to git, so it’s ready to deploy with Elastic Beanstalk.
First, initialize a git repository:
git initNext, tell git to exclude your app’s dependencies. Create a new file called .gitignore and add the following:
# .gitignore
node_modules

# macOS file
.DS_Store
Next, rename the default branch to main:
git branch -M mainNow, add all files to git:
git add .Finally, commit those changes to git with the following command:
git commit -m "Initial commit"The -m option is used to specify the commit message.
After committing your code, you’ll receive an output like so:
# Output
[main (root-commit) 3cbc9e3] Initial commit
 6 files changed, 1420 insertions(+)
 create mode 100644 .gitignore
 create mode 100644 package-lock.json
 create mode 100644 package.json
 create mode 100644 server.js
 create mode 100644 utils/findPrime.js
 create mode 100644 views/index.ejs
Your app’s code is now committed to git and ready to be deployed with Elastic Beanstalk.
Deploy your Express app with Elastic Beanstalk
Deploying to Elastic Beanstalk involves three steps:
- Initialize an Elastic Beanstalk application.
- Create an Elastic Beanstalk Environment.
- Run the deploy command.
Initialize an Elastic Beanstalk application
Now you need to associate your Express app with an Elastic Beanstalk app.
Create an Elastic Beanstalk local repository. Back in your terminal, run:
eb init --platform node.js --region us-east-1I’m using us-east-1 as my AWS region, you can specify another if you prefer.
Running eb init creates the directory and file .elasticbeanstalk/config.yml with the config you just specified.
# Output
Application express-memcache has been created.
Create an Elastic Beanstalk environment
Next, create an Elastic Beanstalk Environment which provisions the resources required to run your Express app. Still in the terminal run:
eb create express-memcache-envThis command will provision resources such as a security group, load balancer, Auto Scaling group, and EC2 instances. It will also update your .gitignore adding relevant Elastic Beanstalk entries.
This configuration process will take about five to fifteen minutes. Go refill your coffee, stretch your legs, and come back later.
Deploy with Elastic Beanstalk
Finally, you’re ready to deploy. In the terminal run:
eb deployA note on the start command Elastic Beanstalk uses for its Node.js platform. If a package.json file is present, as is the case for this tutorial, Elastic Beanstalk runs npm start by default as the app’s start command. A Procfile could be added to specify a different start command.
Note, as a start command is not present in your package.json, npm start runs node server.js by default, even though the main property is set to index.js (not server.js).
When deployment has finished, open your Express app in a browser:
eb openYou now have an Express app deployed with Elastic Beanstalk.
Add caching to Express
Memcache is an in-memory, distributed cache. Its primary API consists of two operations: SET(key, value) and GET(key). Memcache is like a hashmap (or dictionary) that is spread across multiple servers, where operations are still performed in constant time.
The most common use for Memcache is to cache expensive database queries and HTML renders so that these expensive operations don’t need to happen over and over again.
Create a cache
To use Memcache in Express, you first need to provision an actual Memcache cache. You can easily get one for free from MemCachier. MemCachier provides a fast and flexible Memcache, compatible with the protocol used by the popular Memcached software.
Head over to MemCachier, sign up for an account, and create a free
development cache, selecting Amazon Web Services as the provider, and choosing the same region as your Elastic Beanstalk environment. If you chose the same as me earlier, that is US East (N. Virginia), us-east-1. If you need to find your EB region, open .elasticbeanstalk/config.yml and look for the default_region property. It’s important your cache is in the same region as your app so latency is as low as possible.
There are three configuration variables you’ll need for your application to be
able to connect to your cache: MEMCACHIER_SERVERS, MEMCACHIER_USERNAME, and
MEMCACHIER_PASSWORD. You can find these on the Settings page of your cache’s analytics dashboard.
You’ll need to add these variables to your Elastic Beanstalk environment.
eb setenv MEMCACHIER_USERNAME=<username> MEMCACHIER_PASSWORD=<password> MEMCACHIER_SERVERS=<servers>For example, eb setenv MEMCACHIER_USERNAME=1E4630 MEMCACHIER_PASSWORD=E9692E5BA662E5AD55477ED1FC5EF9B3 MEMCACHIER_SERVERS=mc3.dev.ec2.memcachier.com:11211
We can confirm that they’ve been set by running:
eb printenvYou should see your MemCachier env variables, as well as all the previous env variables we’ve set.
Configure a cache client
Now, you’ll configure a Memcache client in your Express app, using the environment variables you just saved, so the app can communicate with your cache.
In your terminal, install the memjs library:
npm install memjsNext, create a services directory. Then, create the file services/memcache.js and open it in your editor. At the top of the file, import memjs and configure a cache client:
// services/memcache.js
const { Client } = require('memjs');

module.exports = Client.create(process.env.MEMCACHIER_SERVERS, {
  failover: true,
  timeout: 1,
  keepAlive: true,
});
This code creates a MemCachier cache client. As for the options, failover is set to true to use MemCachier’s high availability clusters. If a server fails, commands for all keys stored on that server will automatically be made to the next available server. A timeout of 1 second is more reasonable for a deployed app than the default of 0.5 seconds. And keepAlive: true keeps connections to your cache open even when idle, which is desirable because making connections is slow and caches must be fast to be effective.
Everything is ready to start implementing caching in Express, which you’ll do next.
Cache resource-intensive computations
In this section, you’ll cache resource-intensive computations to speed up your app and which results in more efficient CPU use. The findPrime function is an resource-intensive computation, when a large enough number is submitted. You’ll cache its result and serve that cached value when available instead of repeating the calculation.
First, open server.js to add the memcache client:
// server.js
const express = require('express');
const findPrime = require('./utils/findPrime');
const memcache = require('./services/memcache'); // add

...
Then, store a calculated prime number in the cache:
// server.js
...

  const prime = findPrime(n);

  const key = 'prime_' + n;

  memcache.set(key, prime.toString(), { expires: 0 }, (err) => {
    if (err) console.log(err);
  });

...
The set method takes a key as its first parameter and a value of a string as its second, so you convert the prime number to a string. The third options argument makes sure the item being stored never expires. The fourth and final parameter is an optional callback, where an error is thrown if present.
Note, as a best practice, cache errors should be handled gracefully. A cache is an enhancement and should generally not crash an app on failure. An app can continue to work perfectly fine, albeit slower, without its cache.
Note, at this point, your app will continue to work locally but without caching. An error will be output when memcache.set is called, because it will not be able to find a cache server:
# Output
MemJS: Server <localhost:11211> failed after (2) retries with error - connect ECONNREFUSED 127.0.0.1:11211
Error: No servers available
...
For the rest of this tutorial, you don’t need local caching. If you want it to work, you could run Memcached at localhost:11211, which is the memjs default.
Next, stage and commit your changes:
git add . && git commit -m "Add memjs client and cache prime number"Then, deploy these changes with Elastic Beanstalk:
eb deployView Memcache statistics
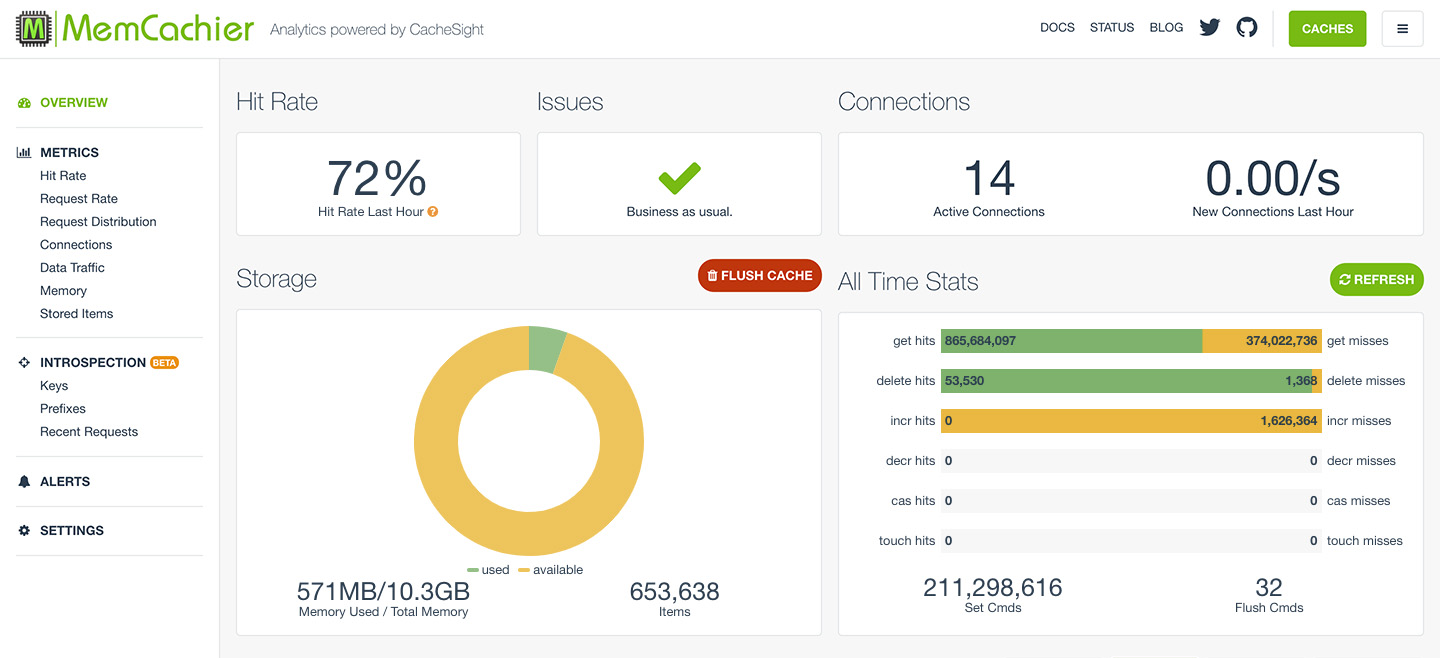
To help demystify Memcache caching operations, it’s invaluable to be able to visualize what’s going on under the hood.
One way to do that, though very cumbersome, is to telnet into a Memcached server and run the stats command to see changes as operations are performed on your cache.
With MemCachier however, you get an analytics dashboard that displays your cache’s statistics so you can monitor performance and troubleshoot issues quickly and easily.
To open your MemCachier analytics dashboard, log in to your MemCachier account, click Caches, then click the Analytics button for your cache.
When the deployment is complete, open the app in your browser:
eb openThen, submit a number to find its biggest prime.
Back on your MemCachier analytics dashboard, the Set Cmds stat on the All Time Stats board and the Items stats on the Storage board will have both increased by 1. Each time you submit any number, Set Cmds will increase. Each time you submit a new number, Items will increase. Press the Refresh button to load any new stats.
With items stored in the cache, you can make use of them. You’ll now check if an item is cached and, if so, you’ll serve it from the cache; otherwise, you’ll find the prime number as before.
Back in server.js, update your GET / controller:
// server.js
...

app.get('/', (req, res) => {
  const n = req.query.n;

  if (!n) {
    res.render('index');
    return;
  }

  let prime;

  const key = 'prime_' + n;

  memcache.get(key, (err, val) => {
    if (err) console.log(err);

    if (val !== null) {
      // Use the value from the cache
      // Convert Buffer string before converting to number
      prime = parseInt(val.toString());
    } else {
      // No cached value available, find it
      prime = findPrime(n);

      memcache.set(key, prime.toString(), { expires: 0 }, (err) => {
        if (err) console.log(err);
      });
    }

    // Initialize likes for this number when necessary
    if (!likesMap[n]) likesMap[n] = 0;

    const locals = { n, prime, likes: likesMap[n] };
    res.render('index', locals);
  });
});

...
This code initializes prime without a value, using the let keyword, as its value is now reassigned. Then memcache.get attempts to retrieve the cached prime number. Most of the controller’s code now lives in the memcache.get callback because its result is required to determine how to handle the request. If a cached value is available, use it. Otherwise, do the computation to find the prime number and store the result in the cache as before.
The value returned in the memcache.get callback is a Buffer so you convert it to a string before converting prime back into a number.
Commit your changes:
git add . && git commit -m "Check cache for prime number"Then, deploy the changes:
eb deployNow, when you submit a number not yet cached to your app, the Set Cmds, Items and get misses stats on your MemCachier dashboard will increase by 1. The miss occurs because you try to get the item from the cache before setting. The item is not in the cache, which results in a miss, after which the item gets stored. When you submit a number that is cached, get hits will increment.
And with that you are caching expensive computations. Next, you’ll cache your app’s rendered views.
Cache rendered views
In this section, you’ll cache the views rendered by your Express app with middleware. Earlier, you set up ejs as a template engine and created a template used to render views for each number N submitted. Rendered views can be resource-intensive to create so caching them can speed up request handling and use less resources.
To begin, create a middleware directory. Then, create the file middleware/cacheView.js and open it in your editor. In cacheView.js, add these lines for the middleware function:
// middleware/cacheView.js
const memcache = require('../services/memcache');

/**
 * Express middleware to cache views and serve cached views
 */
module.exports = function (req, res, next) {
  const key = `view_${req.url}`;

  memcache.get(key, (err, val) => {
    if (err) console.log(err);

    if (val !== null) {
      // Convert Buffer string to send as the response body
      res.send(val.toString());
      return;
    }
  });
};
You first import the memcache client. Then, you declare a key, such as view_/?n=100. Next, you check if a view for that key is in the cache with memcache.get. If there is no error and a value exists for that key, there’s nothing more to do, so the request finishes by sending the view back to the client.
Next, if a view is not cached, cache it. To do this, override the res.send method by updating the middleware as follows:
// middleware/cacheView.js
...

module.exports = function (req, res, next) {
  const key = `view_${req.url}`;

  memcache.get(key, (err, val) => {
    if (err) console.log(err);

    if (val !== null) {
      // Convert Buffer to UTF-8 string to send as the response body
      res.send(val.toString());
      return;
    }

    const originalSend = res.send;
    res.send = function (body) {
      memcache.set(key, body, { expires: 0 }, (err) => {
        if (err) console.log(err);
      });

      originalSend.call(this, body);
    };
  });
};
Override the res.send method with a function that stores the view in the cache before calling the original send function as usual. Invoke the original send function with call, which sets its this context to what it would have been if not overridden. Make sure to use an anonymous function (not an arrow function), so the correct this value will be specified.
Then, pass control to the next middleware by adding next() at the end of the memcache.get callback:
// middleware/cacheView.js
...

/**
 * Express middleware to cache views and serve cached views
 */
module.exports = function (req, res, next) {
  const key = `view_${req.url}`;

  memcache.get(key, (err, val) => {
    if (err) console.log(err);

    if (val !== null) {
      // Convert Buffer to UTF-8 string to send as the response body
      res.send(val.toString());
      return;
    }

    const originalSend = res.send;
    res.send = function (body) {
      memcache.set(key, body, { expires: 0 }, (err) => {
        if (err) console.log(err);
      });

      originalSend.call(this, body);
    };

    next();
  });
};

...
Calling next invokes the next middleware function in the app. In your case, there is no other middleware, so the controller is called. The res.render method for Express renders a view, then calls res.send internally with that rendered view. So now, in the controller for the home route, your override function is called when res.render is called, storing the view in the cache before finally calling the original send function to complete the response.
Note, if you’d prefer not to monkey patch the send method, you could pass a callback to the render method in the controller. The downside of that approach is having to duplicate the view caching code in the controller for each route being cached.
Now import the view caching middleware into server.js:
// server.js
const express = require('express');
const findPrime = require('./utils/findPrime');
const memcache = require('./services/memcache');
const cacheView = require('./middleware/cacheView'); // add

...
Add the cacheView as the second GET / route argument:
// server.js
...

app.get('/', cacheView, (req, res) => {
  ...
});

...
Commit your changes:
git add . && git commit -m "Add view caching"And deploy:
eb deployWhen you submit a number in your app now, everything should work as usual. If you submit a new number, the MemCachier dashboard stats for Set Cmds, Items, and get misses all increase by 2: once for the prime number calculation and once for the view. If you refresh the app with the same number, you’ll see a single get hit added to the MemCachier dashboard. The view is retrieved successfully from the cache, so there is no need to fetch the prime number result.
Note, the Express application setting view cache is enabled by default in production. This view cache does not cache the contents of the template’s output, only the underlying template itself. The view is still re-rendered with every request, even when the cache is on. As such, it’s different, but complementary to the rendered view caching you implemented.
Now that you are caching views, you may notice that the Like button no longer works. If you were to log the likes value, the value will indeed change. However, the cached view is not currently updated when the number of likes changes. A cached view needs to be invalidated when the view changes.
Next, when likes changes, you’ll invalidate the cached view by deleting it from the cache. Back in server.js, update the GET \like controller:
// server.js
...

app.get('/like', (req, res) => {
  const n = req.query.n;

  if (!n) {
    res.redirect('/');
    return;
  }

  likesMap[n]++;

  // The URL of the page being 'liked'
  const url = `/?n=${n}`;

  res.redirect(url);
});

...
The likes count for this view has changed, so the cached version will be invalid. Update the GET \like controller again to delete the likes count from the cache when likes change:
// server.js
...
  const url = `/?n=${n}`;

  // The view for this URL has changed, so the cached version is no longer valid, delete it from the cache.
  const key = `view_${url}`;
  memcache.delete(key, (err) => {
    if (err) console.log(err);
  });

  res.redirect(url);
...
Commit changes:
git add . && git commit -m "Delete invalid cached view"And deploy:
eb deployThe Like button will now work. You’ll see the respective stats change on your MemCachier dashboard when a view is liked: delete hits increments as the view is deleted, get misses increases because the view was just deleted and so is not in the cache. get hits increments because the prime number was found in the cache, and Set Cmds increases because the updated view is added to the cache. Items stays the same as the view is deleted and re-added.
Cache sessions
In this section, you’ll add sessions to your Express app and cache them by adding your cache as the session store. A common use cases for sessions is user logins, so you can consider this section on caching sessions as a preliminary step for implementing a user login system in future (though the user login system is beyond the scope fo this tutorial). Storing short-lived sessions in a cache can be faster and more scalable than storing in many databases.
Note, a cache is ideal for storing short-lived sessions that time out. However, caches are not persistent; long-lived sessions are better suited to permanent storage solutions like a database.
Install the express-session tool to add sessions to your Express app and connect-memjs to enable use of your MemCachier cache as the session store:
npm install express-session connect-memjsIn server.js, import express-session and connect-memjs:
// server.js
const express = require('express');
const findPrime = require('./utils/findPrime');
const memcache = require('./services/memcache');
const cacheView = require('./middleware/cacheView');
const session = require('express-session'); // add
const MemcacheStore = require('connect-memjs')(session); // add

...
The session middleware is passed to the connect Memcached module, allowing it to inherit from express.session.Store.
Still in server.js, configure the session middleware to use your cache as its store:
// server.js
...

app.set('view engine', 'ejs');

app.use(
  session({
    secret: 'your-session-secret',
    resave: false,
    saveUninitialized: true,
    store: new MemcacheStore({
      servers: [process.env.MEMCACHIER_SERVERS],
      prefix: 'session_',
    }),
  })
);

...
The secret is used to sign the session cookie and would ideally be set with an environmental variable. Be sure to update your-session-secret with a unique string.
resave forces the session to resave if unmodified during a request. You don’t want to store the item in the cache again unnecessarily, so you set it to false.
saveUninitialized: false is useful when you only want to save modified sessions, as is often the case with login sessions where a user property might be added to the session after authentication. In this case, you will store all sessions indiscriminately, so you set it to true.
Finally, set store to your cache, setting the prefix for session cache keys to session_. That means the key for a session item in the cache will look like session_<session ID>.
Next, add some app-level debugging middleware, which will help identify the cached sessions in action:
// server.js
...

app.use(
  session({
    ...
  })
);

/**
 * Session sanity check middleware
 */
app.use(function (req, res, next) {
  console.log('Session ID:', req.session.id);

  // Get the item from the cache
  memcache.get(`session_${req.session.id}`, (err, val) => {
    if (err) console.log(err);

    if (val !== null) {
      console.log('Session from cache:', val.toString());
    }
  });

  next();
});

...
That middleware will log the session ID for each request. It then gets the session for that ID from the cache and logs its contents. This approach demonstrates that sessions are working and being cached.
Commit changes:
git add . && git commit -m "Add session caching"And deploy:
eb deployIn your app, submit a number and then check the Logs to see your debugging messages. They’re located in the Elastic Beanstalk console in the side menu labeled Logs. You will find the session ID and value that you logged, demonstrating that sessions are working and being cached.
On your MemCachier dashboard, once a view and session are cached, you’ll see 3 get hits for every page refresh: 1 for the view, 1 for the session, and 1 for getting the session in the debugging middleware.
You have now implemented session caching. You can stop here or you can clean up your app in the optional final step.
Clean up
Once you’re done with this tutorial and no longer need your app, you can clean up your Elastic Beanstalk environment by using:
eb terminateThis will clean up all of the AWS resources used by your Elastic Beanstalk environment.